1. Set up payroll
Do this once, before your first pay run. It takes you through the Payroll settings in the order Easy needs them, then checks that nothing is missing. Allow about an hour if you have your staff details to hand.
About the screenshots
Every screenshot is from Easy's demo company, Little Polynesian Café. The figures, rates and names are examples. Take your own rates and dates from the Revenue Management Division (RMD) and CINSF notices, not from the pictures.
Before you start
You need:
- Full Payroll switched on. Payroll Lite records one person's pay with no tax, CINSF or leave. Full Payroll adds those. Turn it on under Billing & plan. If you can't see it there, contact Project Five. (Payroll Lite and Full Payroll)
- Your company's RMD number and, if you have one, your CINSF employer reference. They are entered once in Settings → Business details, and payroll reads them from there.
- For each employee: their name, start date, pay rate or salary, RMD PAYE reference, CINSF number, and bank account.
Where everything lives
Open Payroll → Payroll settings. Everything in this chapter is one of the sections down the left.
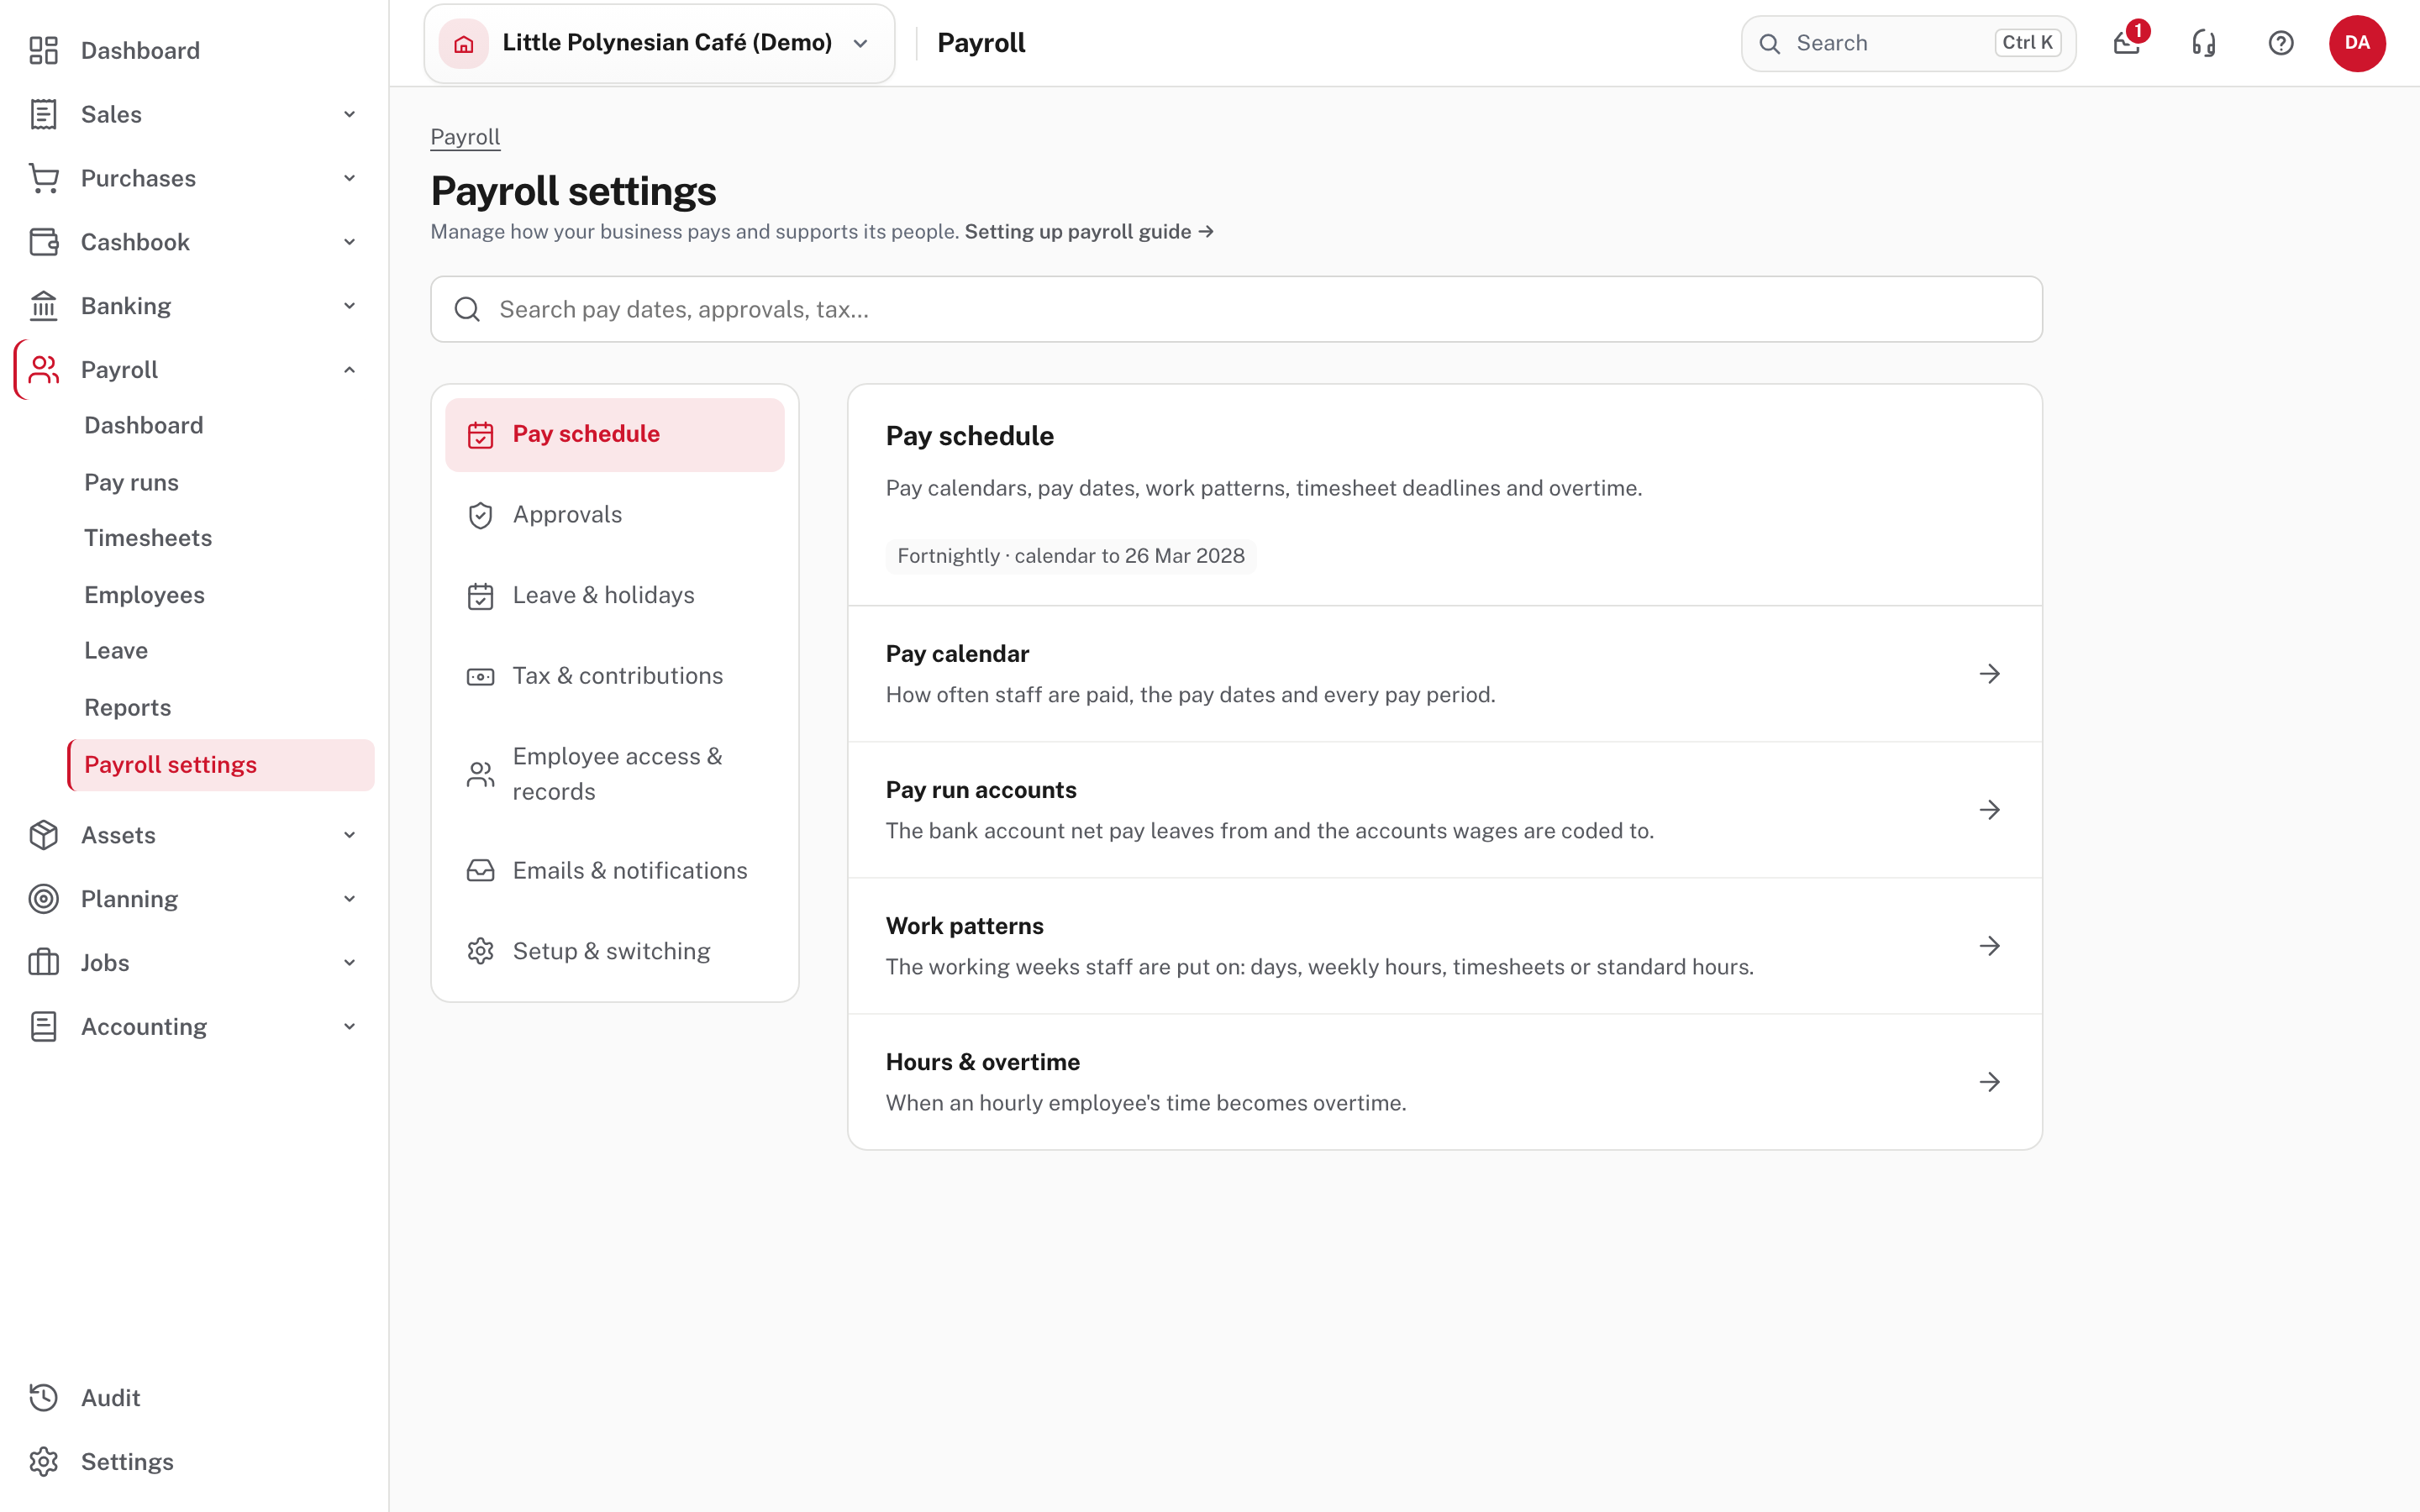
| Section | You will use it for |
|---|---|
| Pay schedule | Step 2 (pay calendar), step 3 (work patterns), step 4 (pay run accounts) |
| Tax & contributions | Step 5 (PAYE and CINSF) |
| Leave & holidays | Step 6 |
| Approvals | Step 7 |
| Employee access & records, Emails & notifications | Step 8 |
| Setup & switching | Step 10 (the readiness check) |
Step 1. Look at the Payroll dashboard
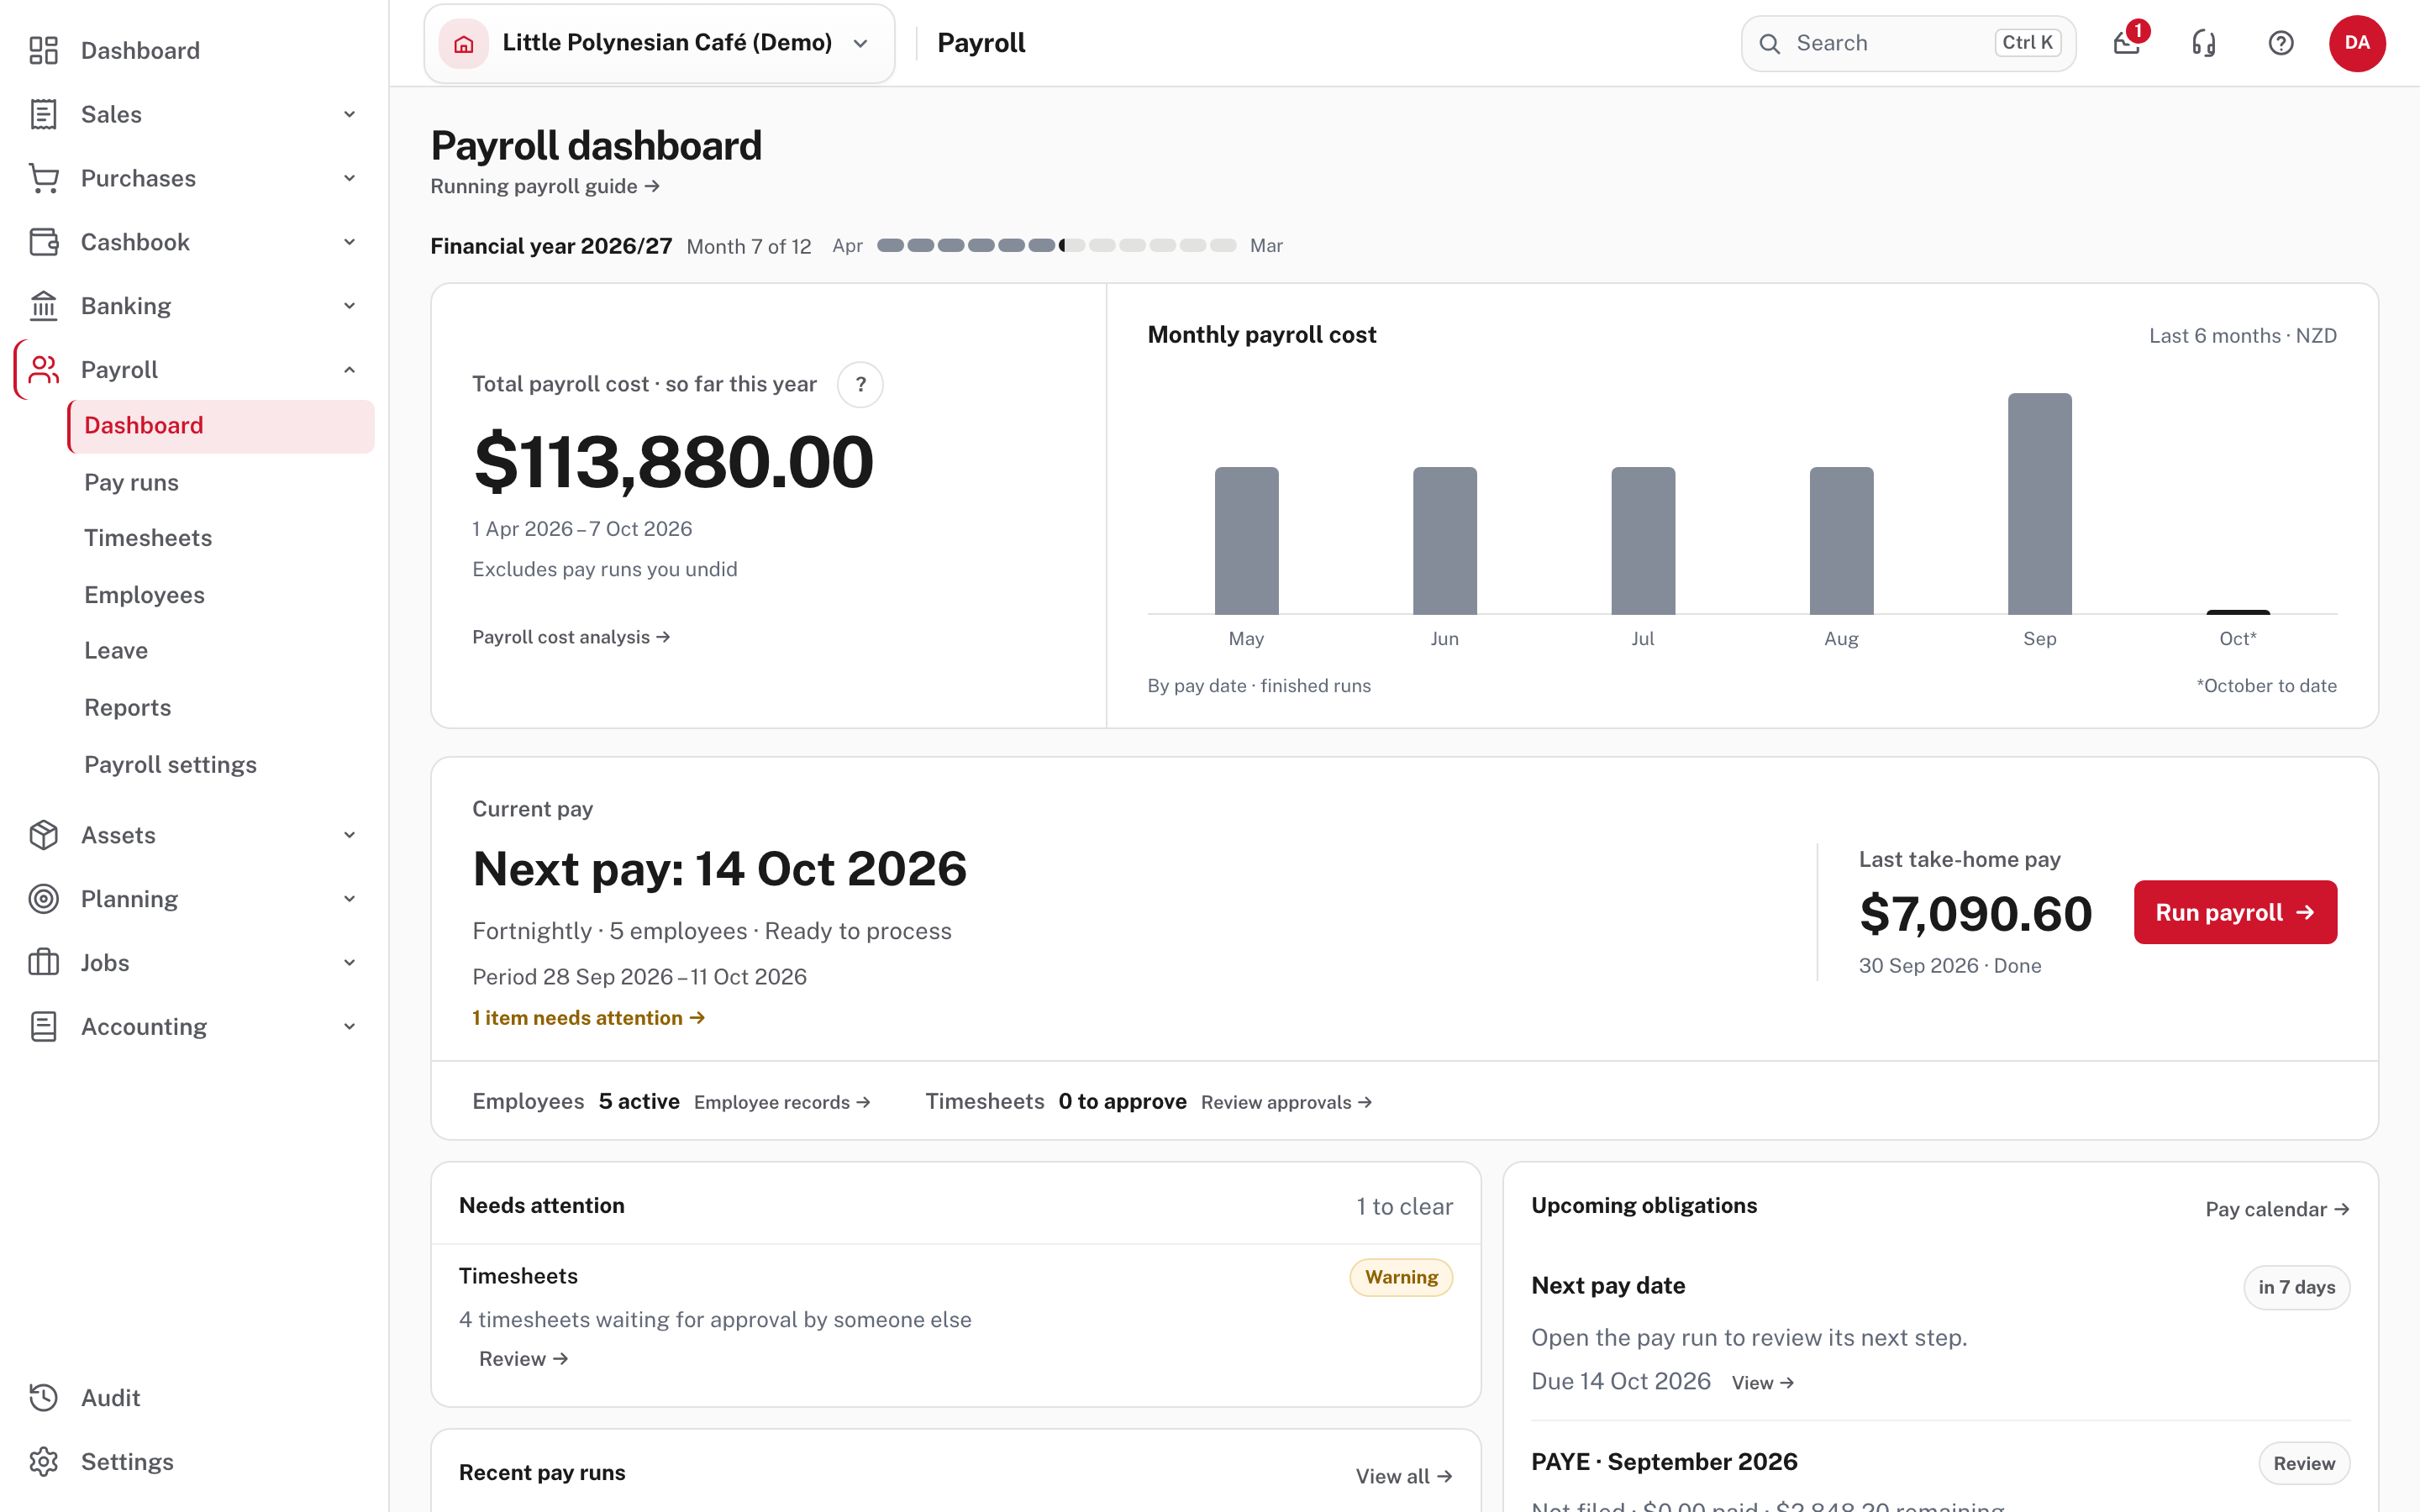
Open Payroll → Dashboard. On a new company it is mostly empty. Once setup is done it shows the next pay date, who is ready to be paid, and anything that needs attention. You will come back here for every pay run.
Step 2. Set the pay calendar
Payroll settings → Pay schedule → Pay calendar.
The pay calendar is the list of pay periods. Timesheets are recorded against it, and pay runs are made from it.
A new company: generate the periods
A company with no calendar sees No pay periods yet. Choose Generate periods.
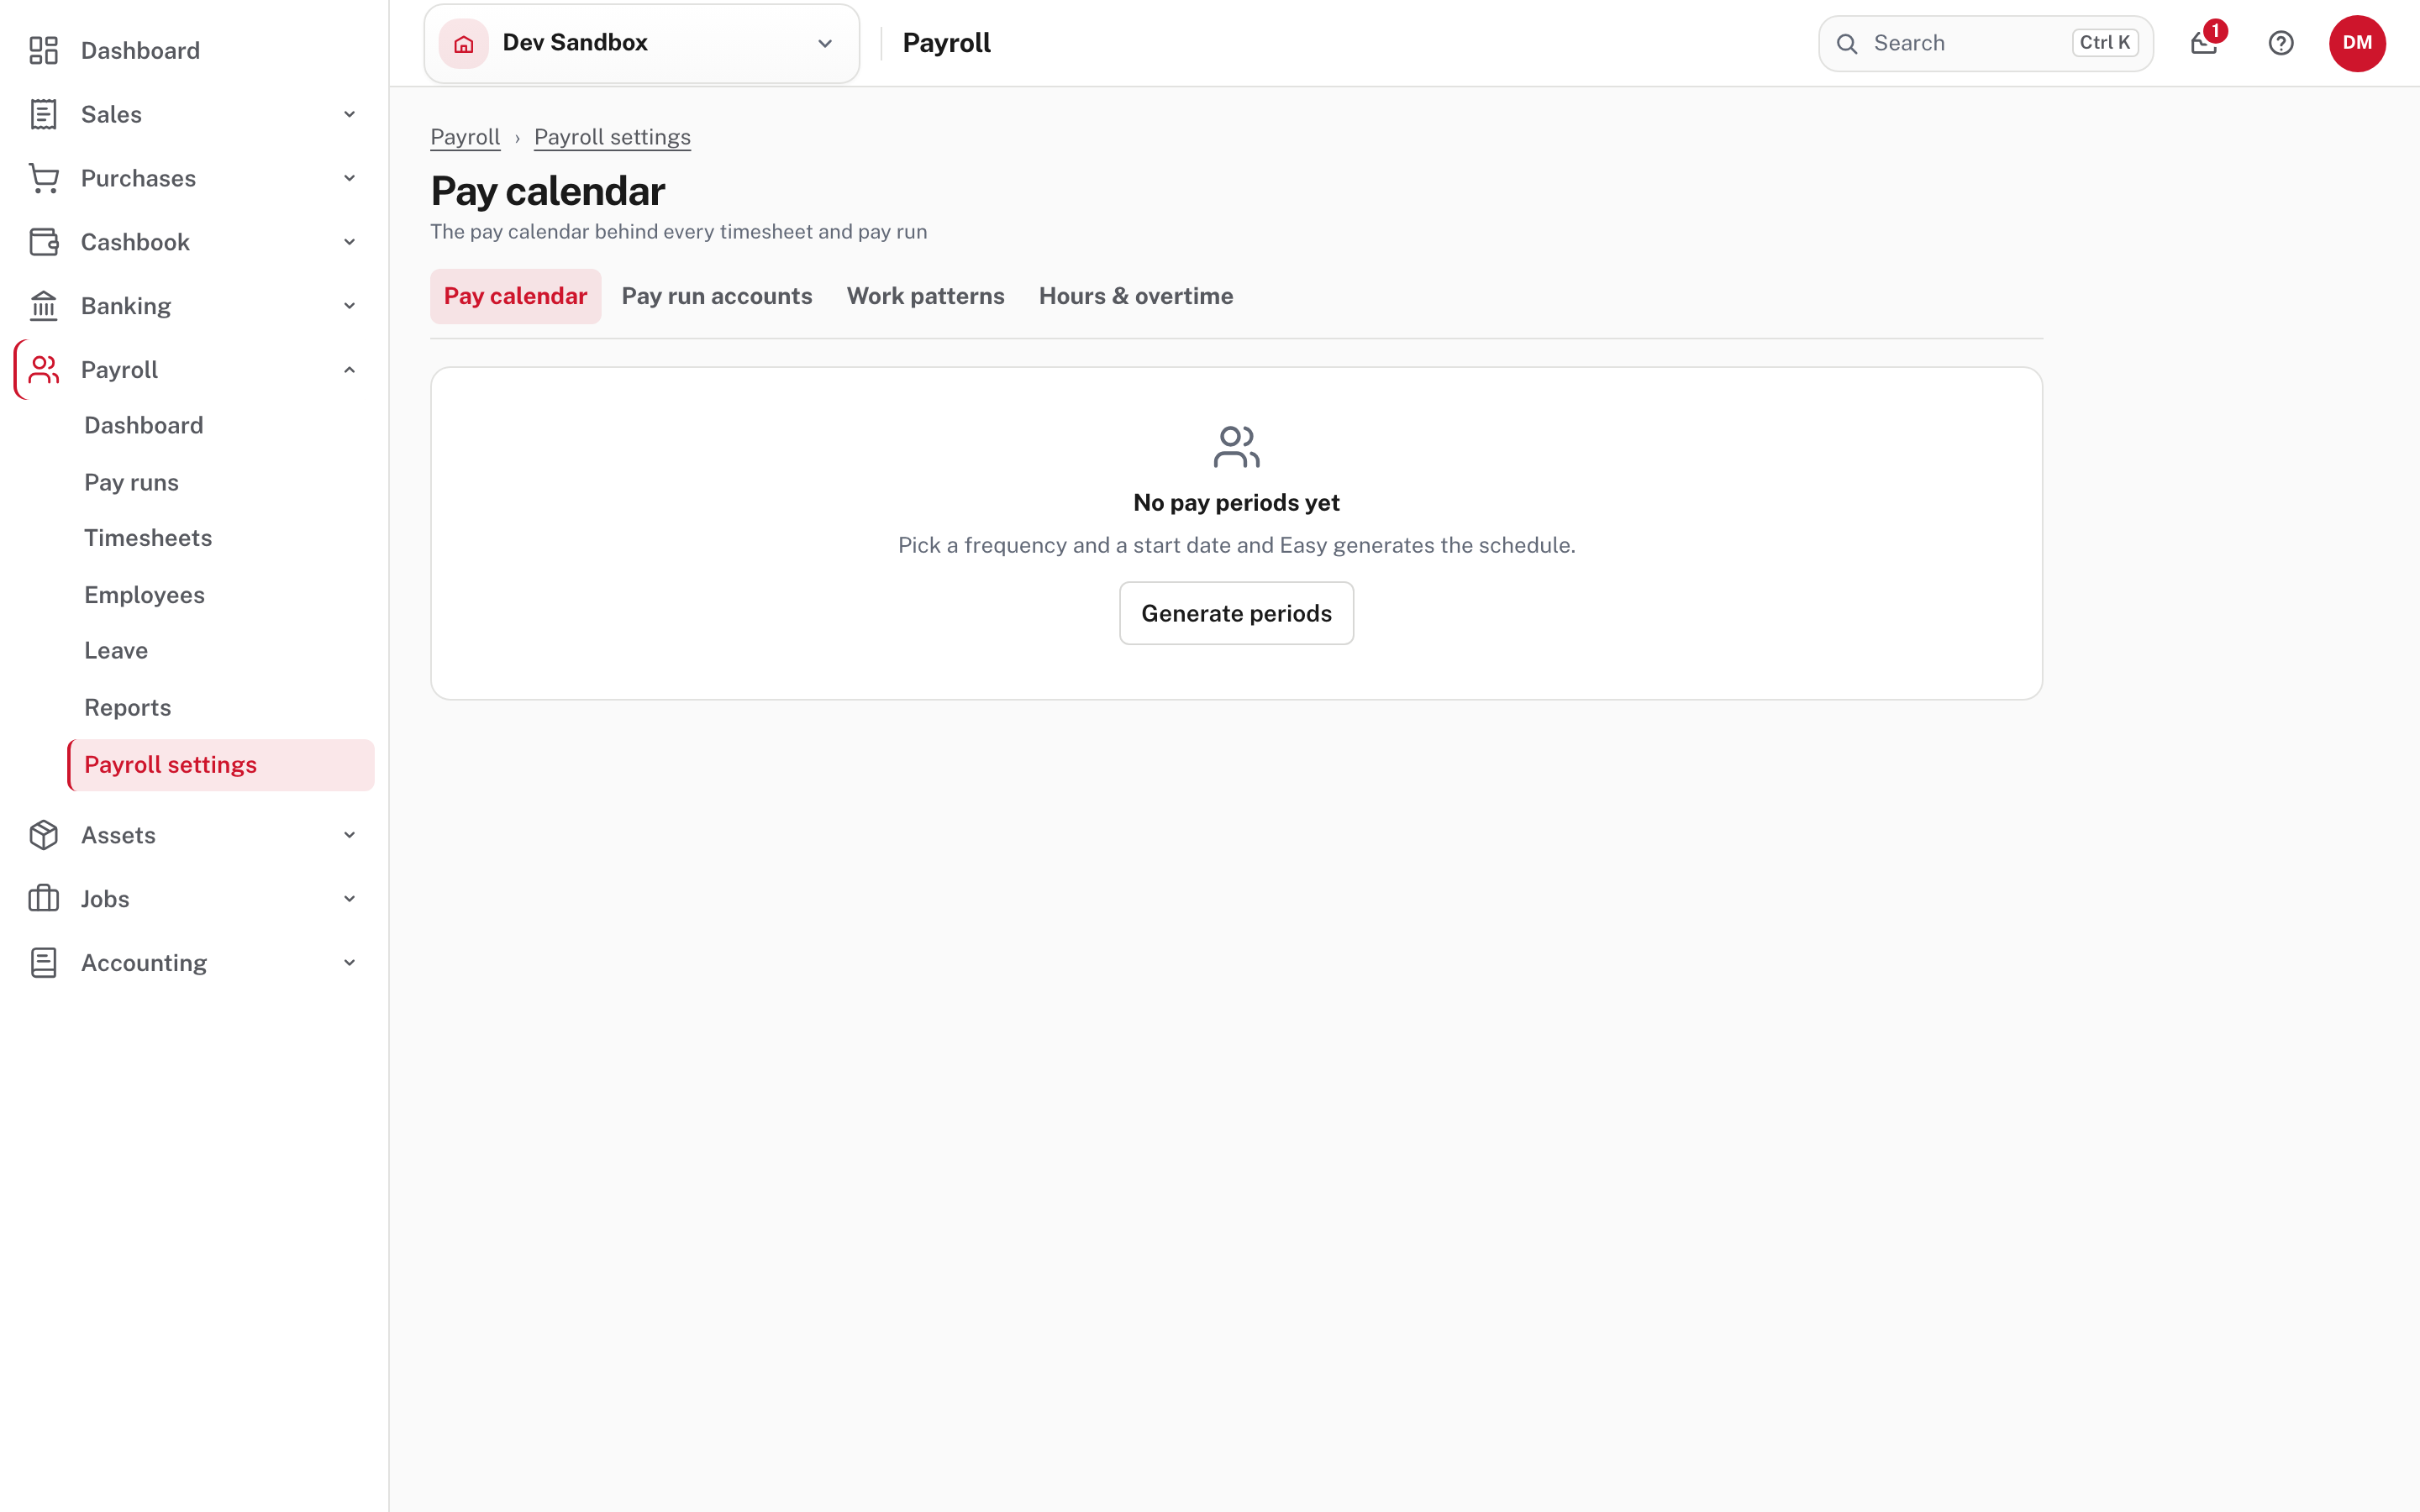
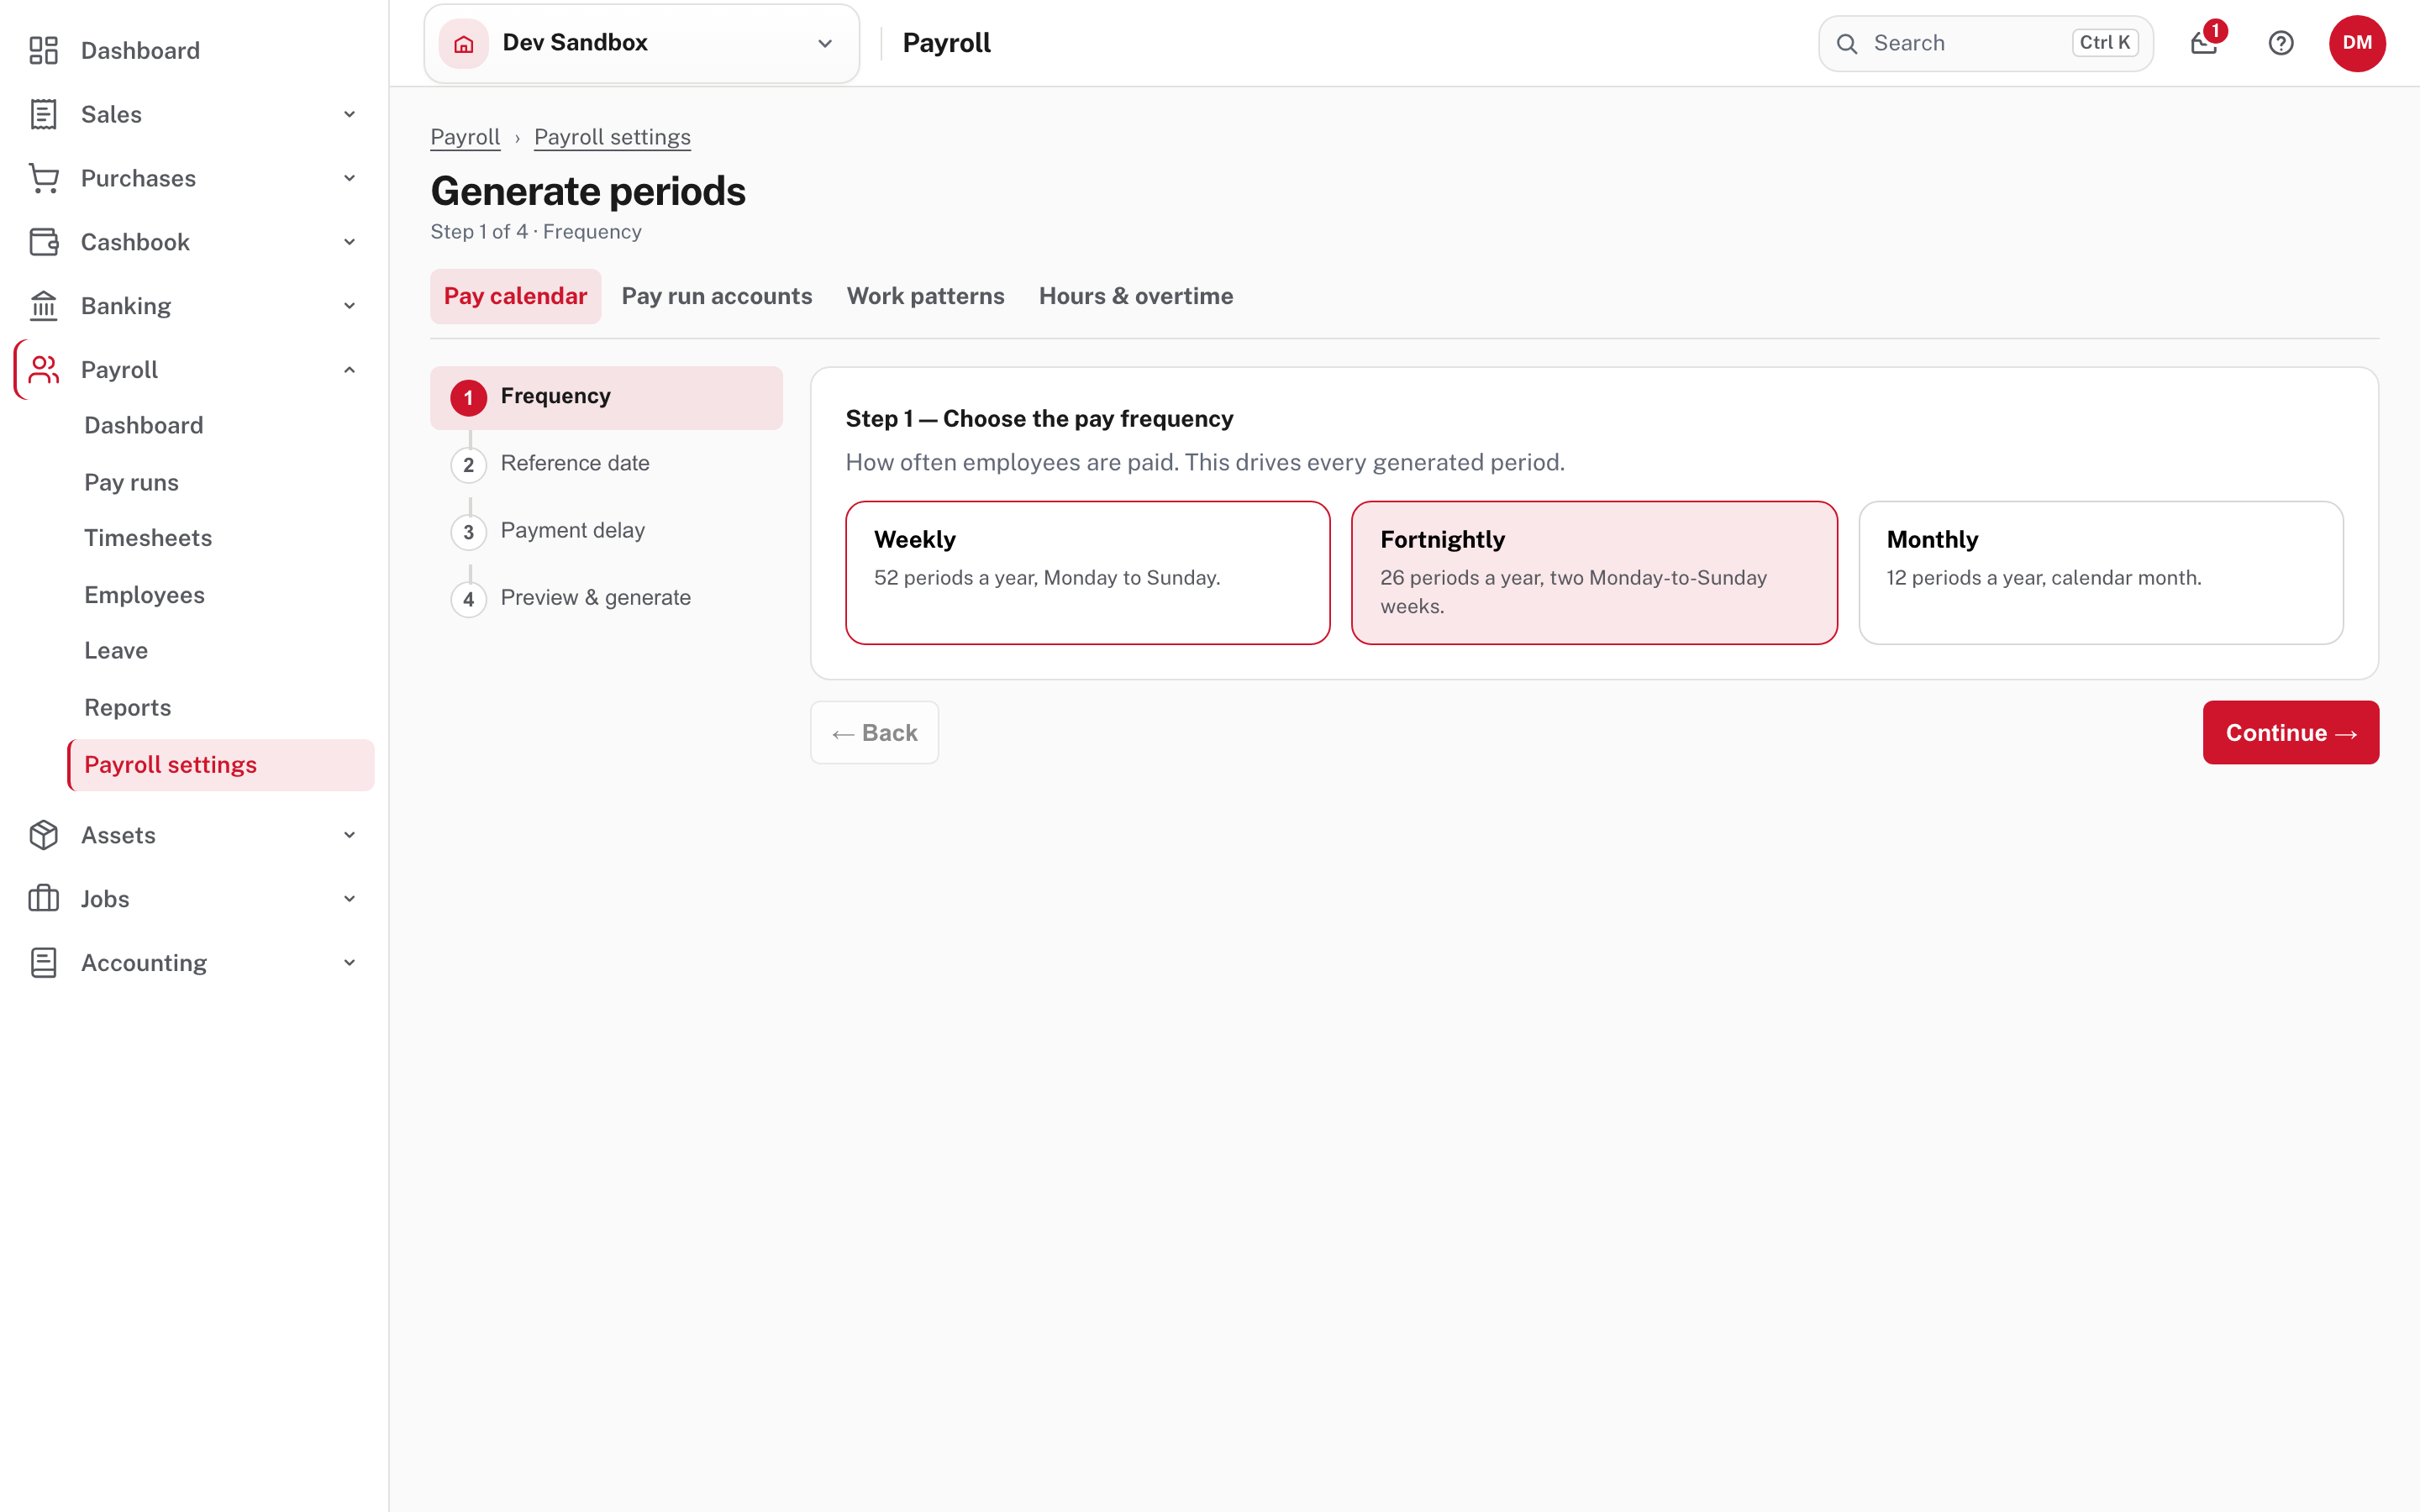
It is four short steps:
- Frequency. Weekly (52 periods a year, Monday to Sunday), Fortnightly (26 periods, two Monday-to-Sunday weeks) or Monthly (12 periods, a calendar month).
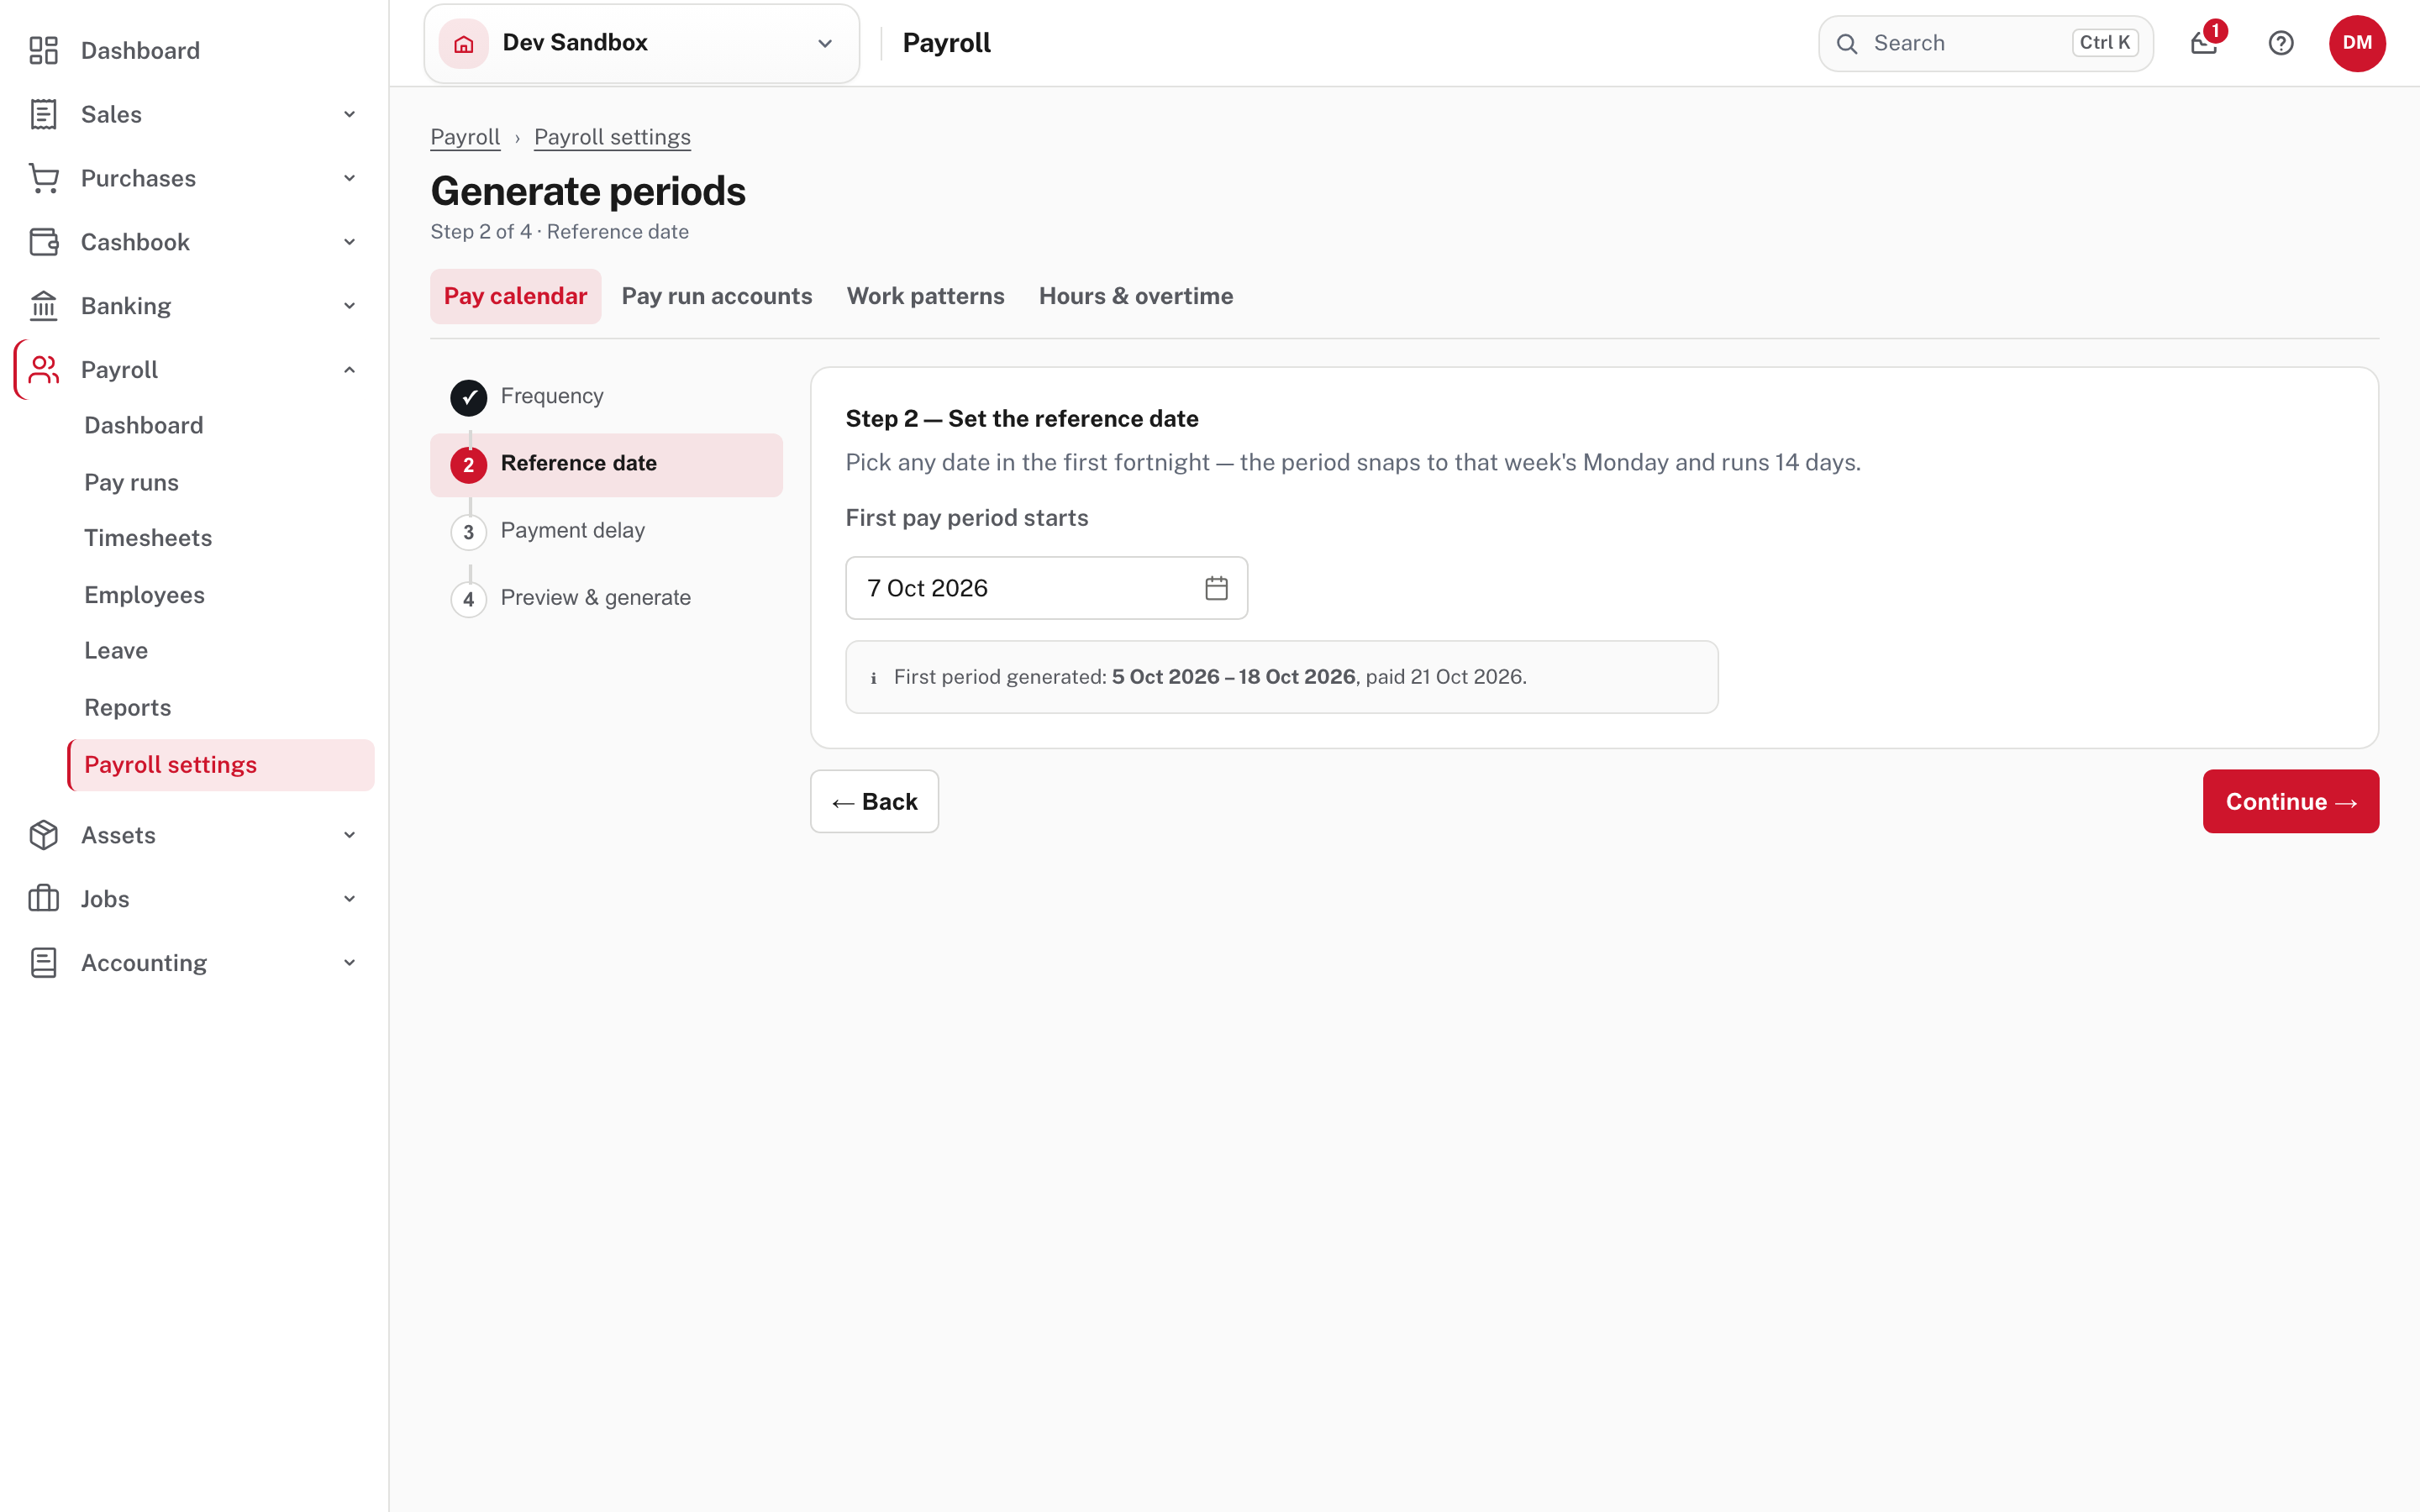
- Reference date. Pick any date in the first period. The period snaps to that week's Monday, and Easy shows the first period it will make and its pay date.
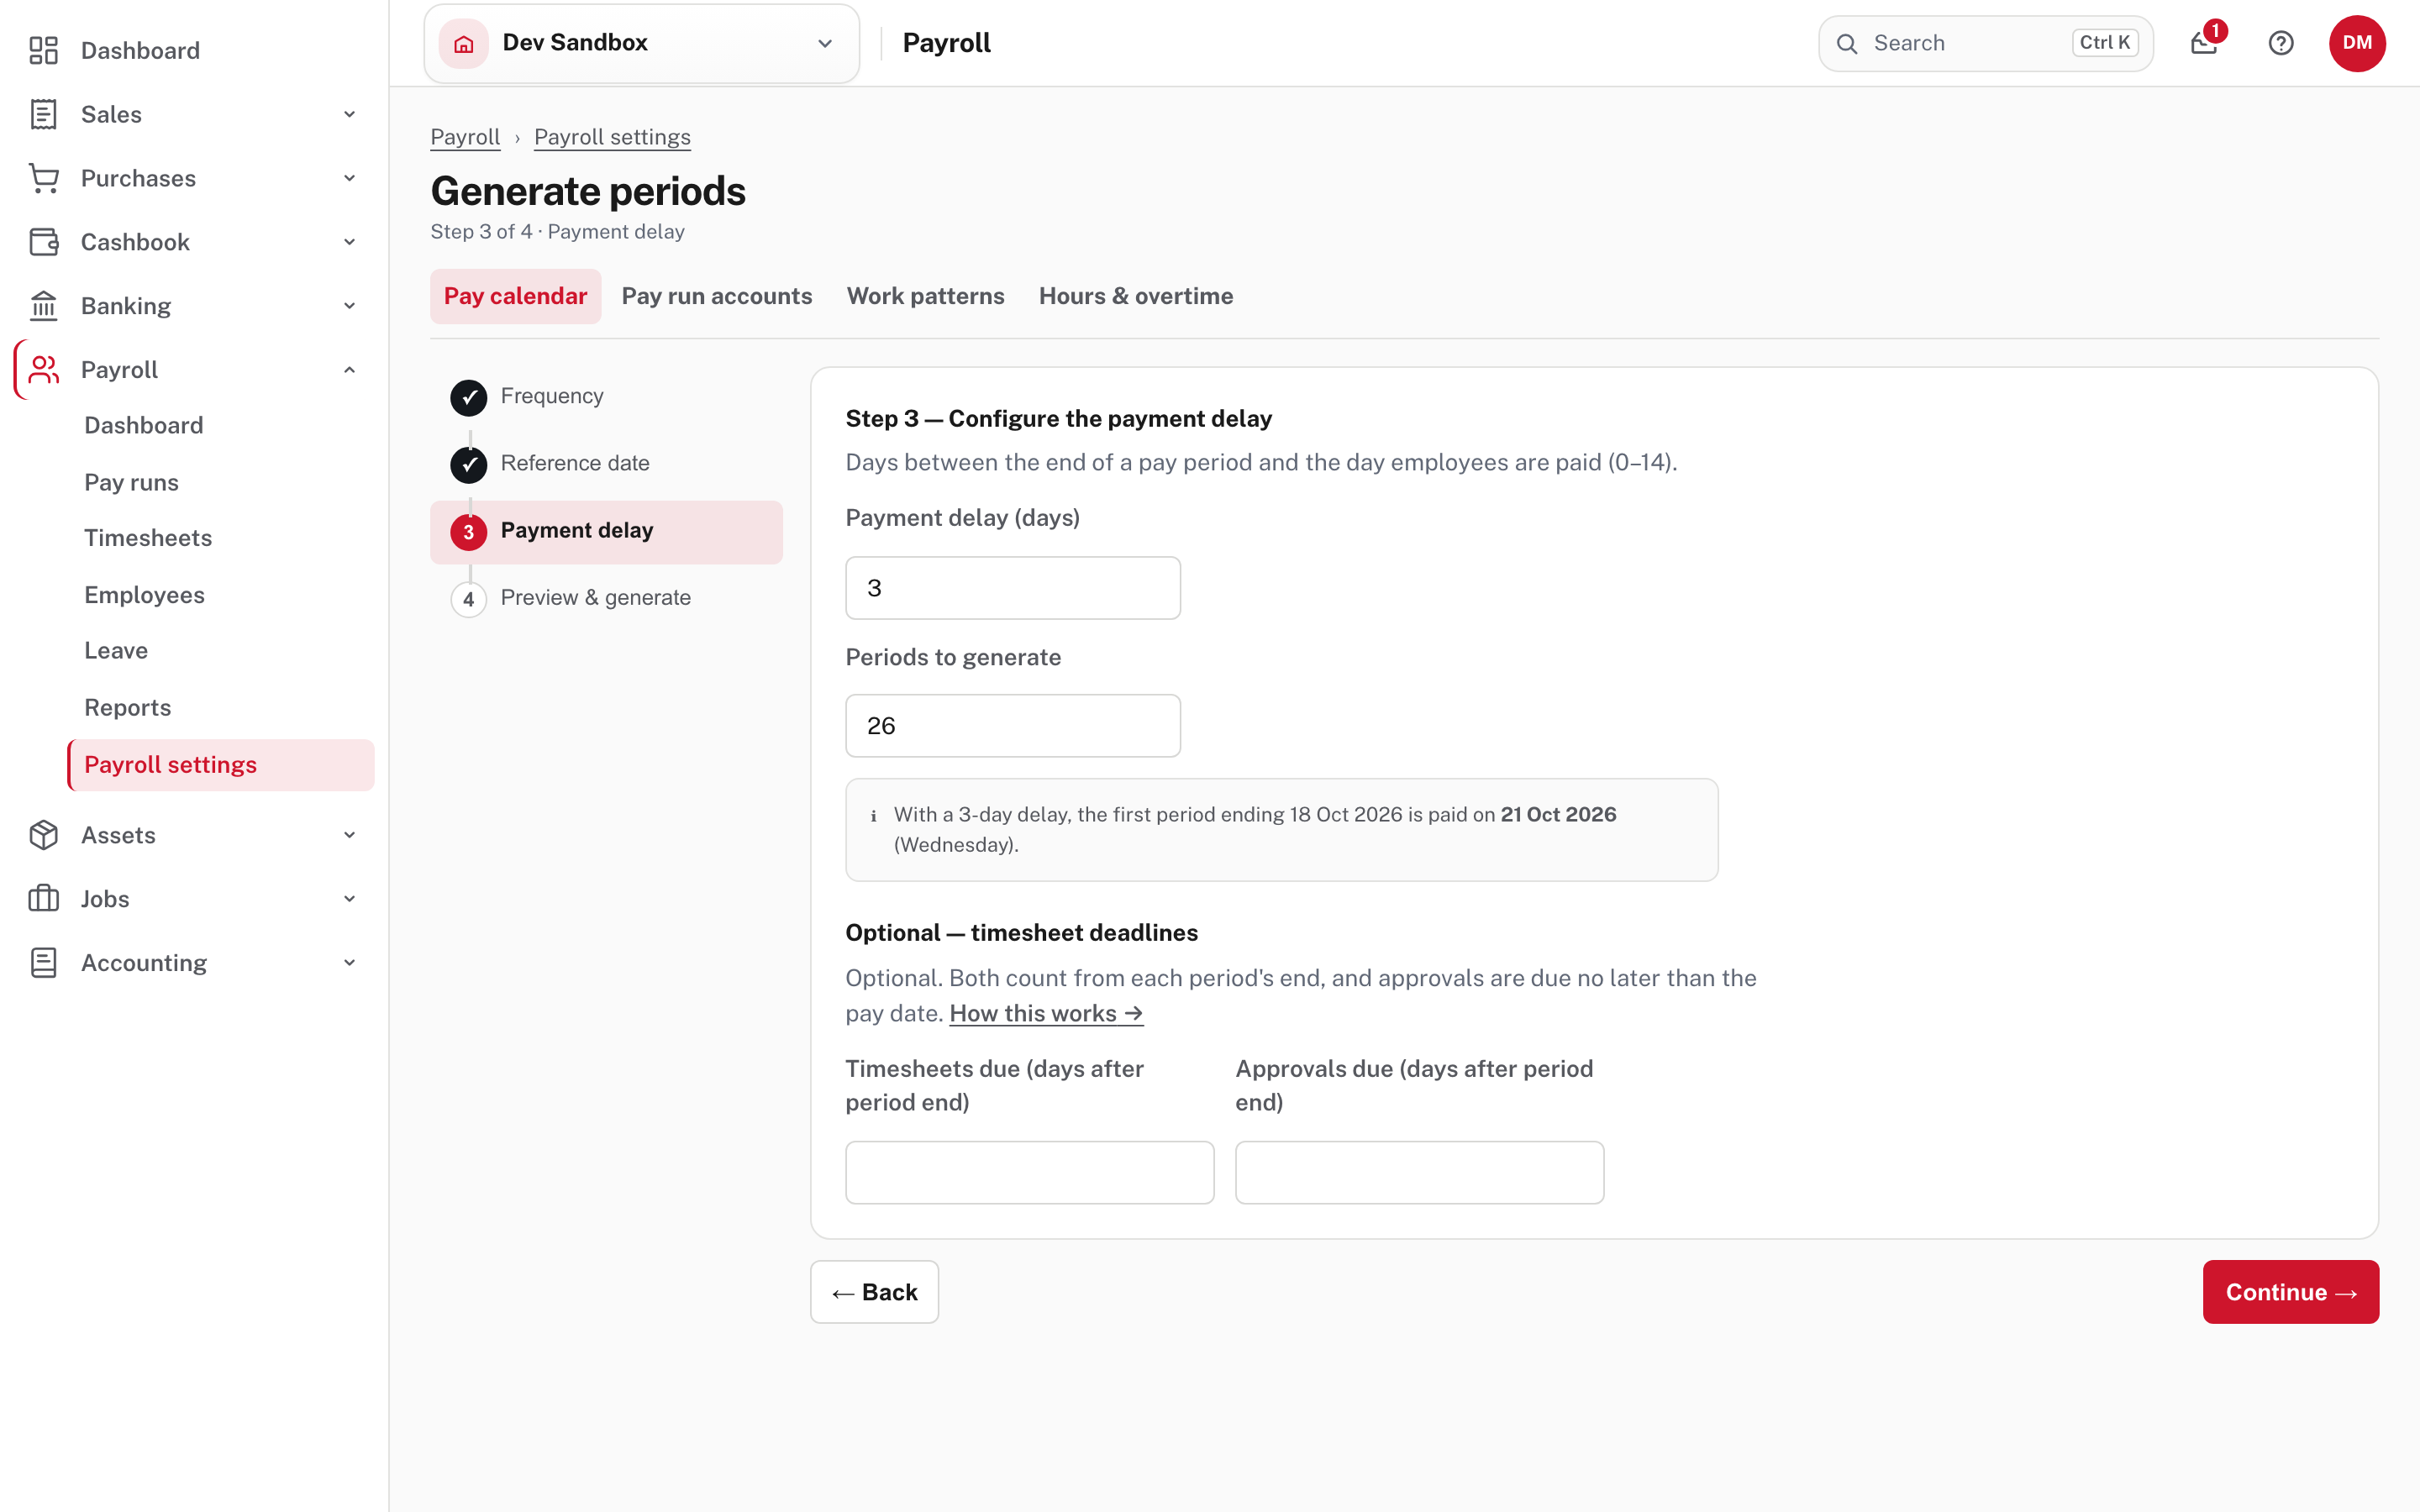
- Payment delay. The days between the end of a period and pay day (0 to 14), and how many periods to generate. Here you can also set the optional timesheet deadlines: Timesheets due and Approvals due, in days after the period ends. Leave them blank for no deadline.
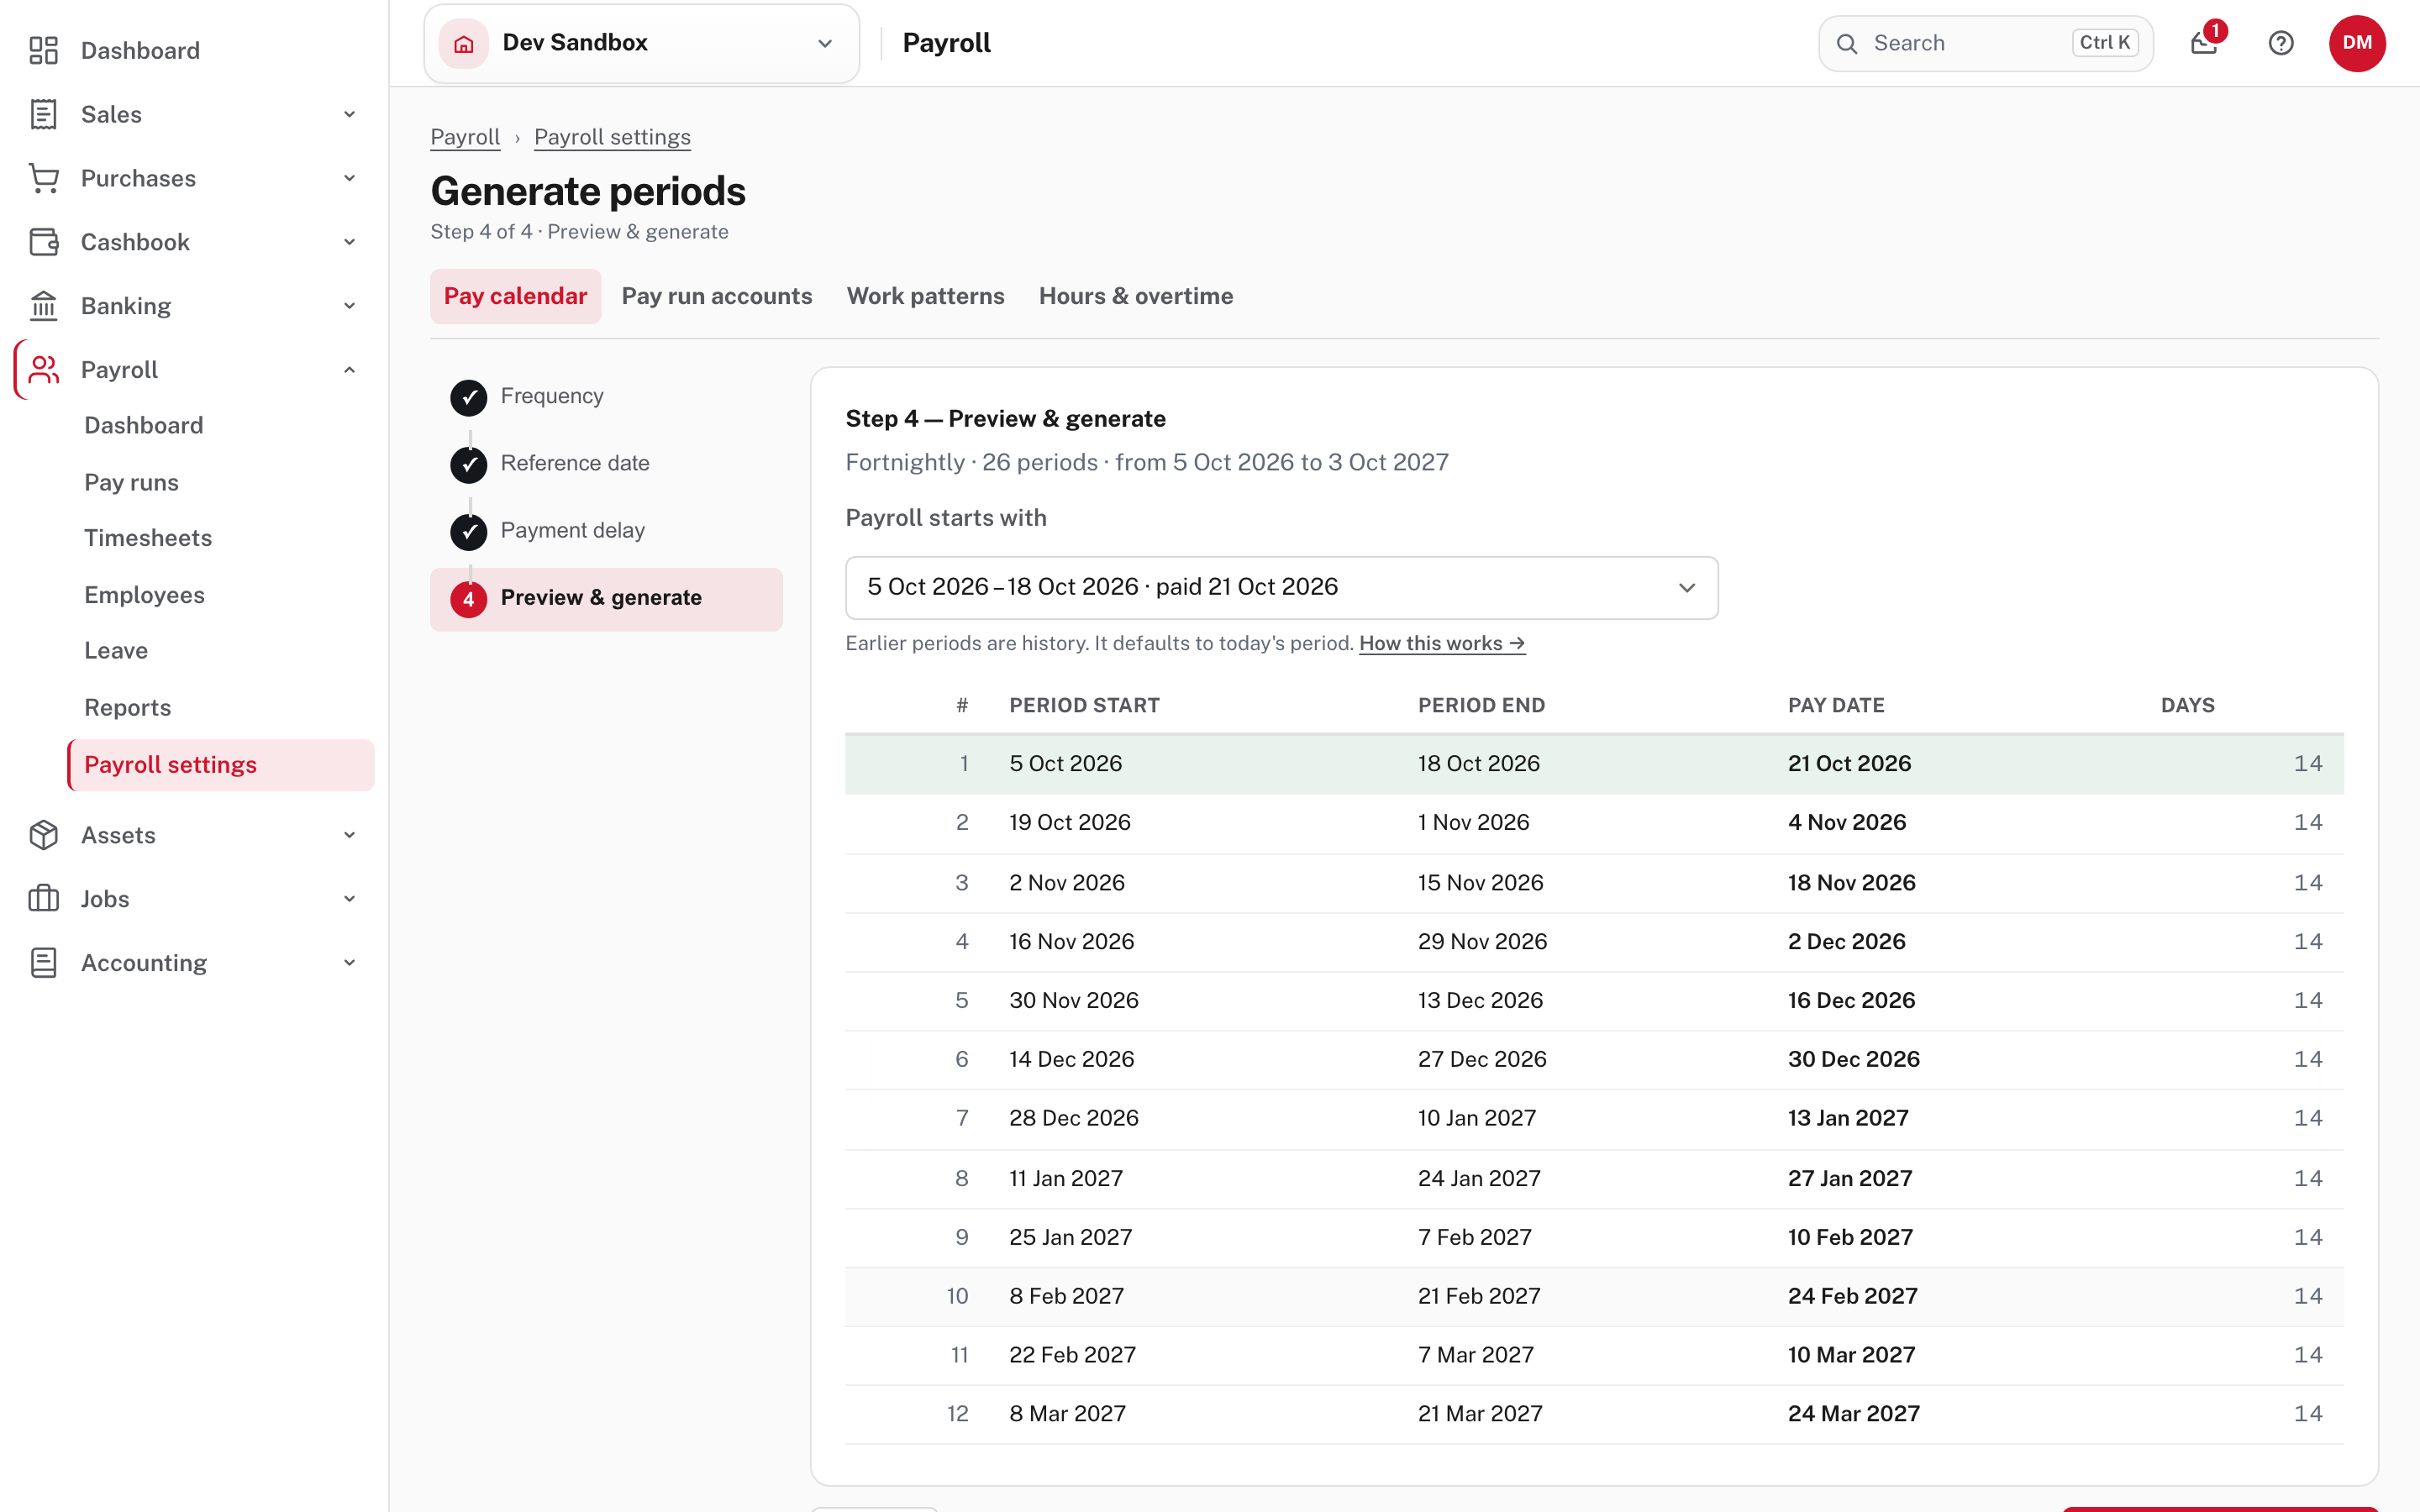
- Preview & generate. Check the list of periods and pay dates. Payroll starts with is the first period you will actually run; it defaults to the period you are in today, and earlier periods become history. Then generate.
A company that already has a calendar
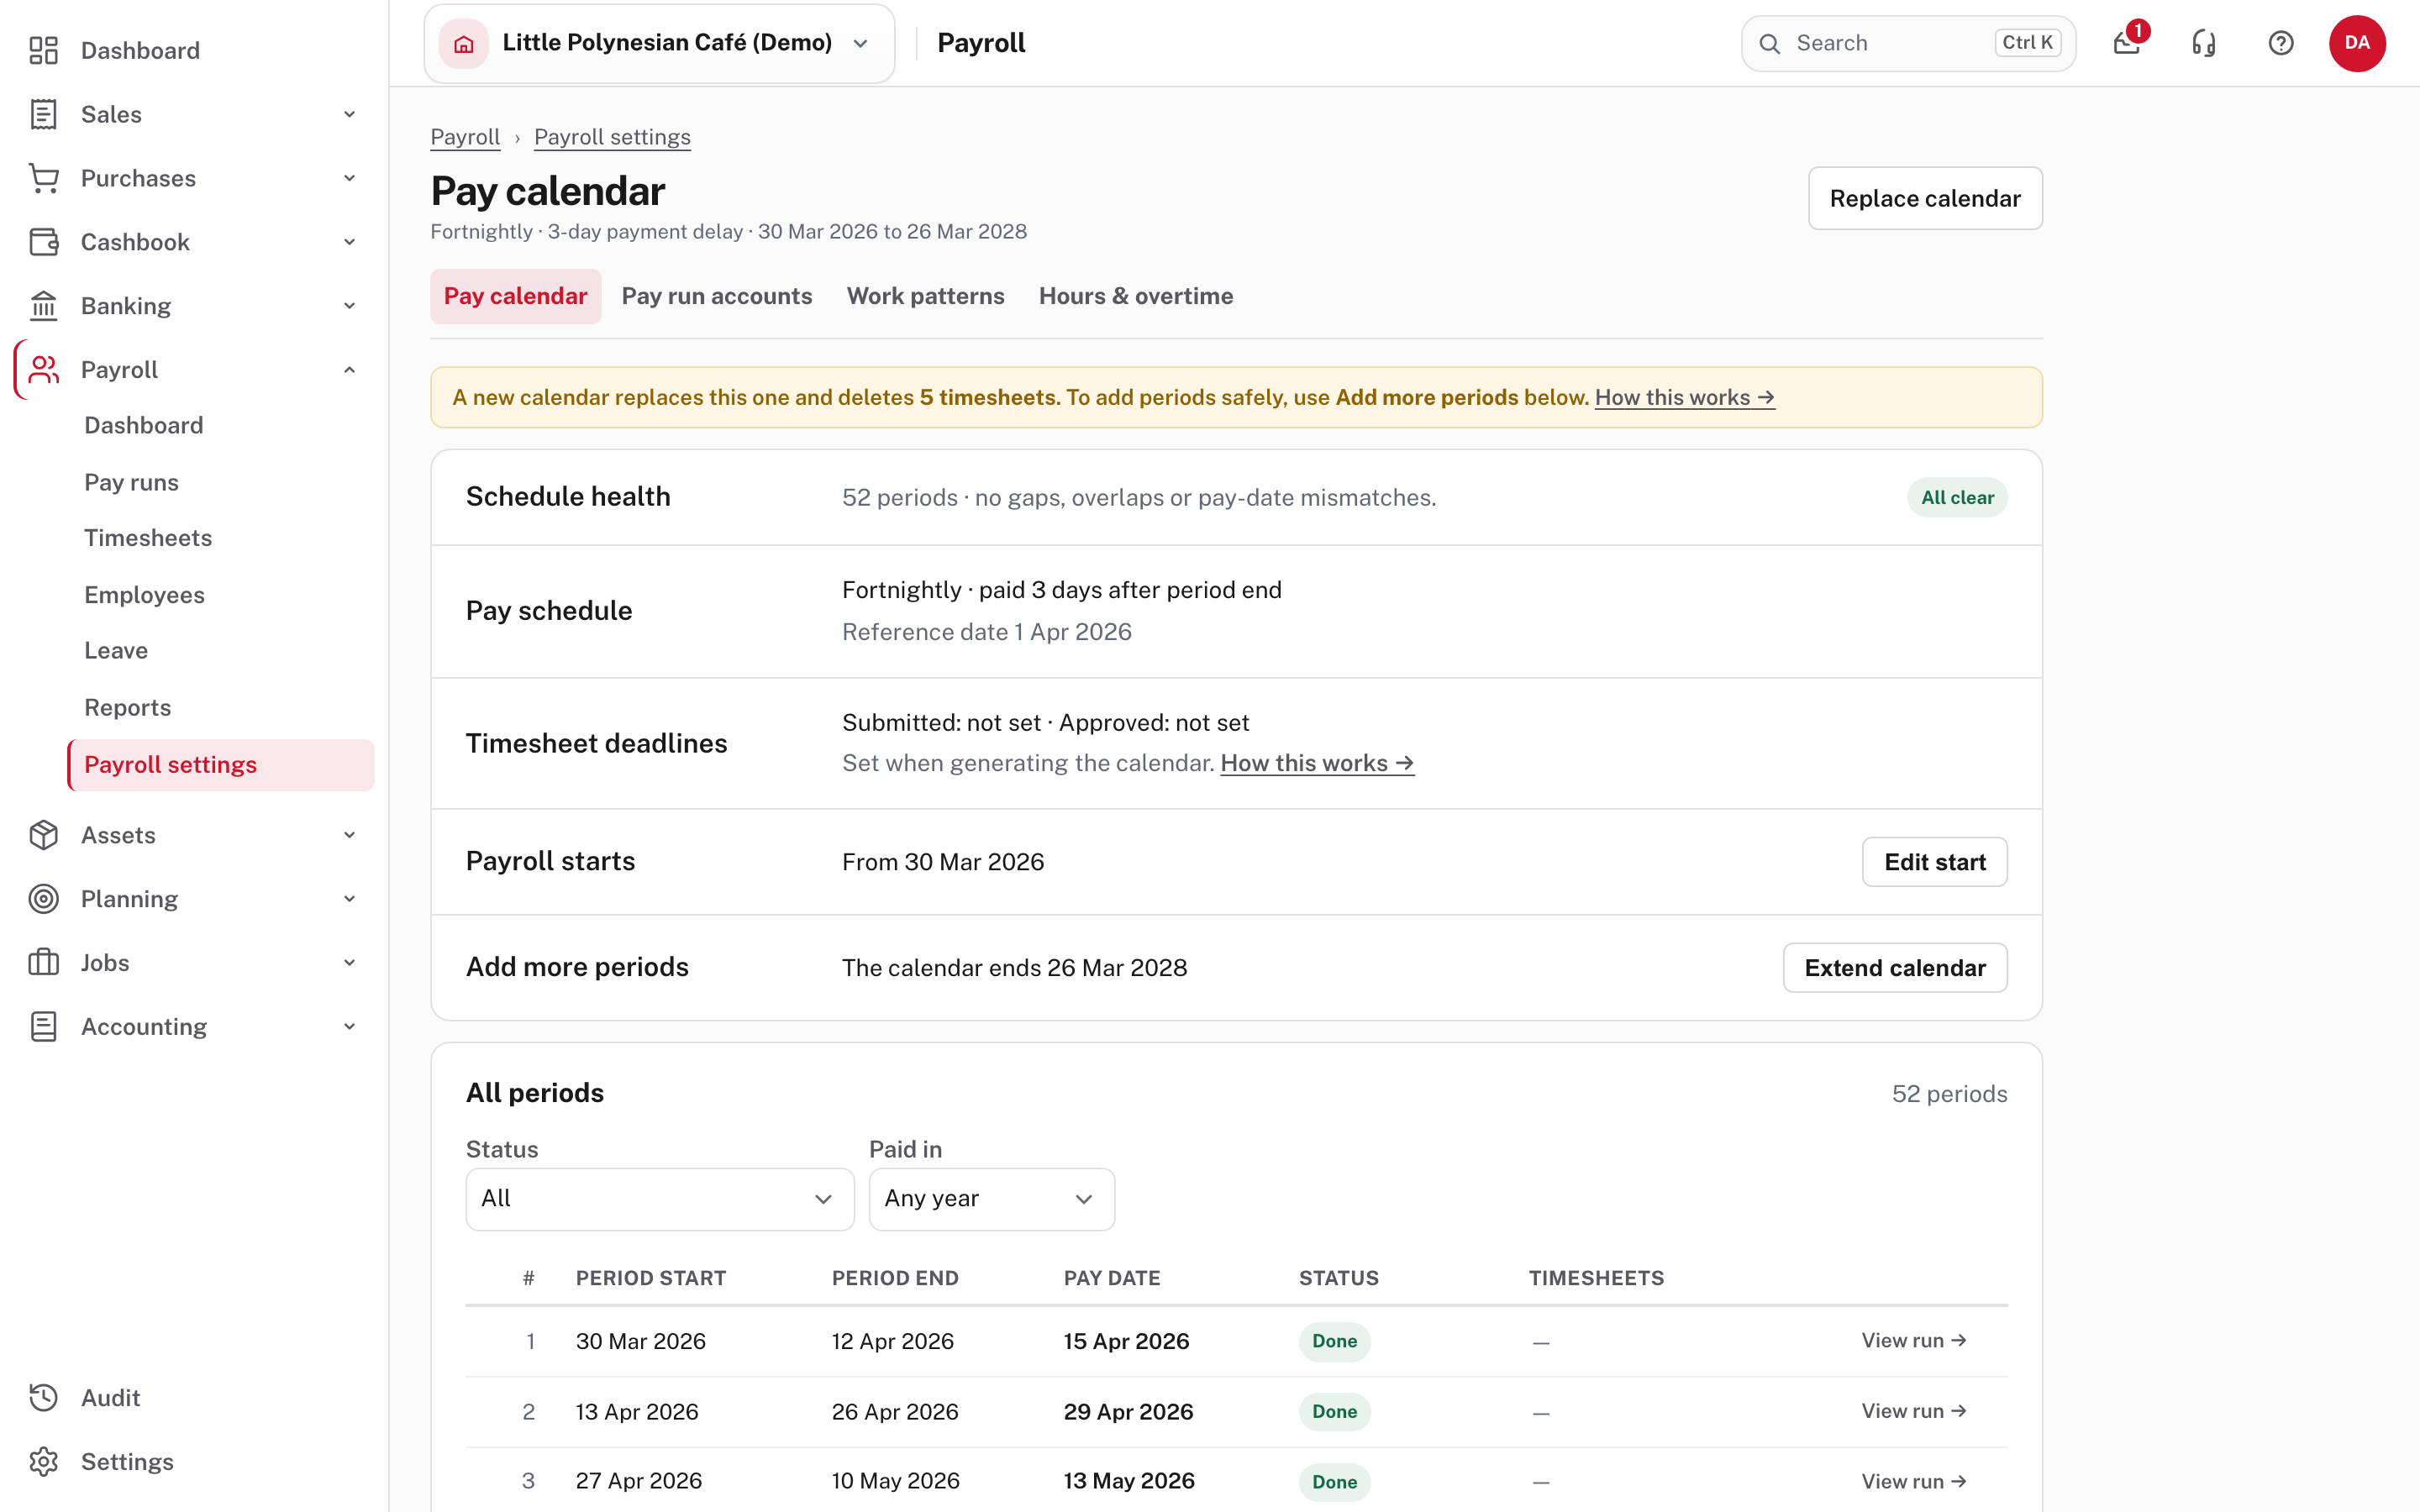
- Pay schedule shows the frequency, how many days after the period ends staff are paid, and the reference date the periods count from.
- Timesheet deadlines are optional. Submitted is when timesheets close; Approved is when approval is due.
- Payroll starts matters if you move to Easy part-way through a year. Earlier periods are history: they are never owed or "up next". Change it with Edit start, as long as you don't move it past a period payroll has already run.
- Schedule health should say All clear: no gaps, no overlaps, no pay-date mismatches.
- Add more periods (Extend calendar) adds periods at the end without touching anything already there.
Replace calendar deletes timesheets
Replace calendar throws away every period and every timesheet recorded against them. It cannot be undone, and it is refused once a pay run has been processed. To add more periods safely, use Extend calendar.
More detail: Pay calendar and periods.
Step 3. Set up work patterns (recommended)
Payroll settings → Pay schedule → Work patterns → + New pattern.
A work pattern is a working week you put people on, for example Full time, Monday to Friday, 40 hours.
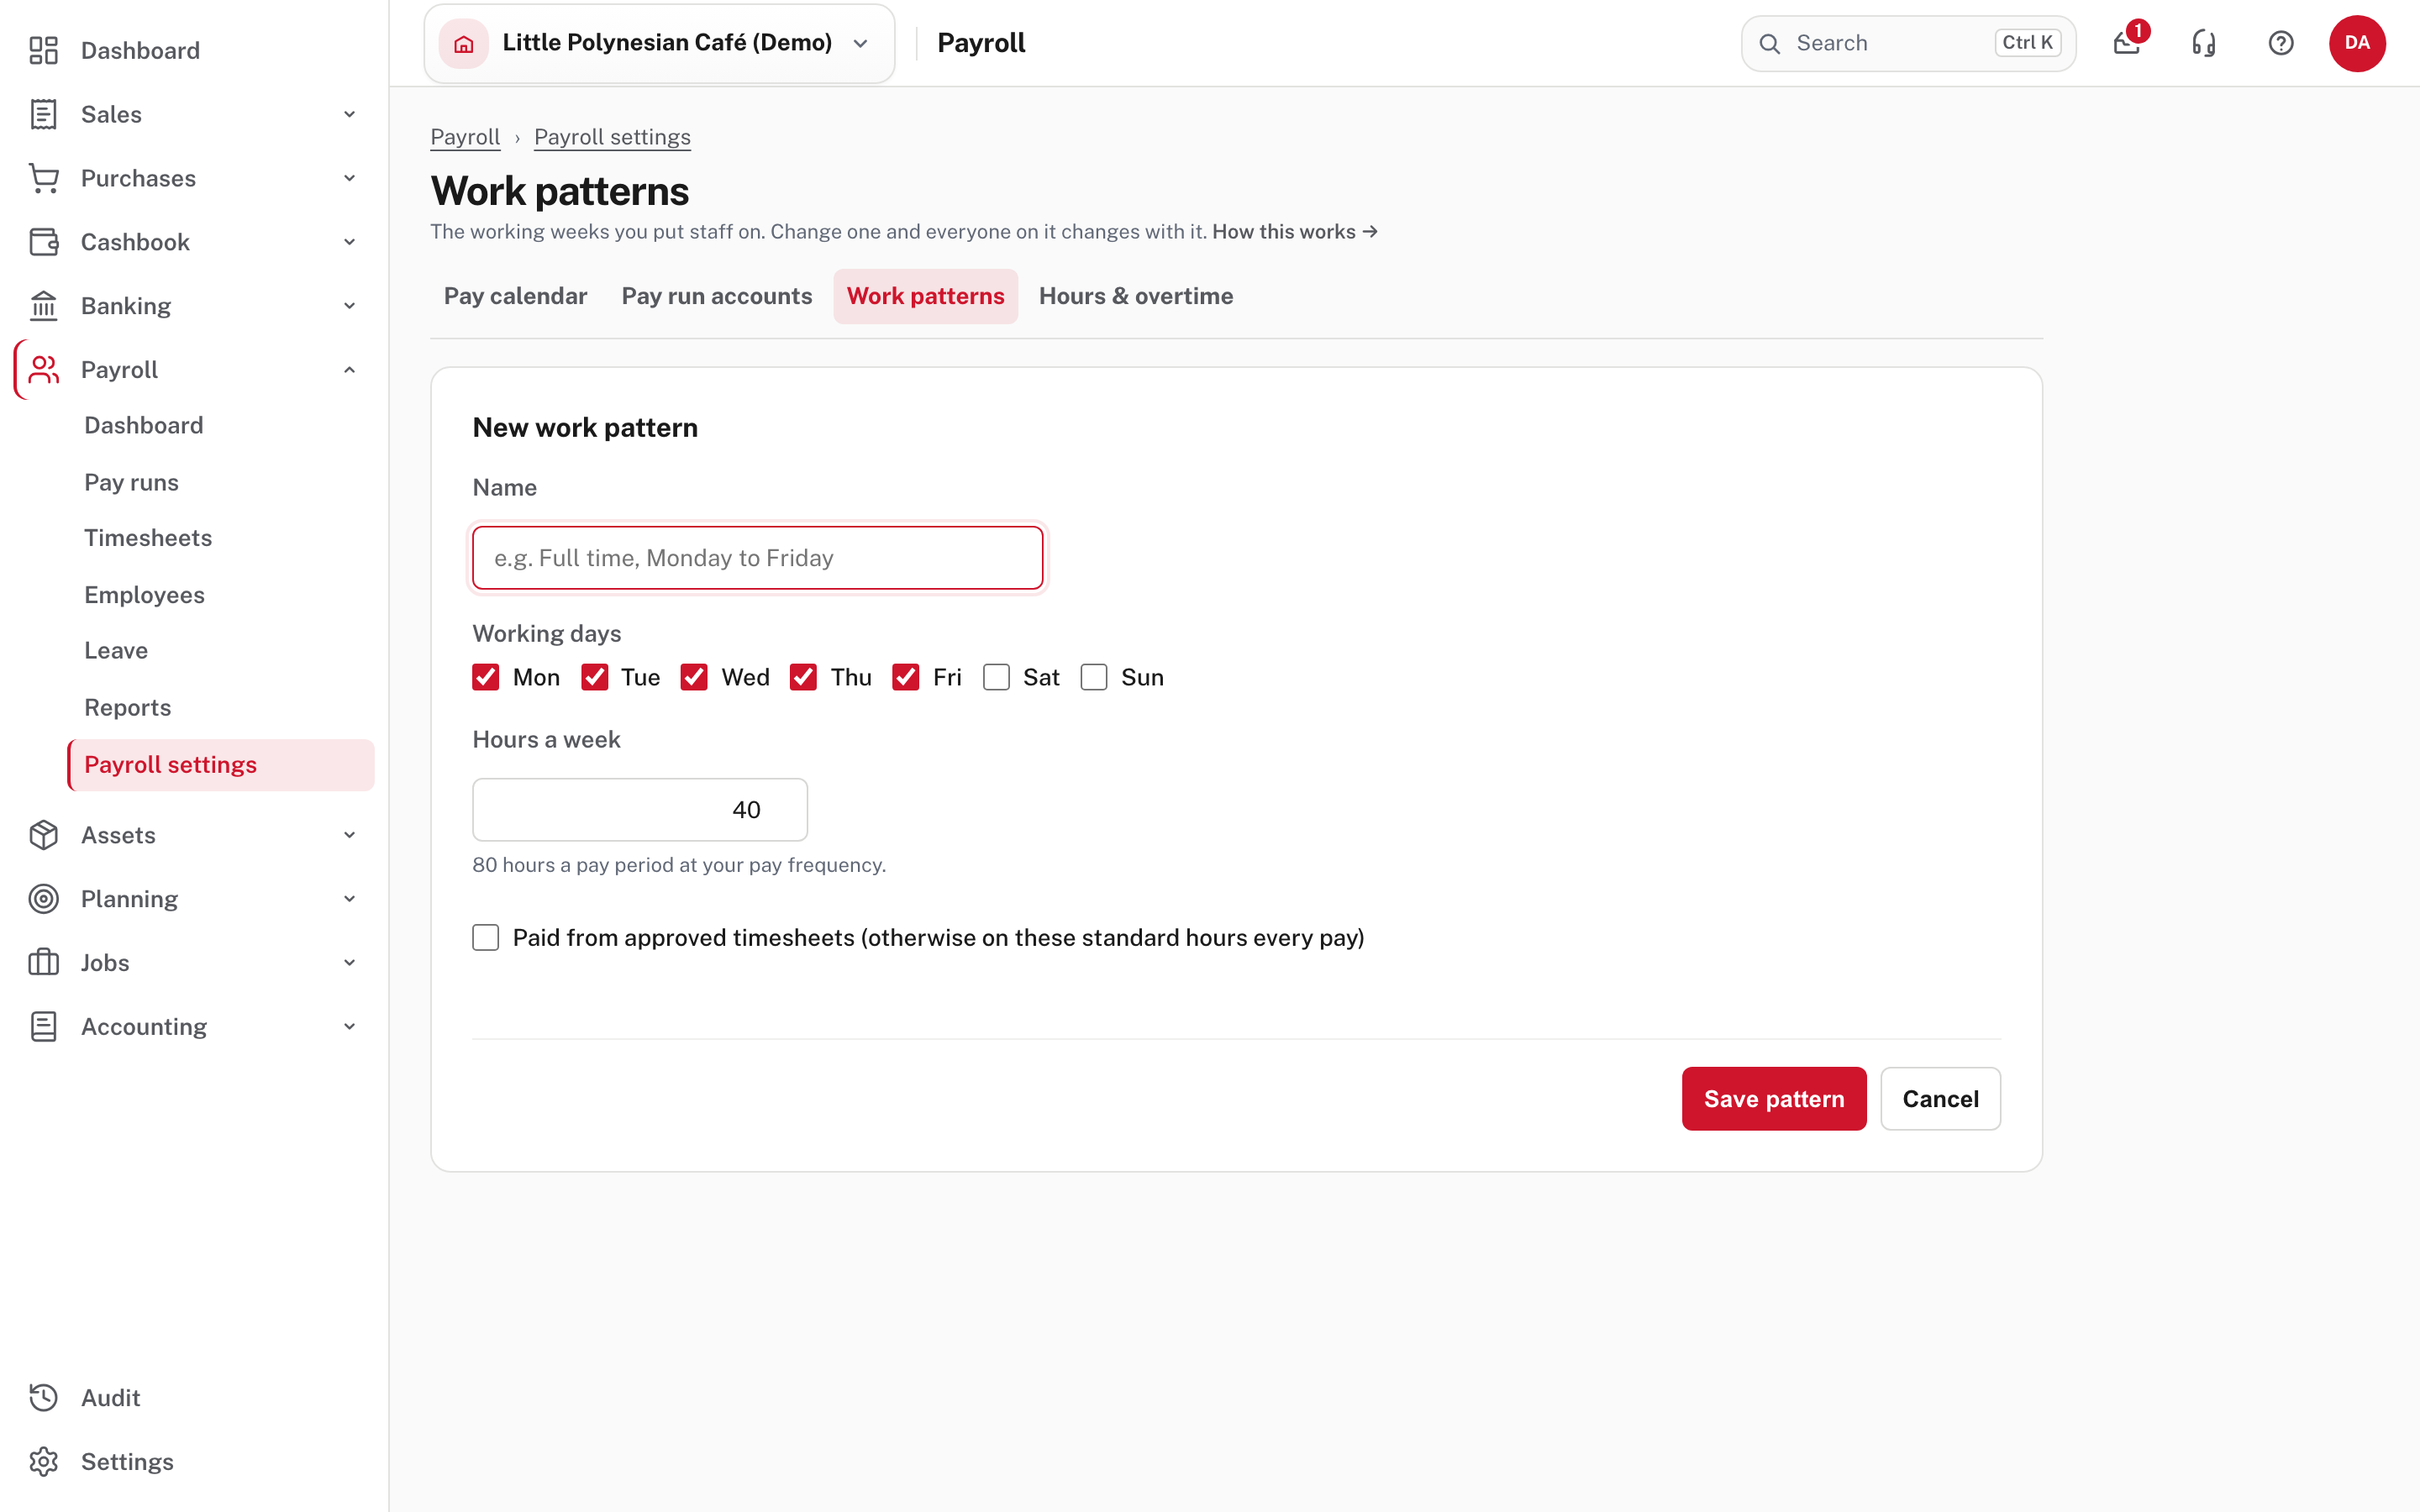
- Name: what you will pick from on the employee's record.
- Working days: tick the days of the week.
- Hours a week: the form shows the hours this makes in each pay period (40 a week is 80 a fortnight).
- Paid from approved timesheets: tick it if the person's pay follows their approved timesheet each period. Leave it unticked and they are paid the standard hours every pay.
Choose Save pattern. Then choose the pattern on each employee's Pay & work pattern section (step 9). If you later change a pattern, everyone on it changes from their next pay run. The Hours & overtime tab beside it sets when an hourly employee's time becomes overtime.
More detail: Employee records, work patterns.
Step 4. Check the pay run accounts
Payroll settings → Pay schedule → Pay run accounts.
These are the accounts every new pay run uses.
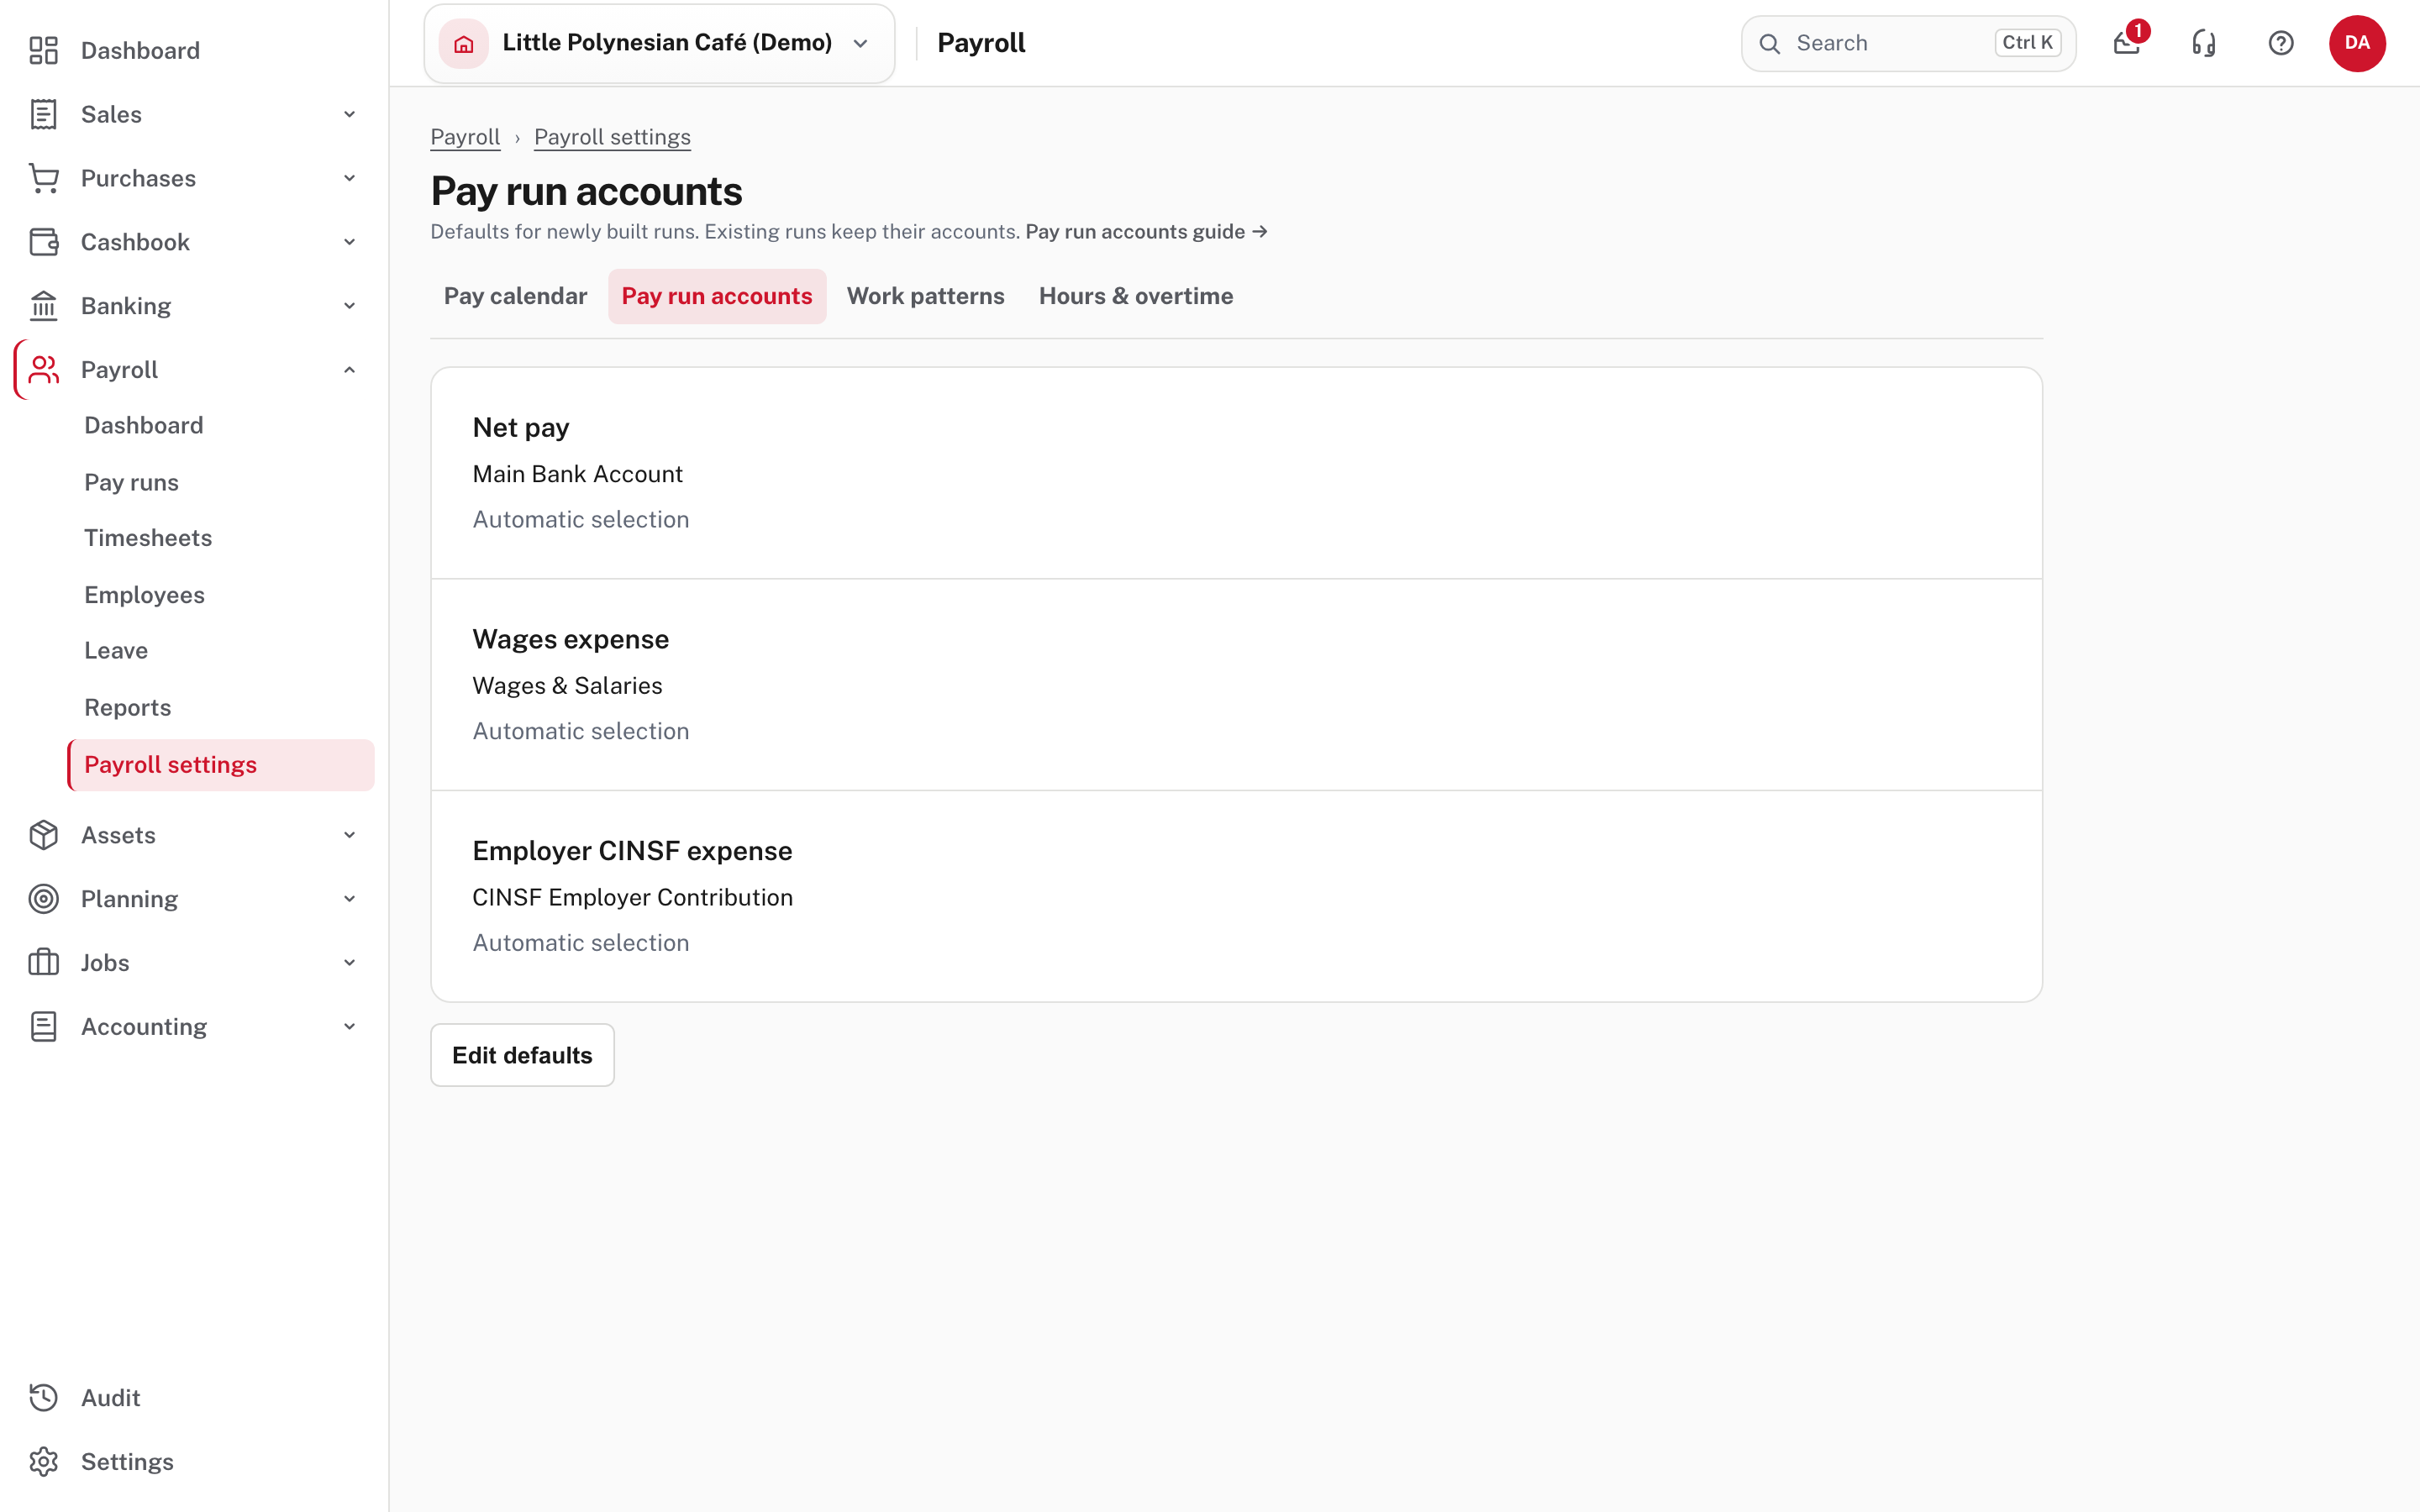
- Net pay: the bank account the wages are paid from.
- Wages expense: where gross wages are recorded.
- Employer CINSF expense: where your own CINSF contribution is recorded.
Easy picks these automatically. Check that they are the accounts you expect, and use Edit defaults if not. A change applies to runs built after it; runs that already exist keep their accounts.
Step 5. Enter the tax and CINSF rules
Payroll settings → Tax & contributions. There is one tab each for PAYE, CINSF and Minimum wage.
PAYE
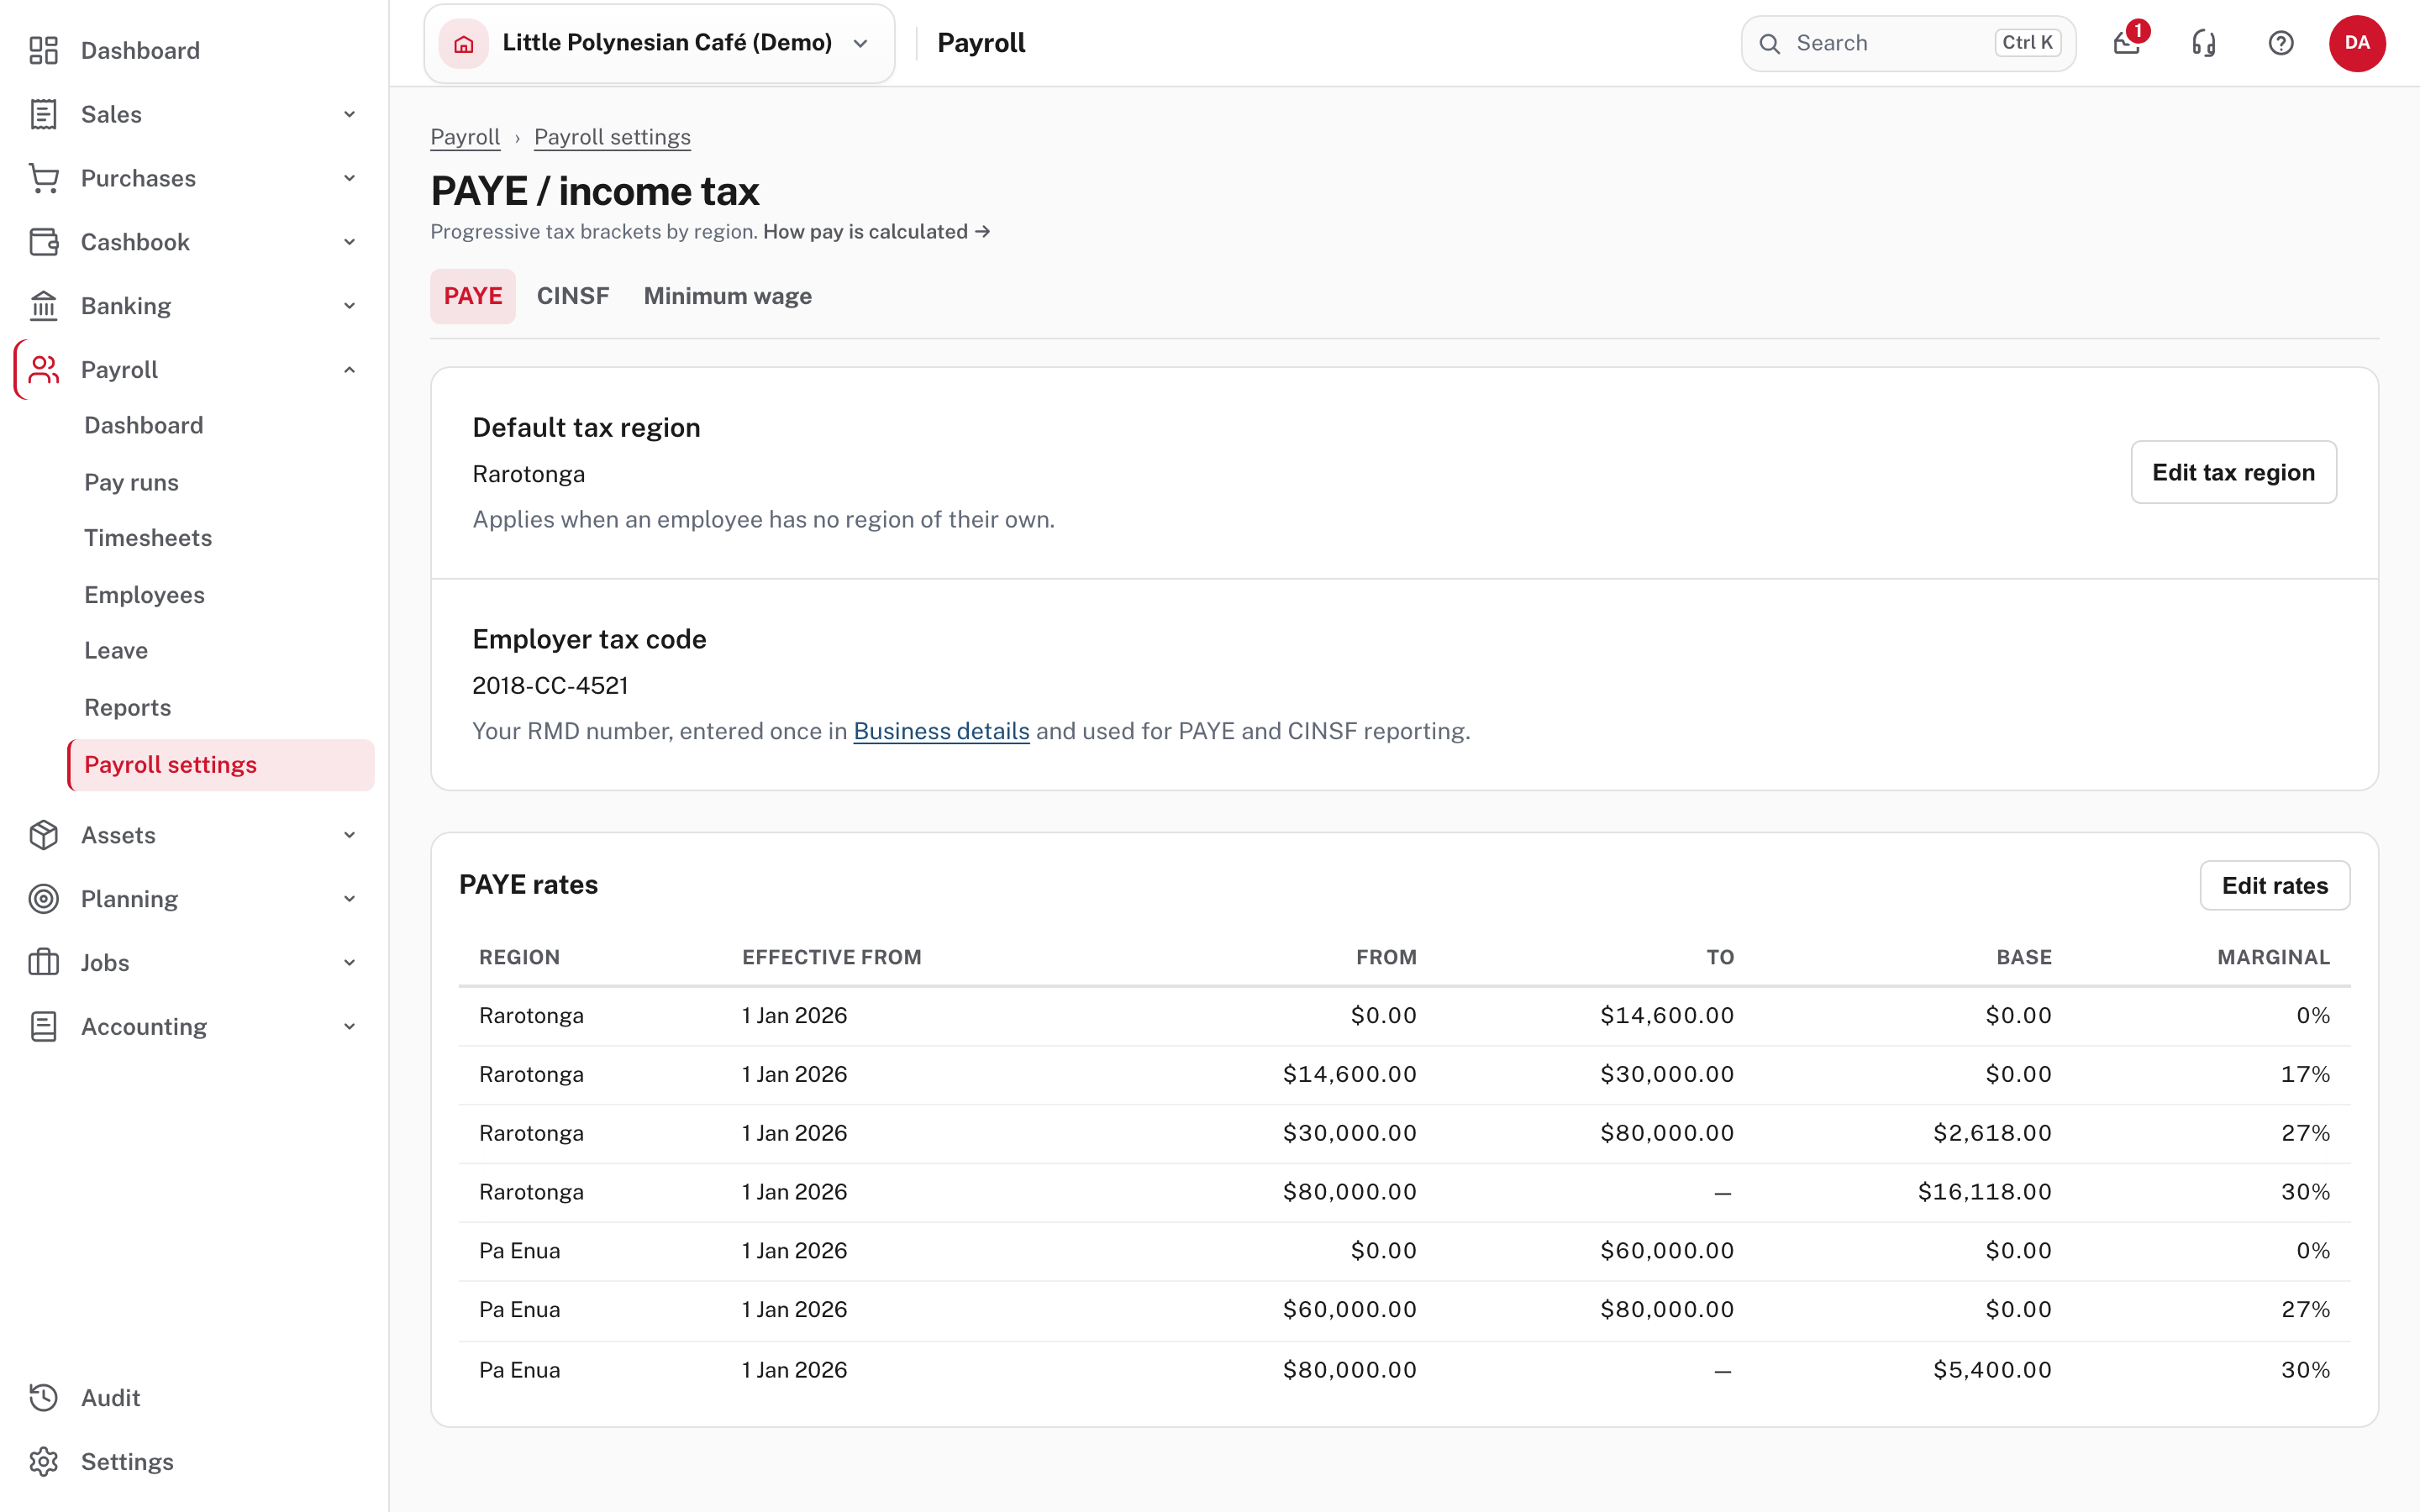
- Default tax region applies to any employee who has no region of their own (Rarotonga or Pa Enua).
- Employer tax code is your RMD number. It comes from Business details, so edit it there.
- PAYE rates is the table of brackets for each region, with the date each set takes effect. Use Edit rates to change it.
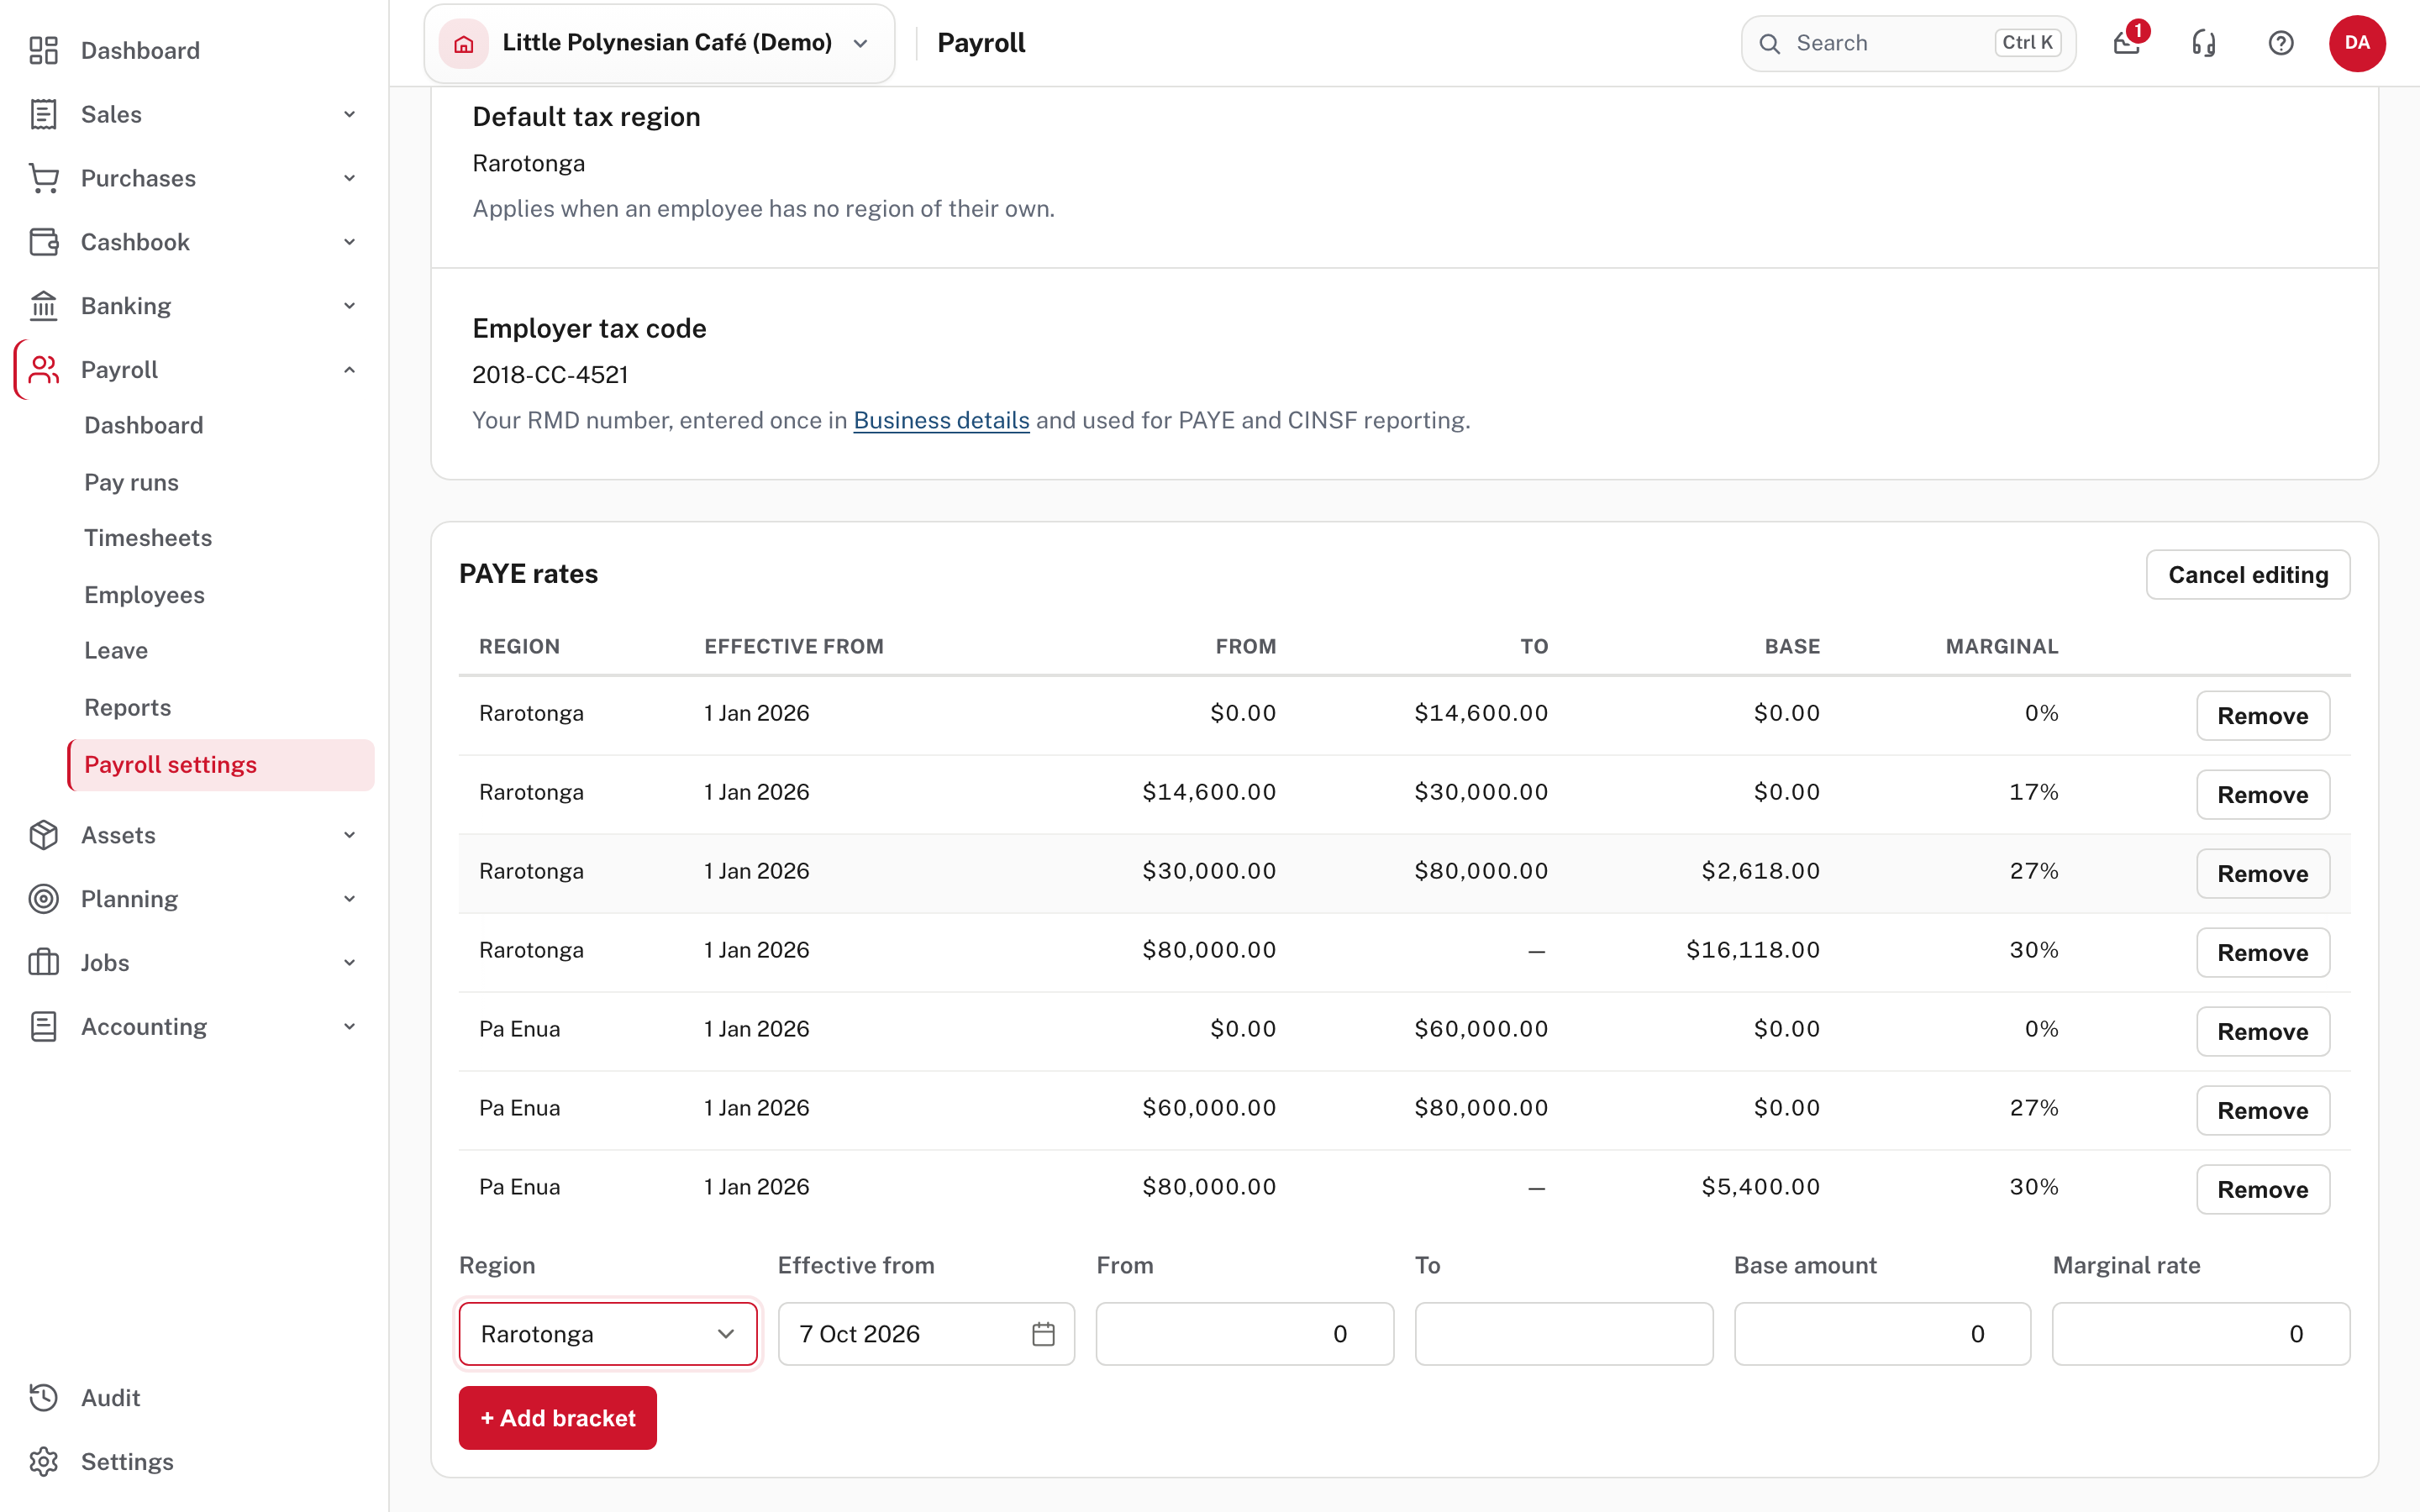
Each row has a Remove button. To add a bracket, fill in Region, Effective from, From, To (empty for the top bracket), Base amount and Marginal rate, then + Add bracket. Look at the table afterwards: the top bracket should show a dash under To.
Check the top bracket
The last bracket for each region must have no upper limit (the To column shows a dash). If it does, every level of earnings is taxed. The readiness check in step 10 tests this.
CINSF
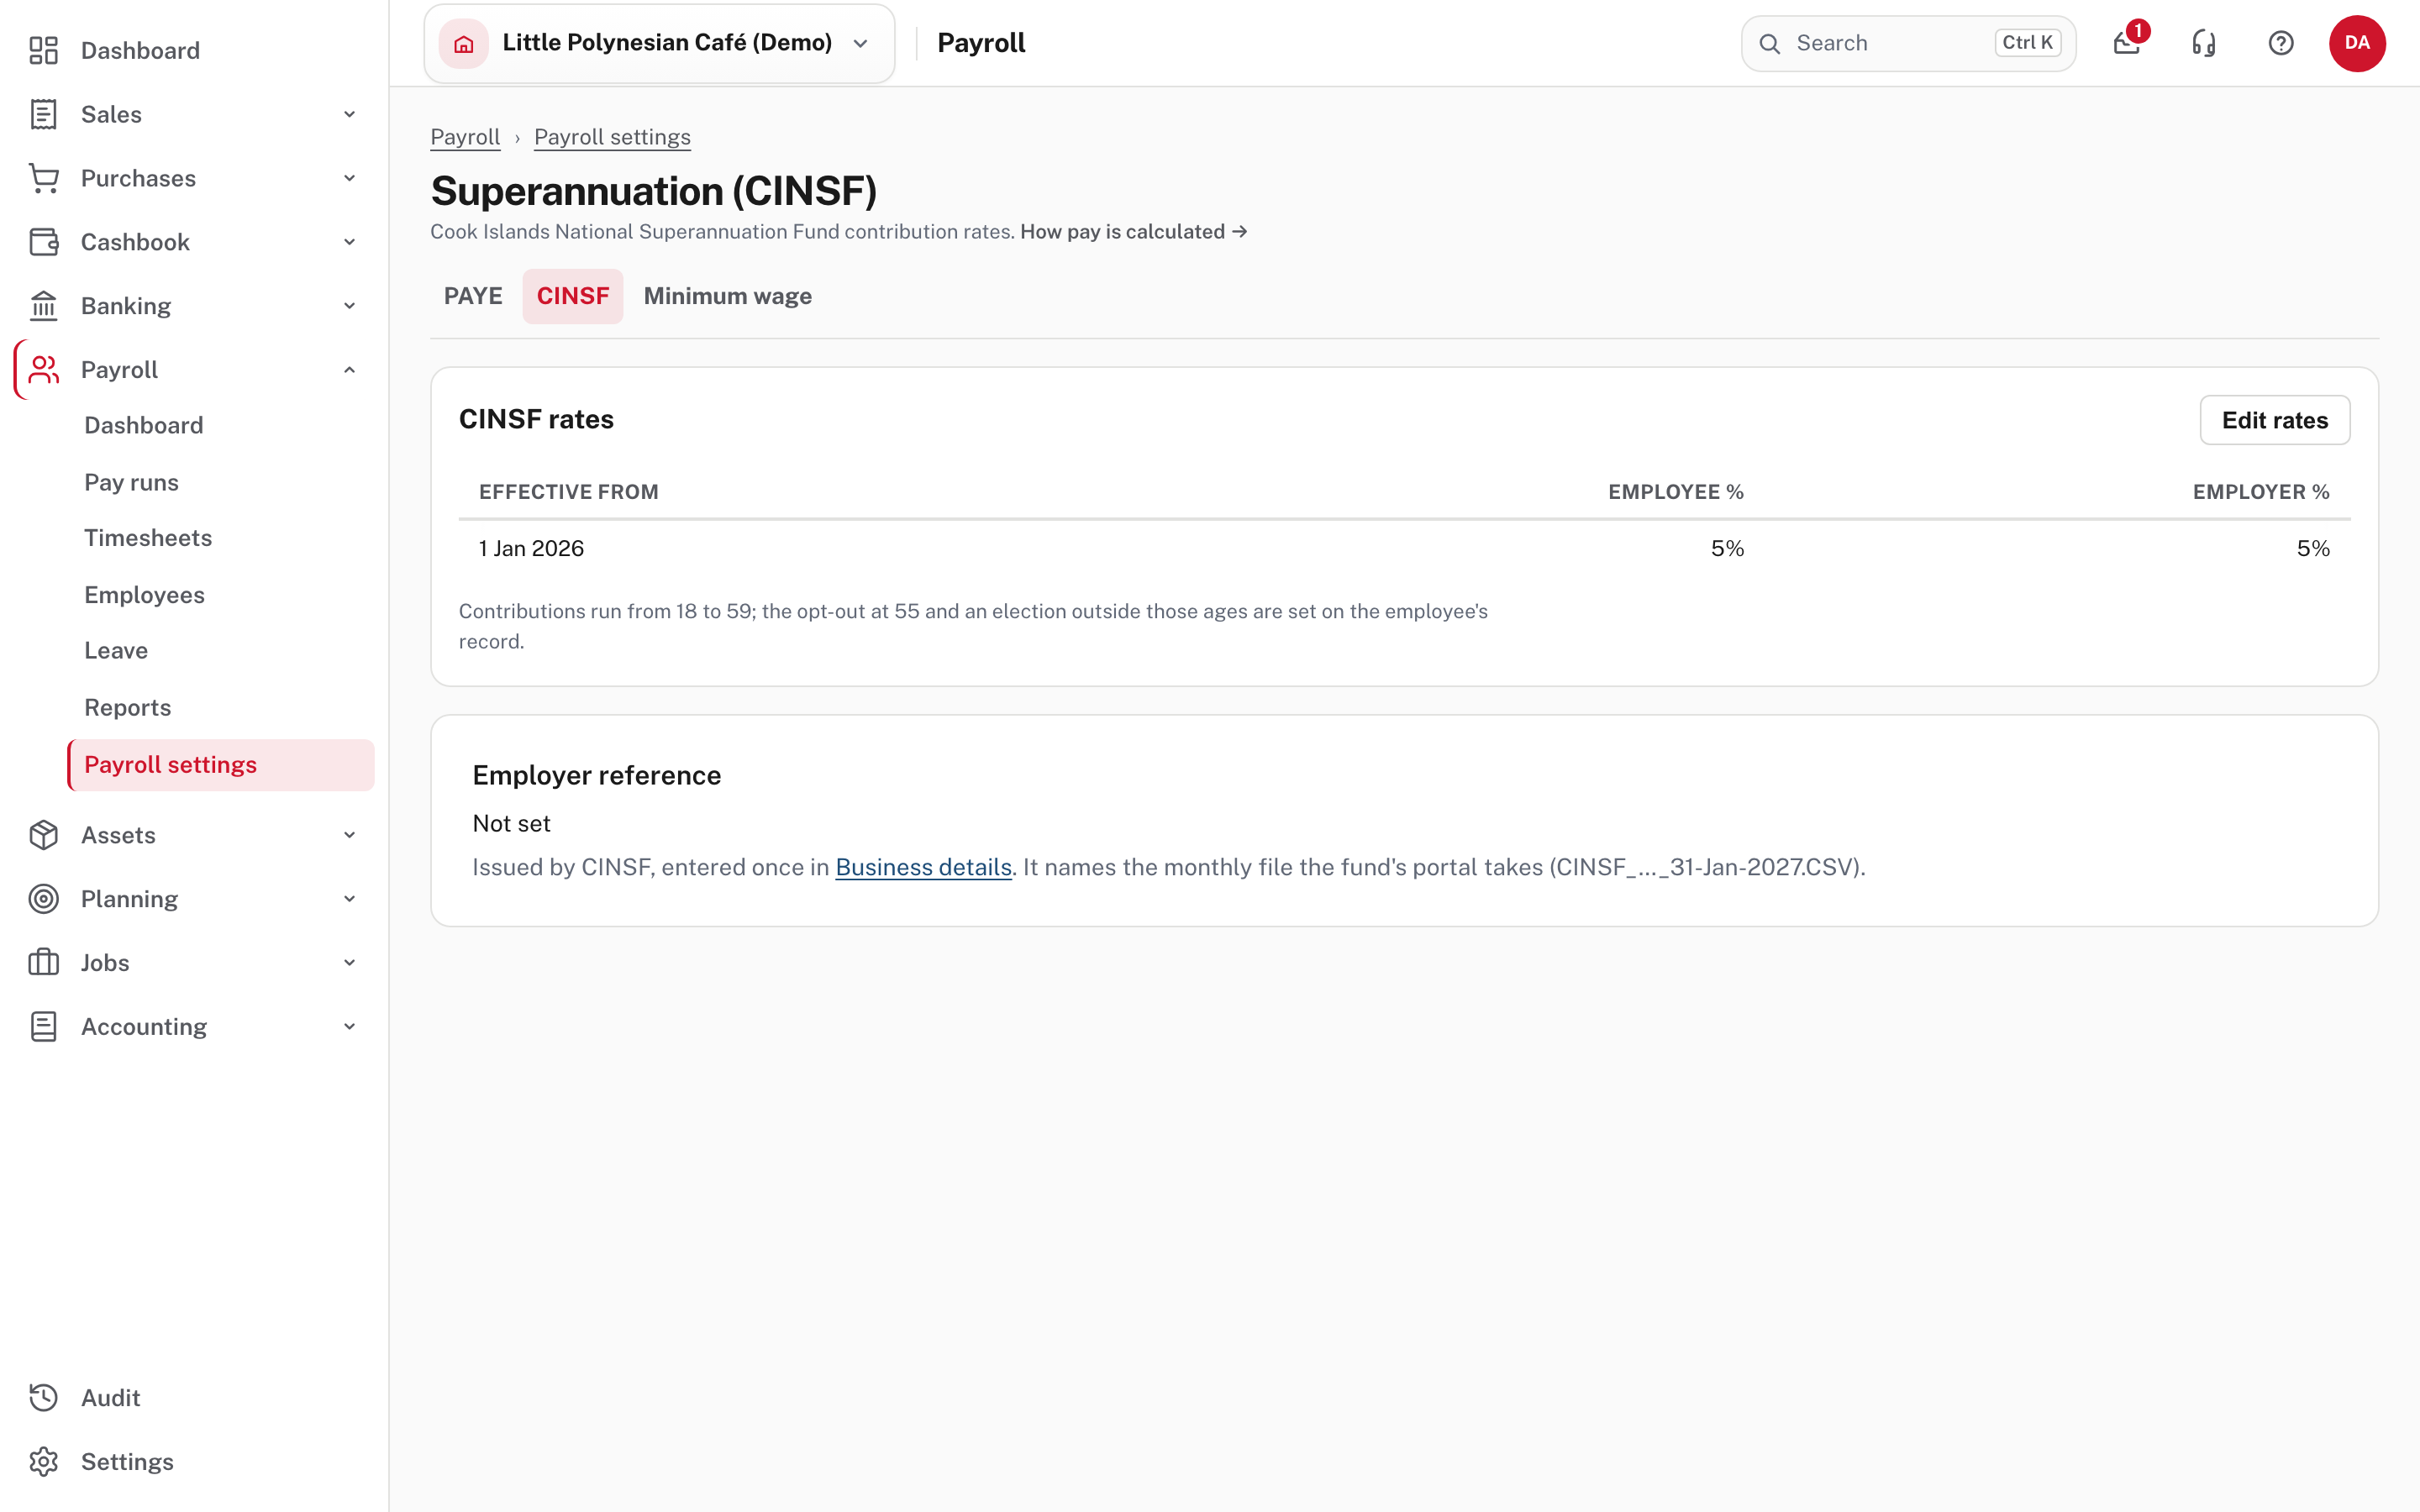
Enter the employee and employer rates and the date they take effect (Edit rates, then + Add rate).
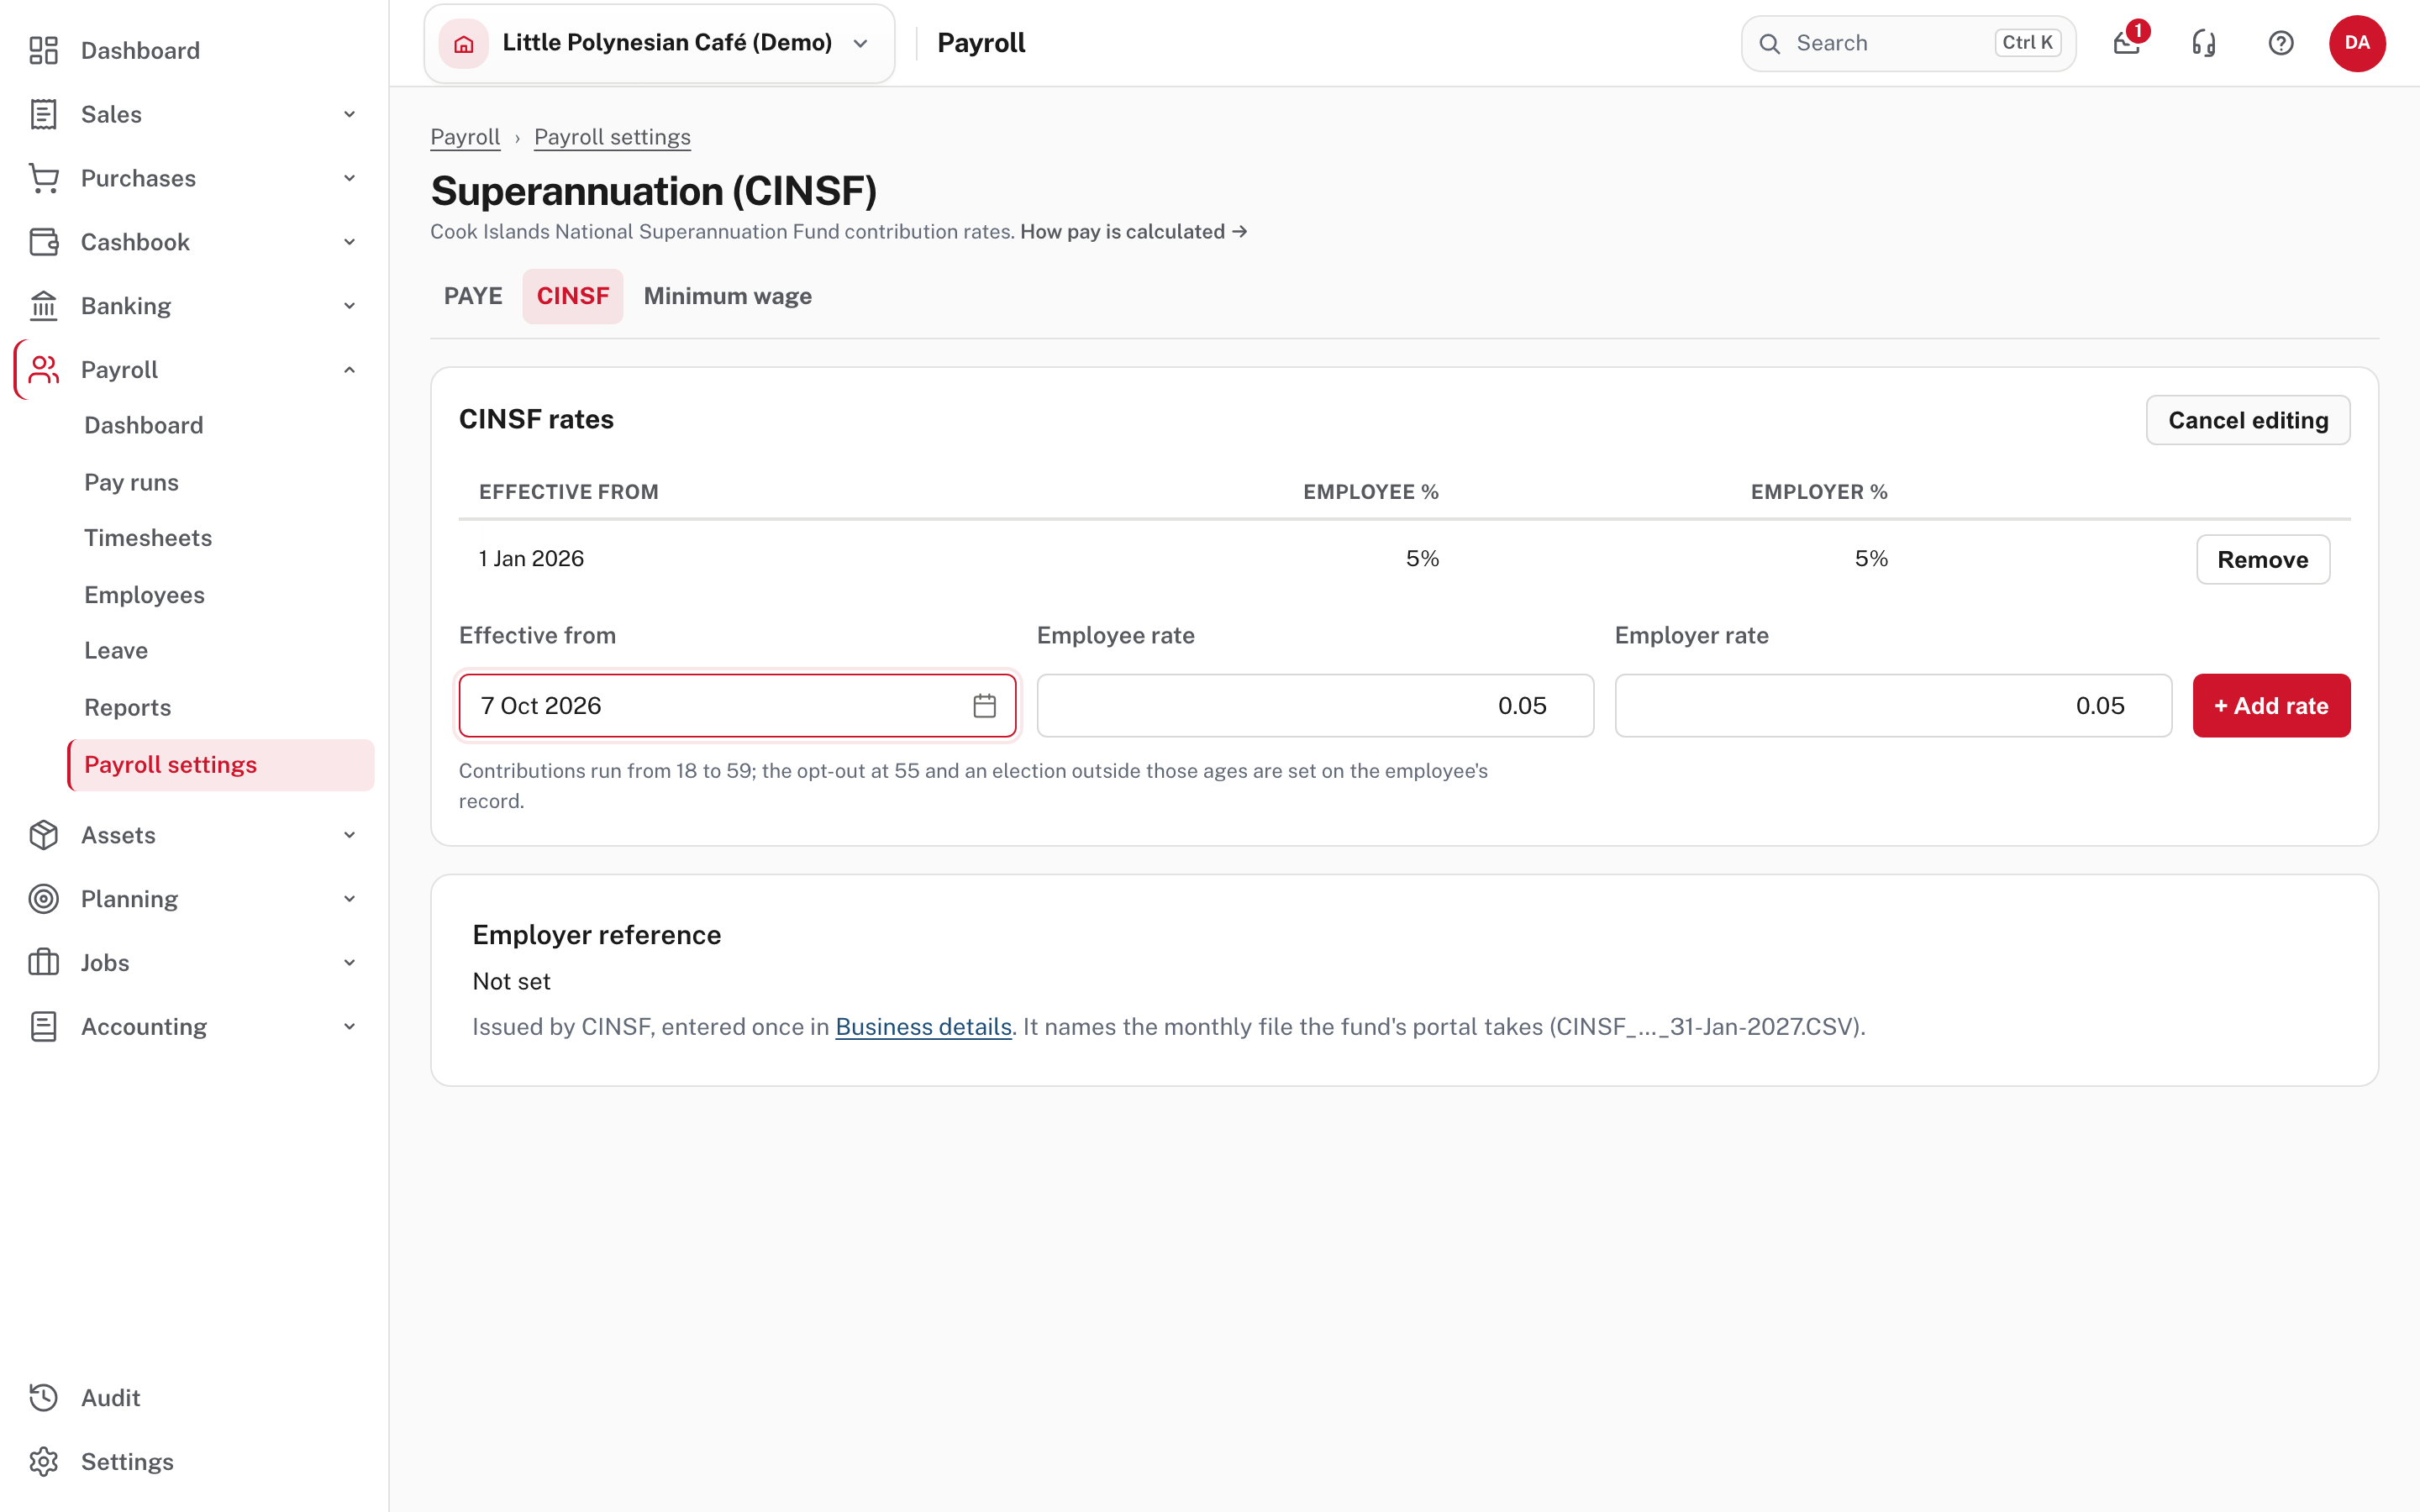
The rate boxes are pre-filled with 0.05, which is 5%. Check the table afterwards shows the percentage you meant.
Contributions run from age 18
to 59; an opt-out at 55, or an election outside those ages, is set on the employee's own record. Your employer
reference also comes from Business details.
Minimum wage holds the minimum hourly rate that every pay run checks against.
More detail: How an employee's pay is calculated.
Step 6. Leave and public holidays
Payroll settings → Leave & holidays.
Leave rules
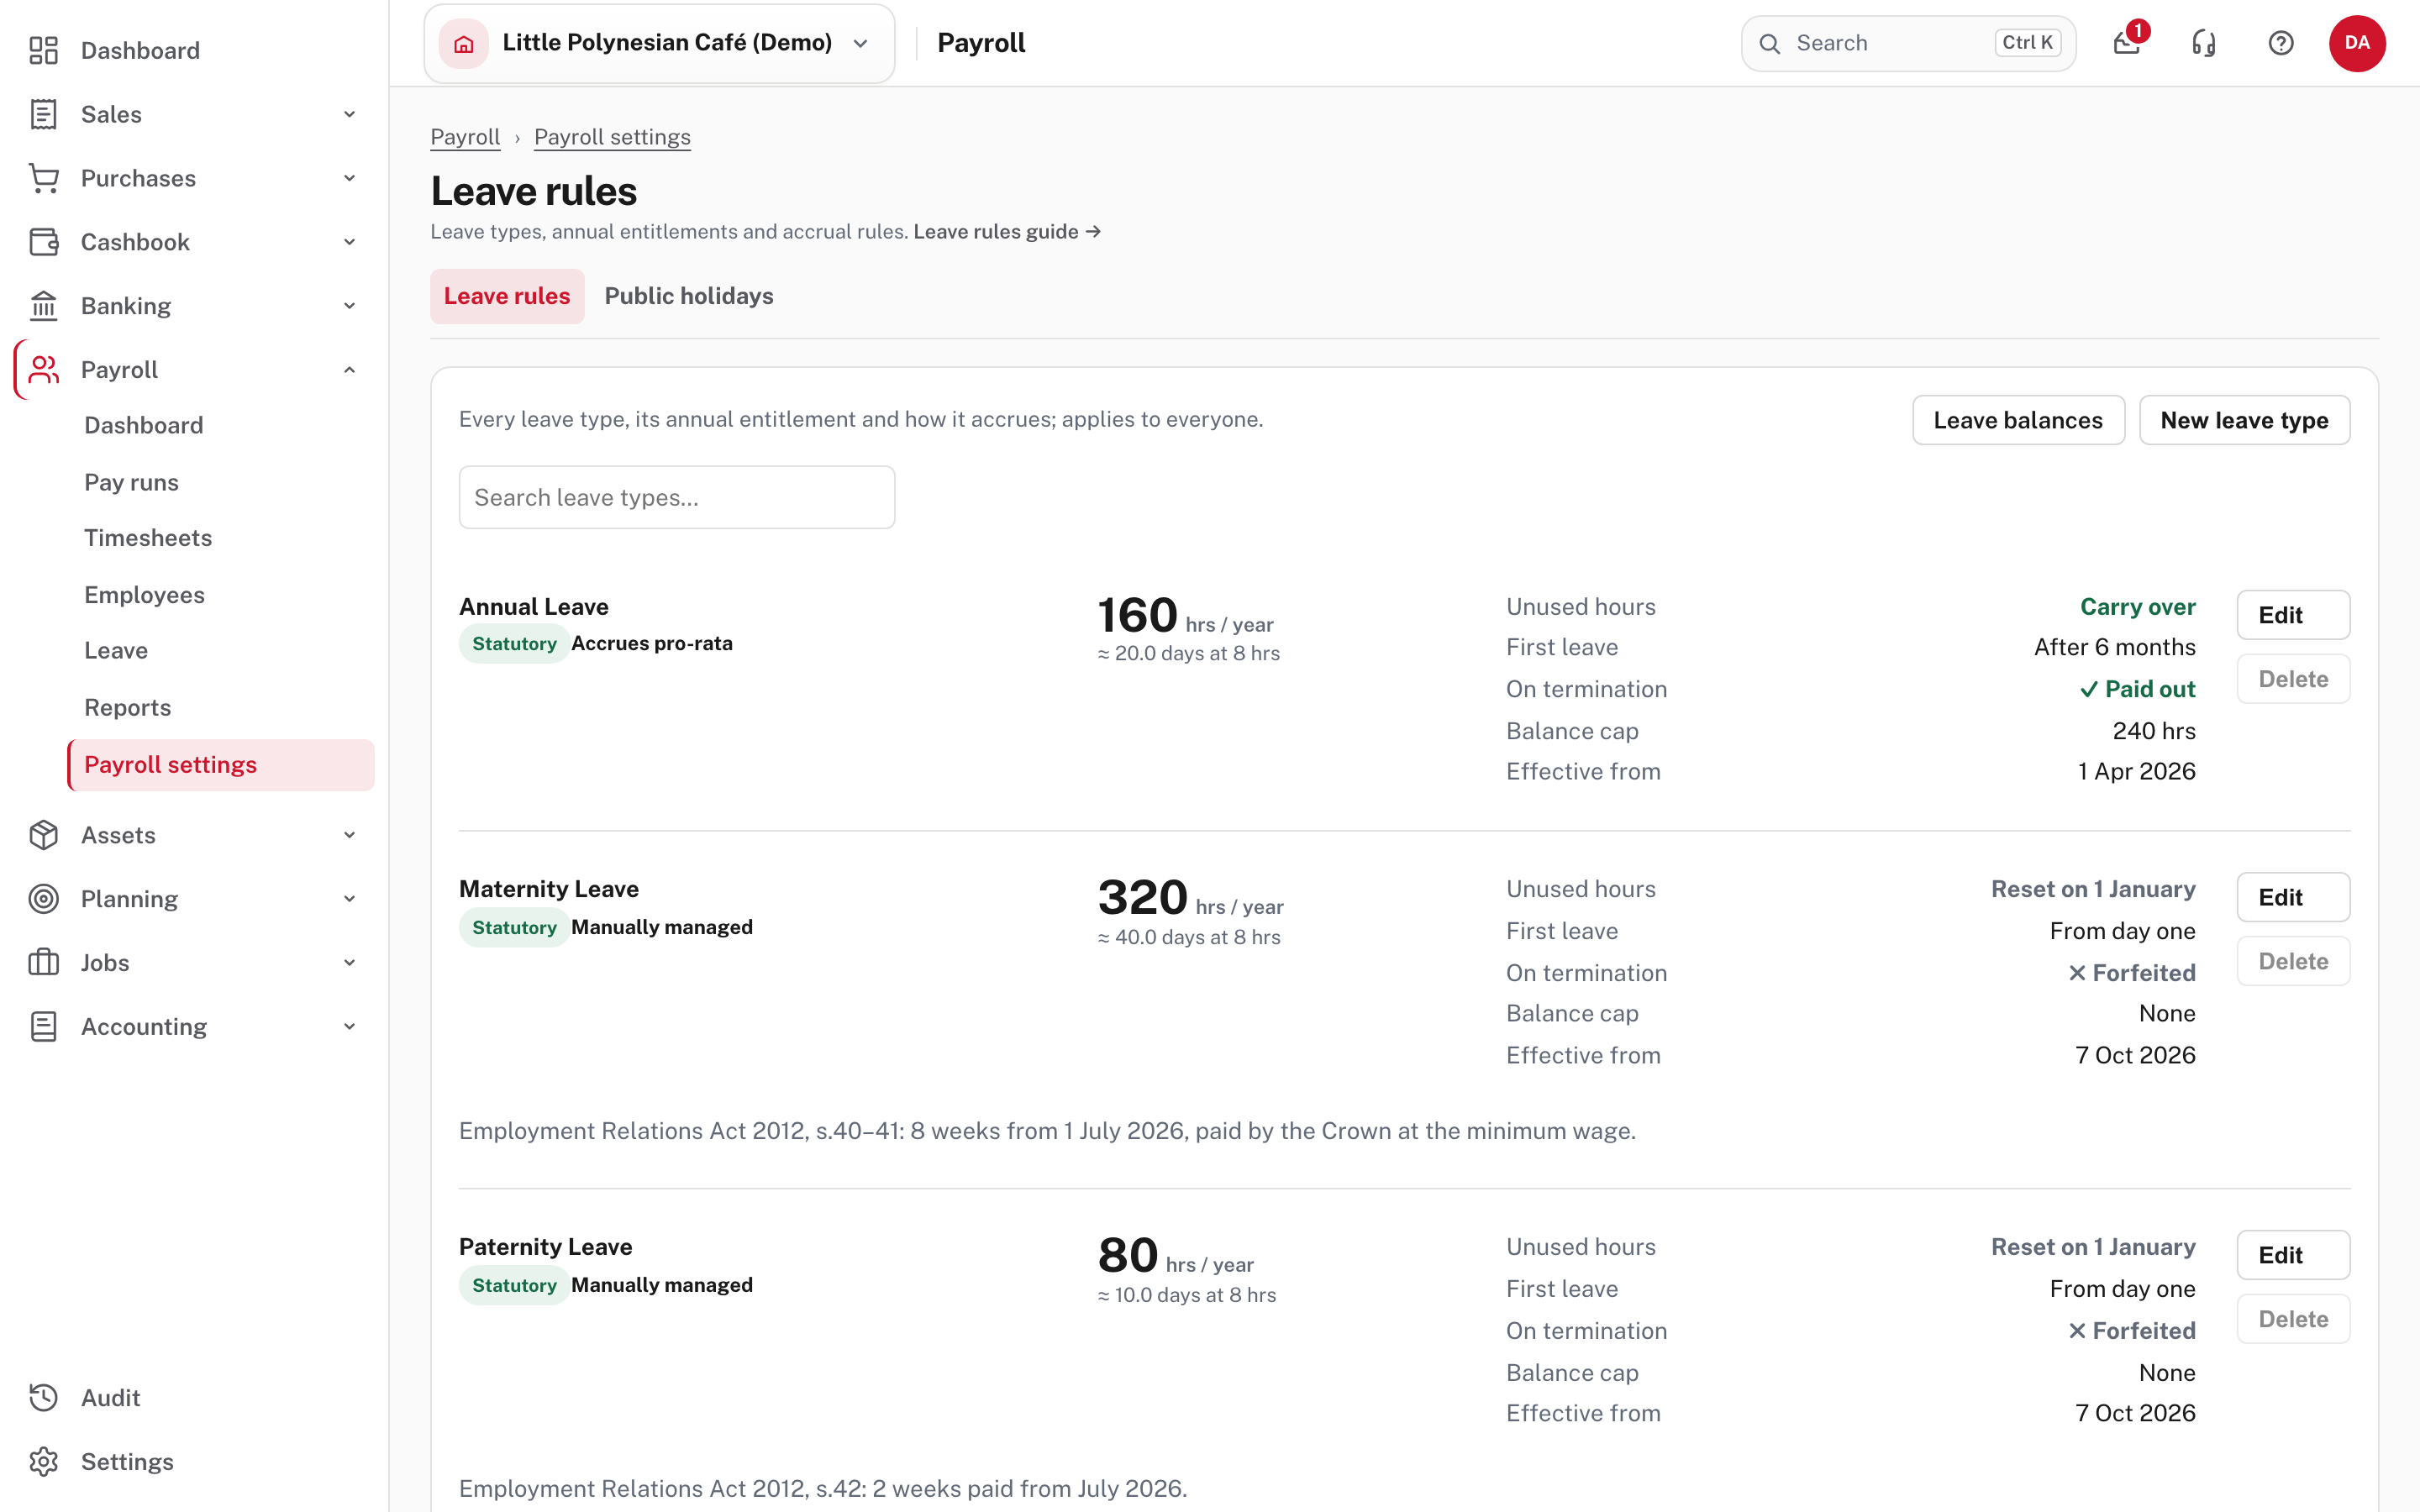
Each leave type shows its yearly entitlement, how it accrues, whether unused hours carry over, what happens on termination, any balance cap, and the date it takes effect. Statutory types are marked Statutory. Check the entitlements, then use New leave type if you offer something extra.
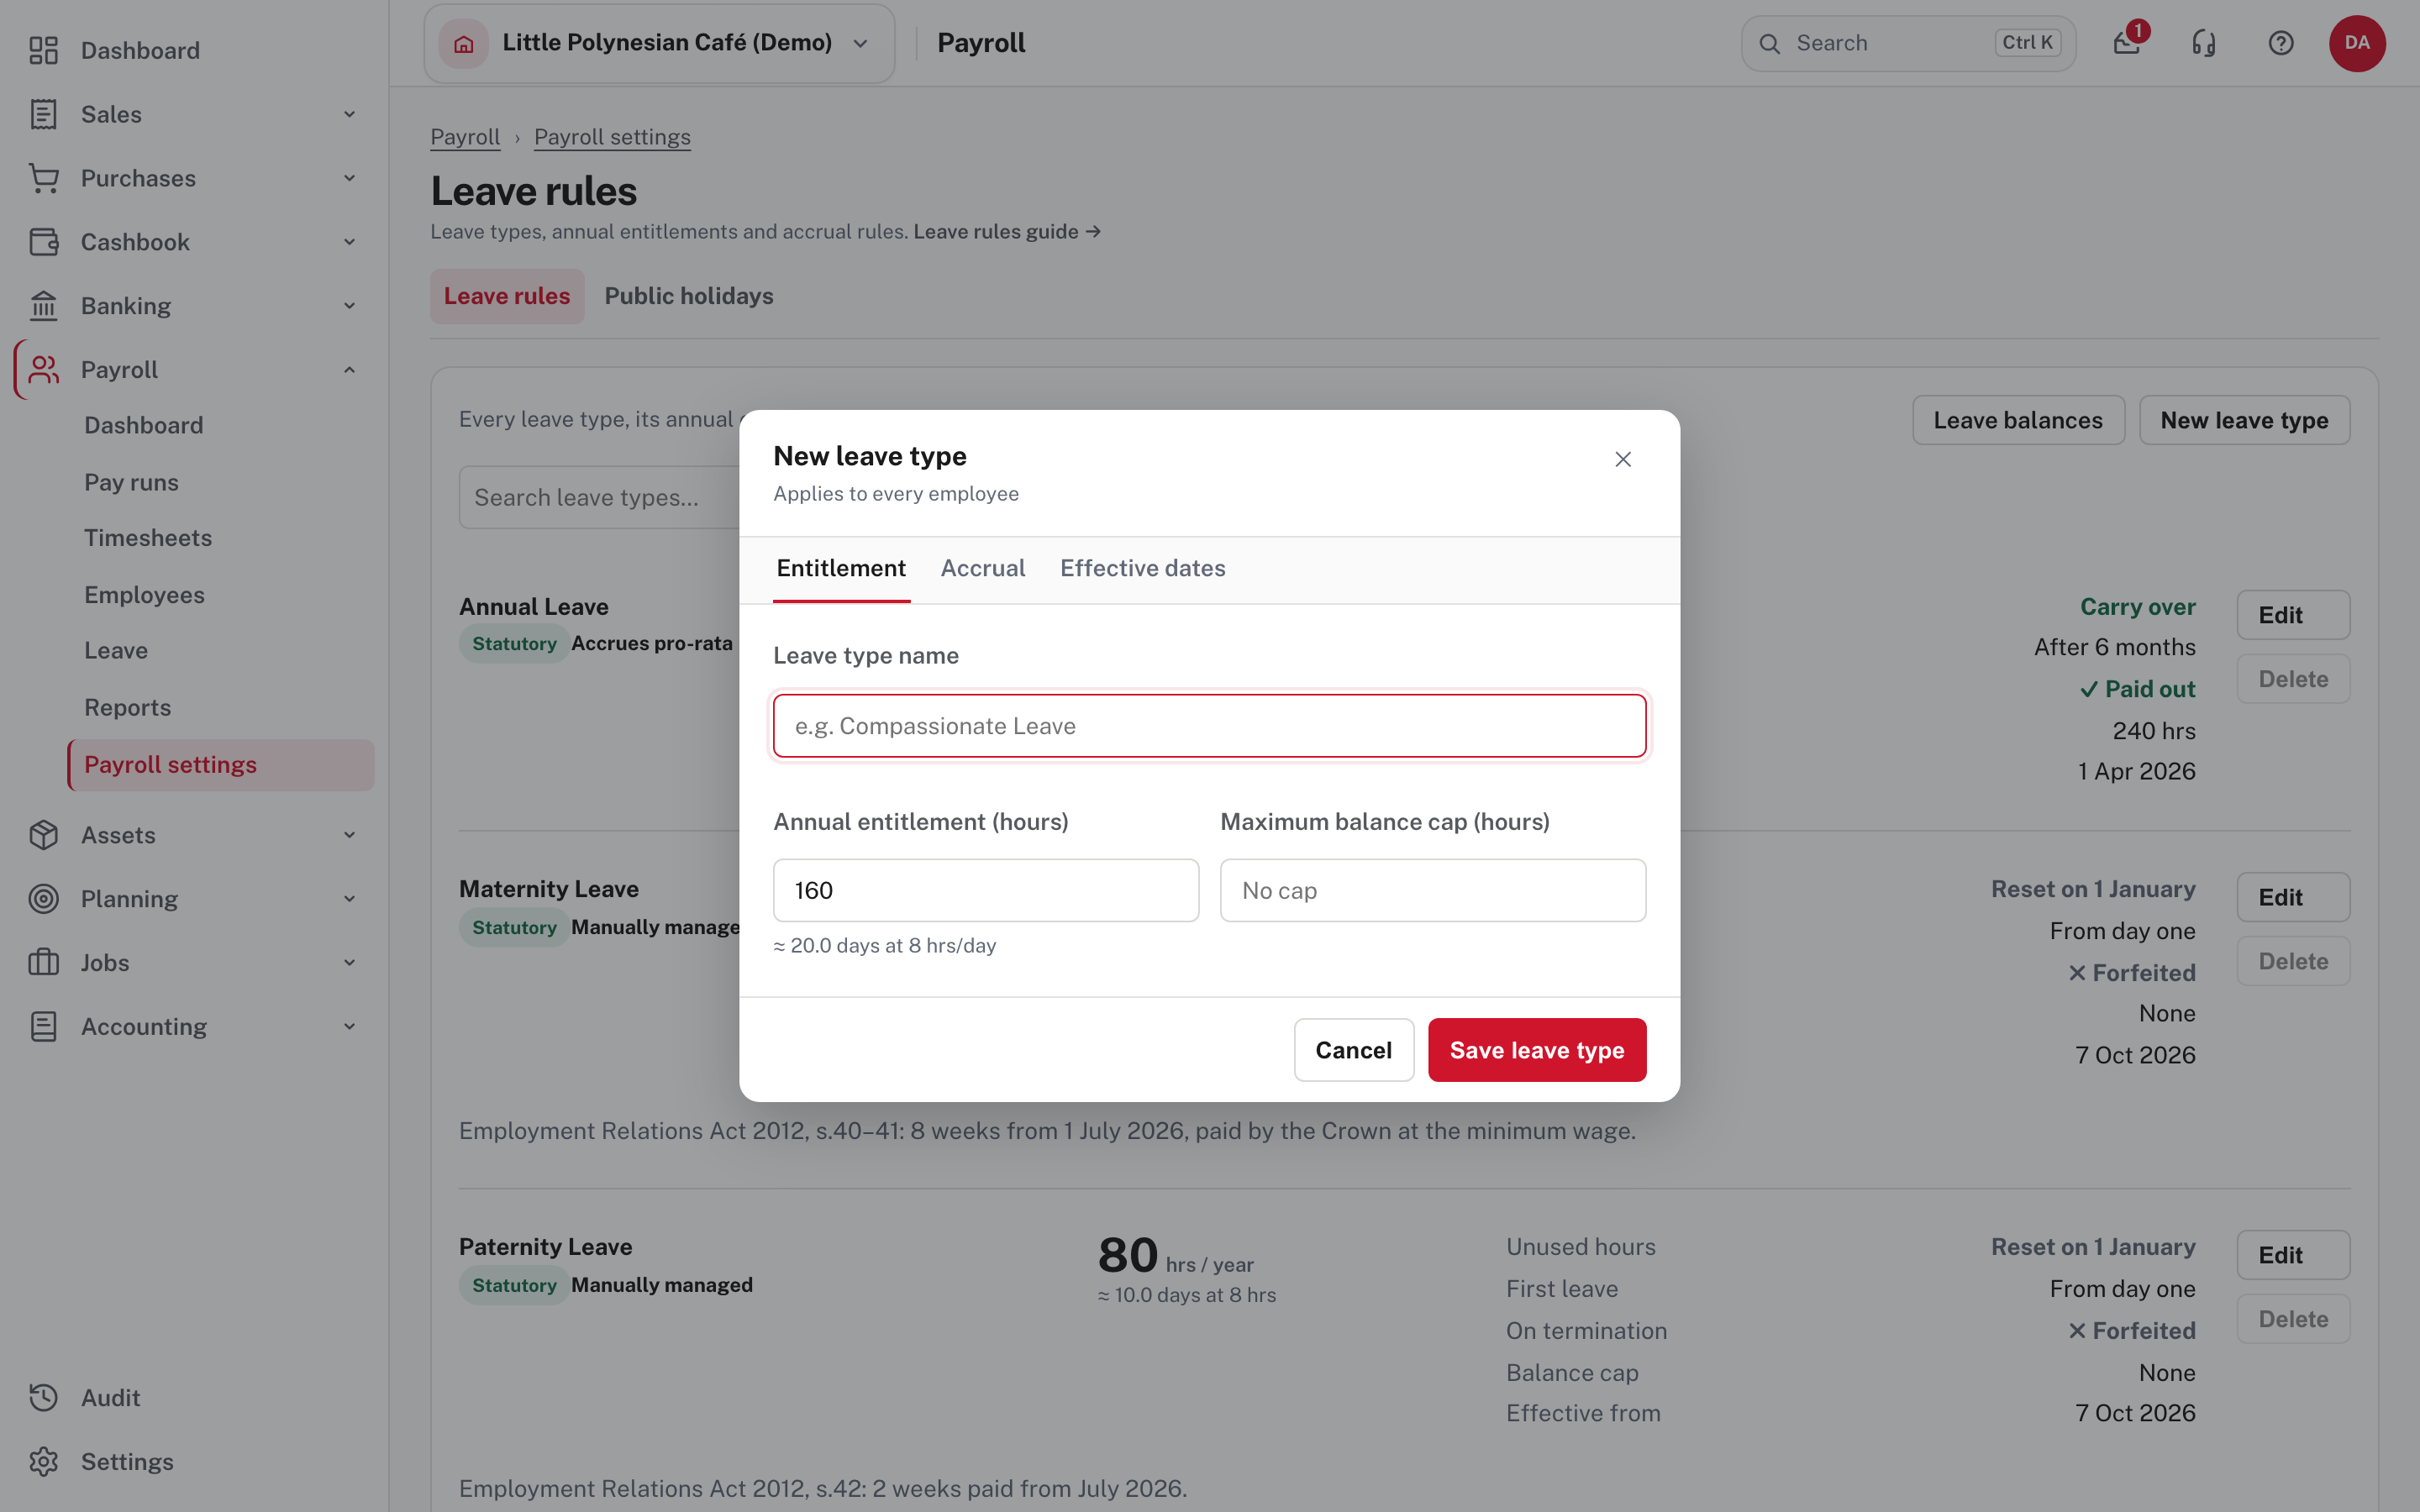
The form has three tabs. Entitlement: the name, the annual entitlement in hours and an optional maximum balance. Accrual and Effective dates: how the hours build up and the date the rule starts. A leave type applies to every employee.
Public holidays
Easy pays and marks public holidays from the list you keep here, so it must be filled in every year. Choose the year at the top right.
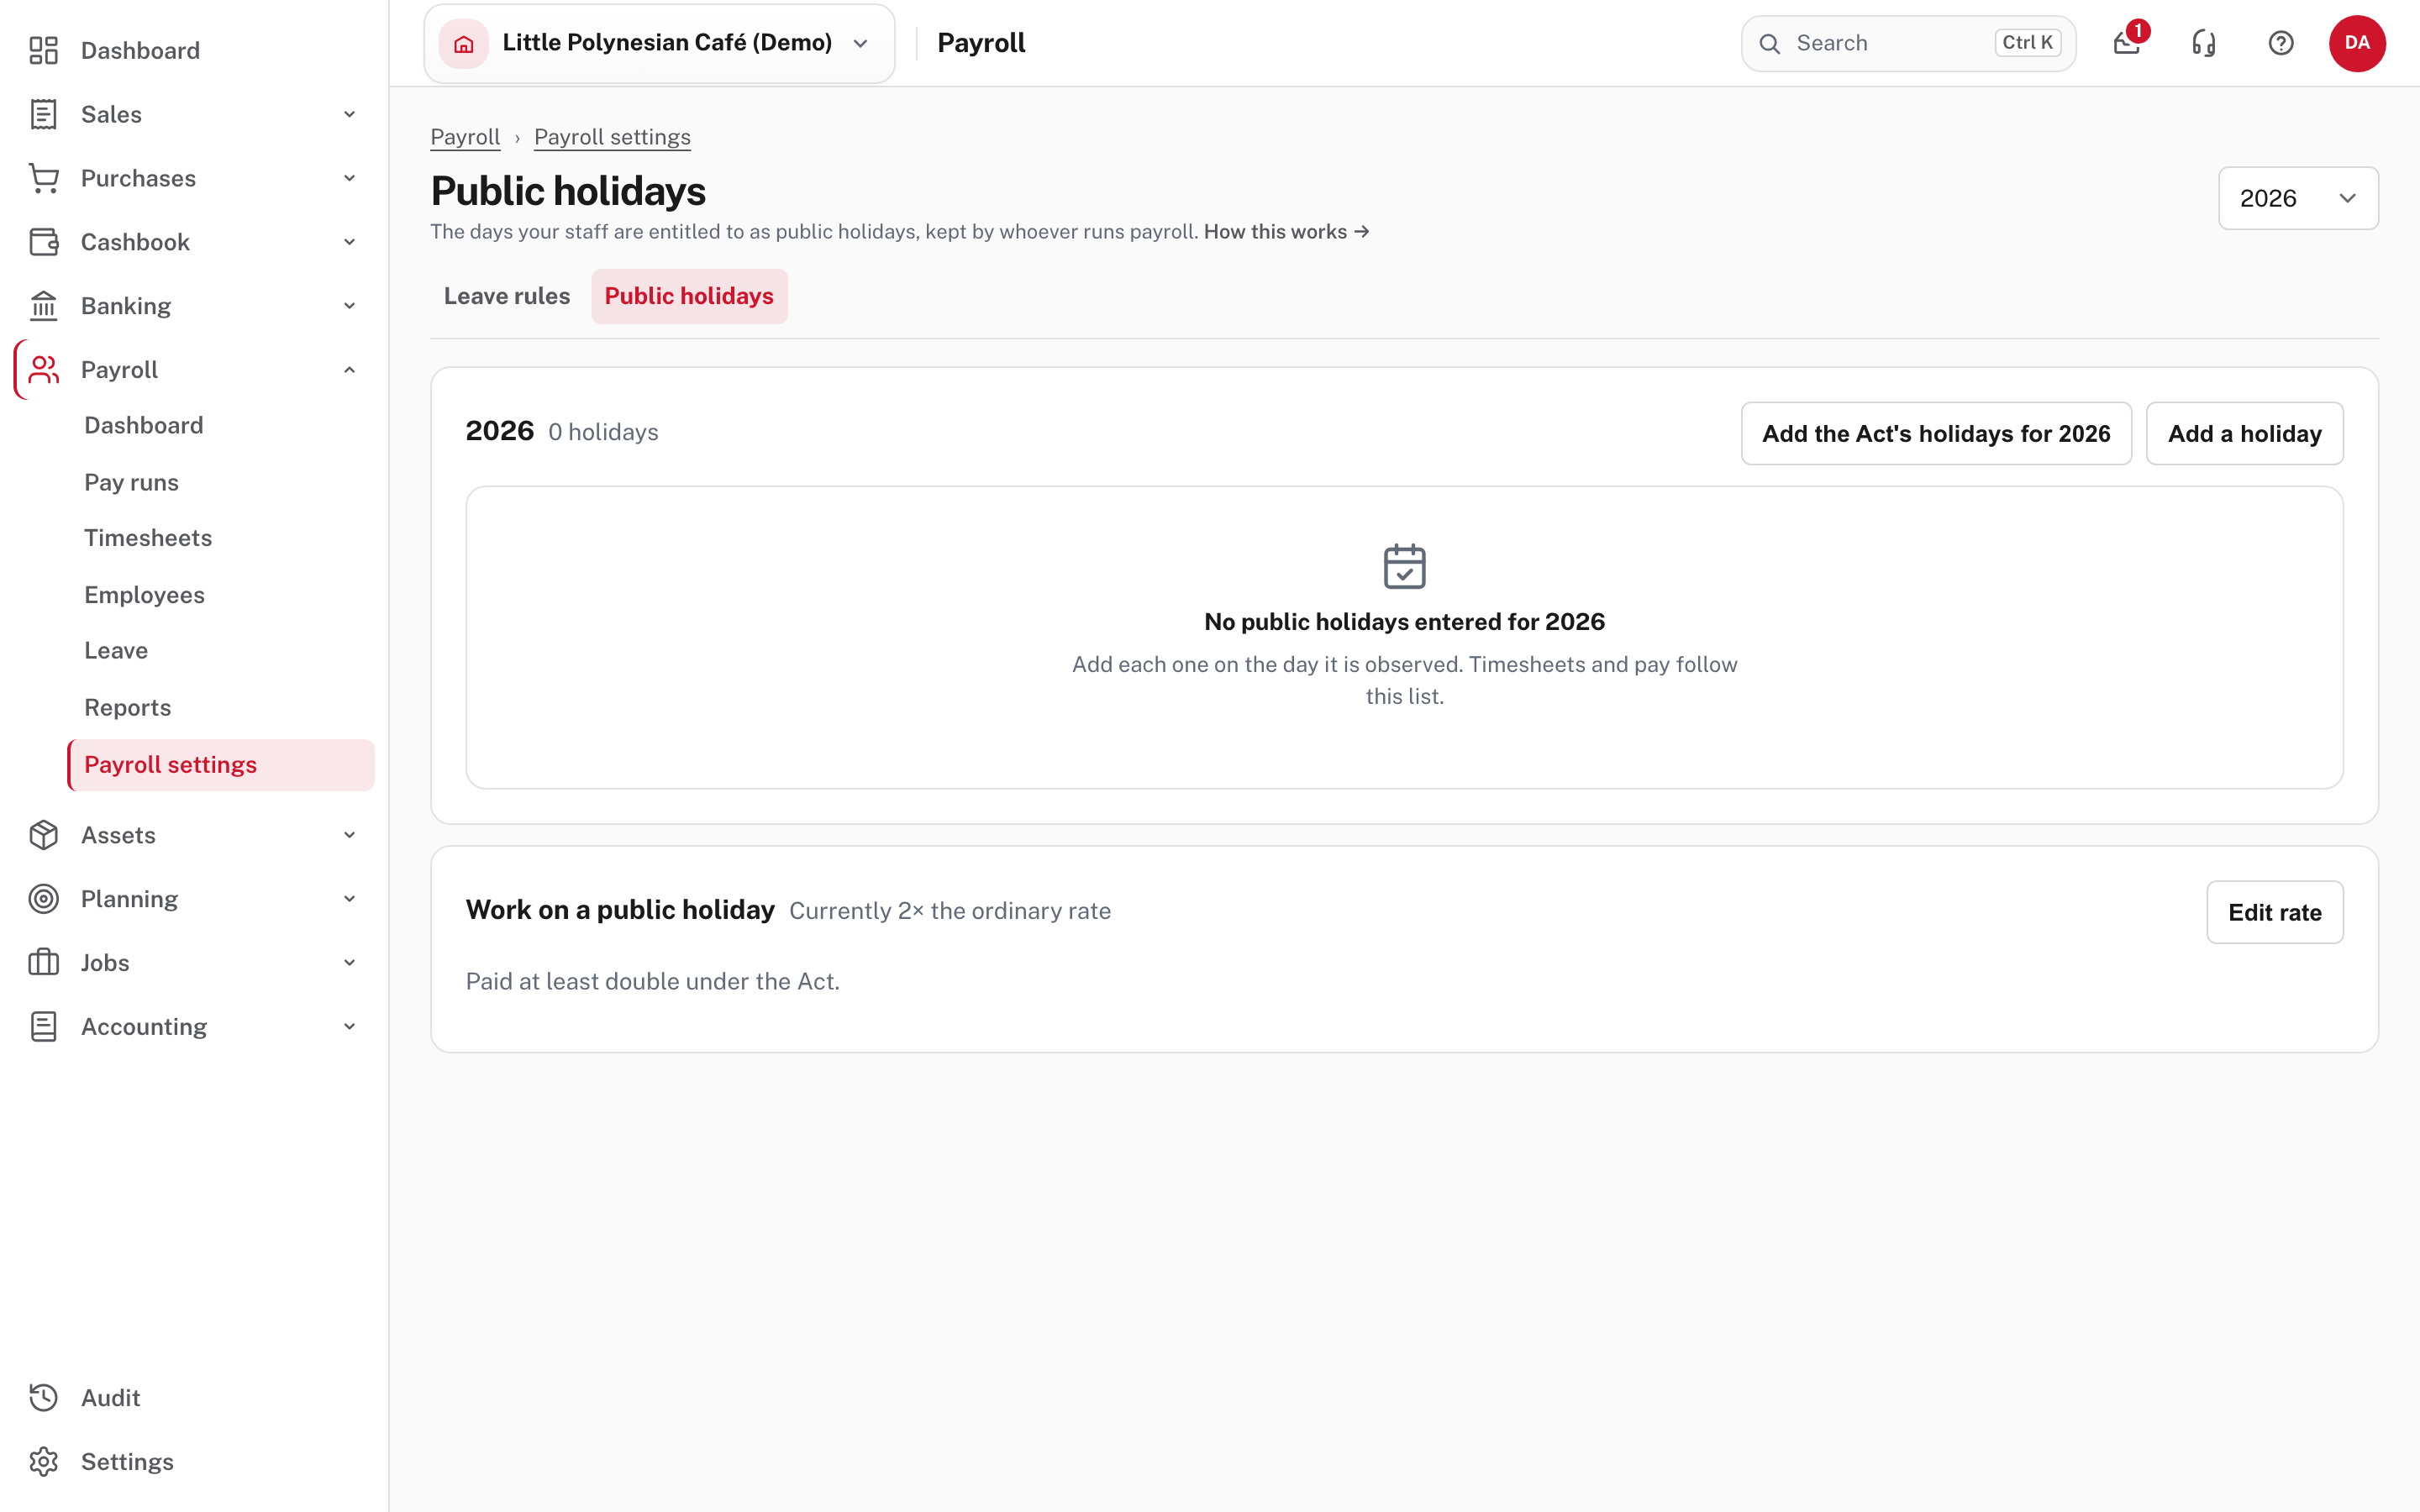
Add the Act's holidays for the year puts the Public Holidays Act's national days on the list in one go.
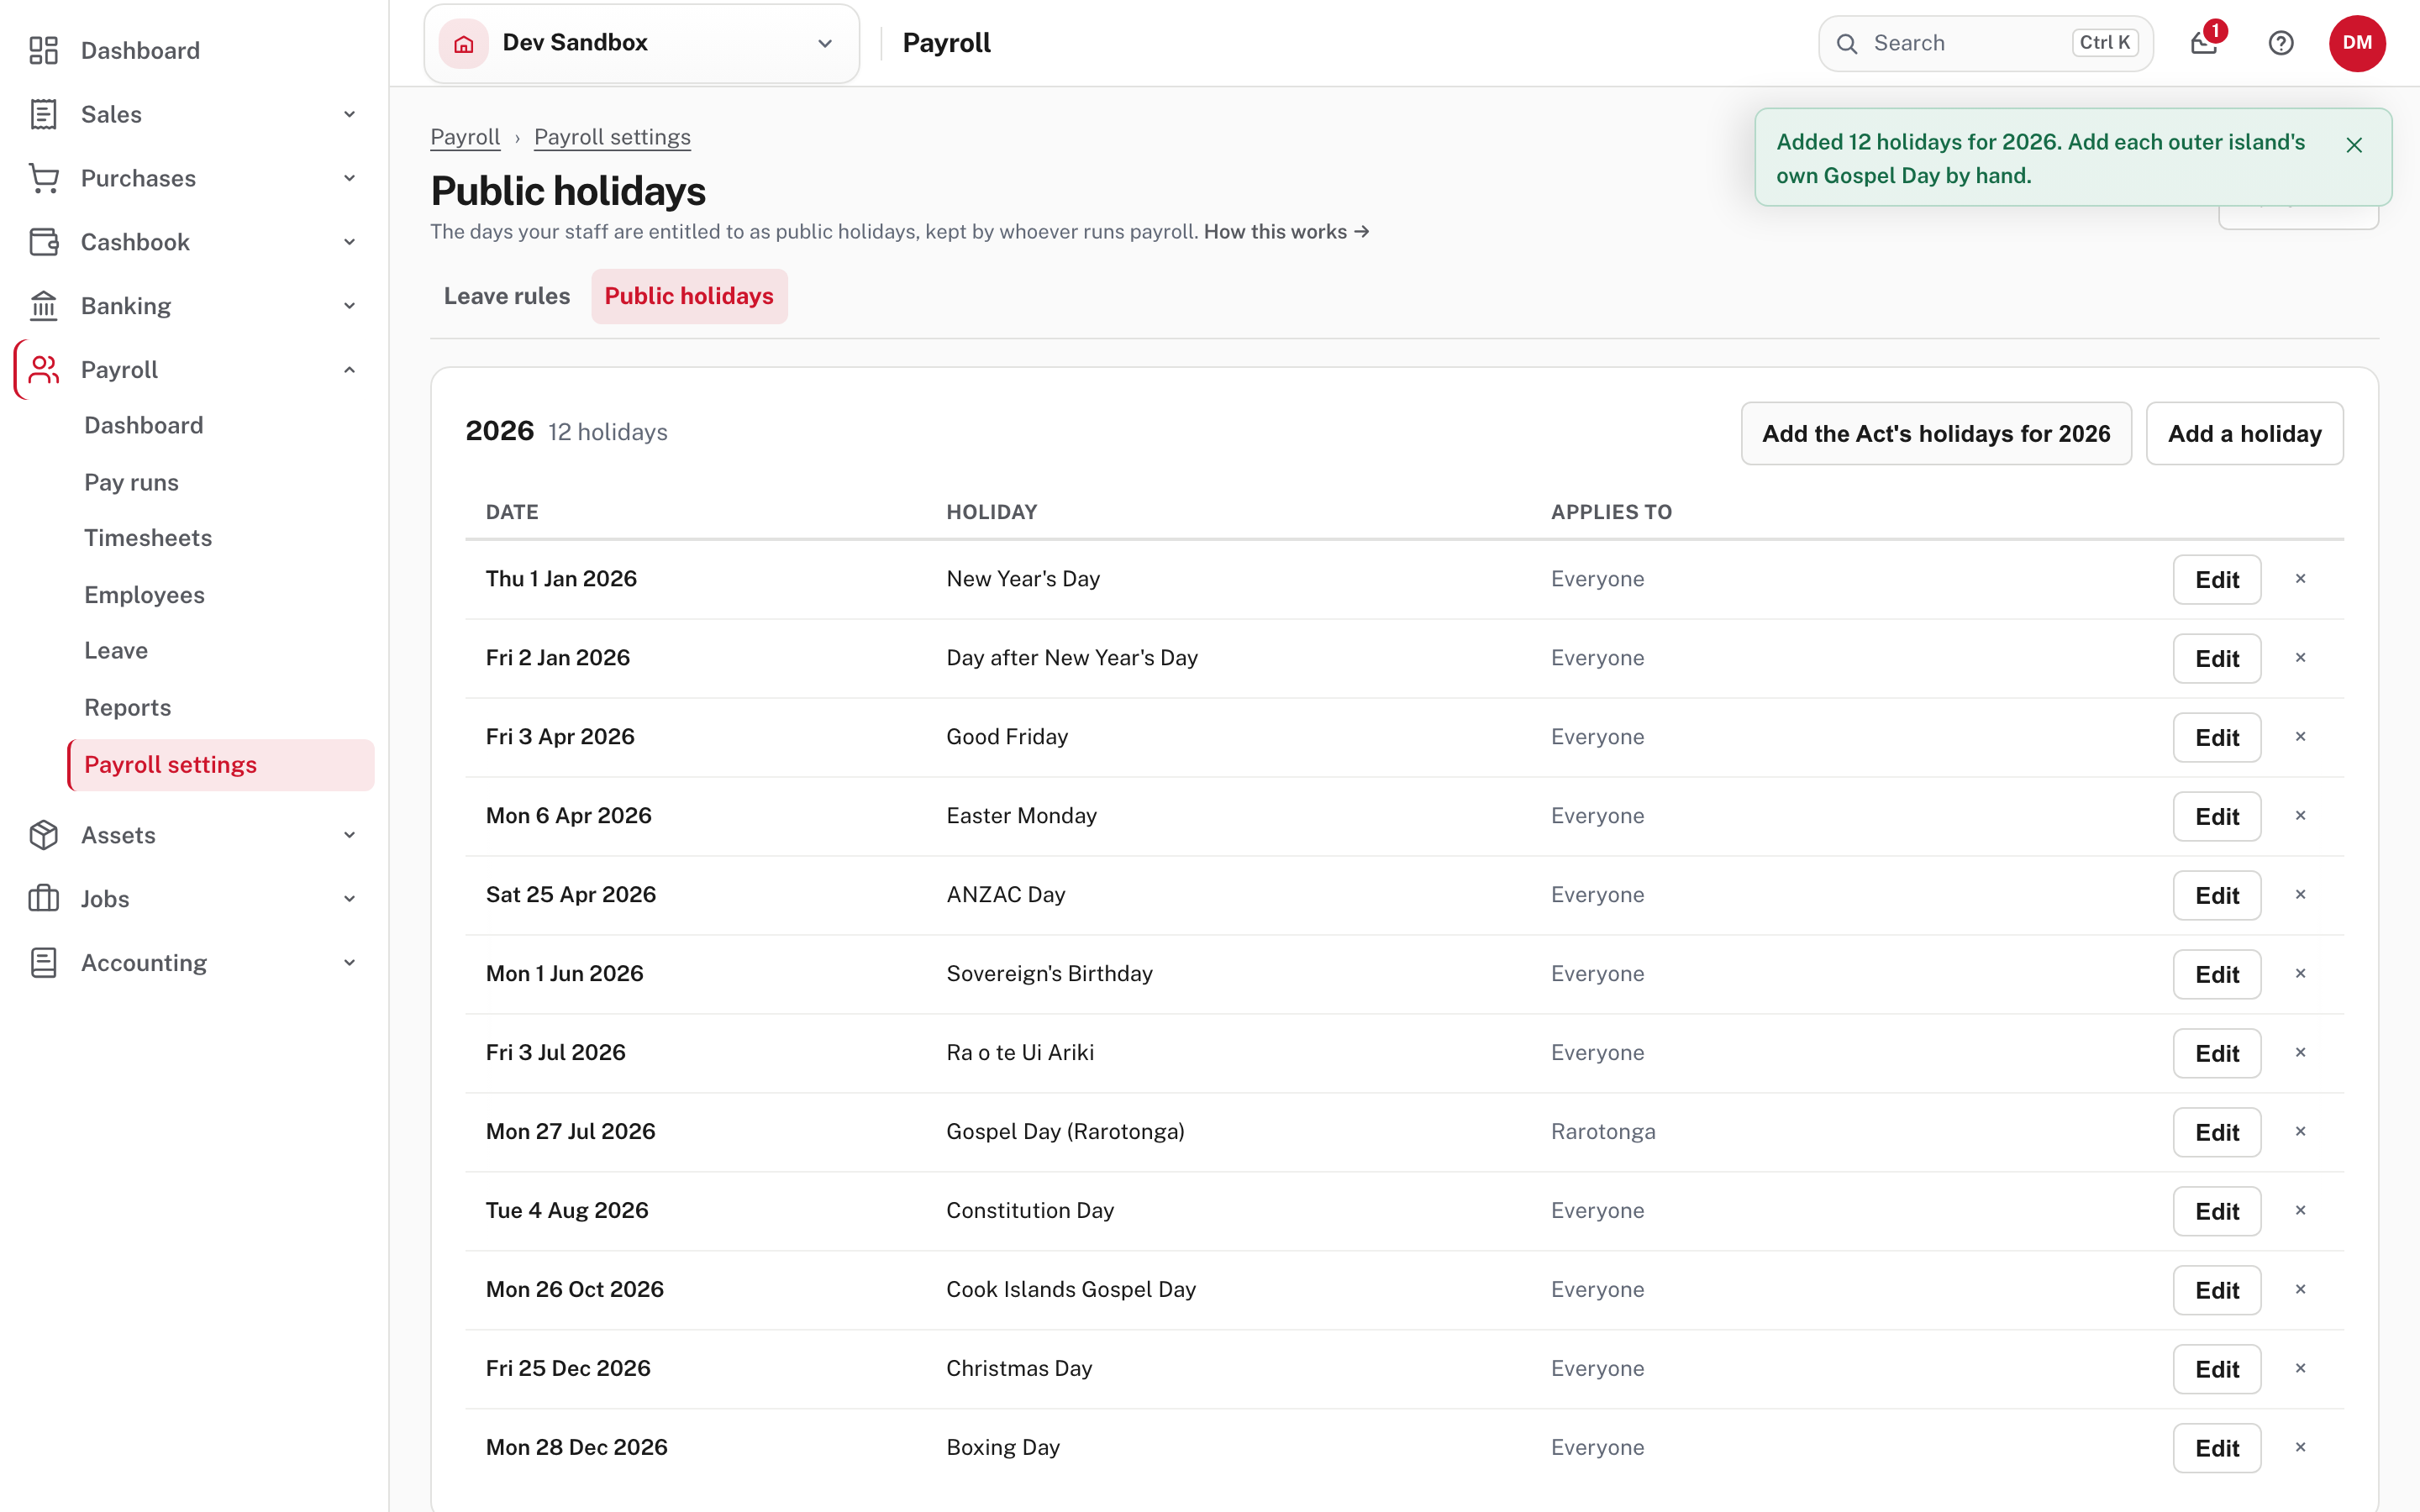
- Weekend days are already moved to the day they are observed. Gospel Day for Rarotonga is added for Rarotonga only; the rest apply to everyone.
- Days already on the list are kept, so your own additions and corrections survive a second run.
- Each outer island's own Gospel Day is not added. Enter it yourself with Add a holiday, as a Pa Enua holiday.
- Check the generated dates against the current notice. If a holiday is moved (for example, to a Monday), Edit it to the day it is observed.
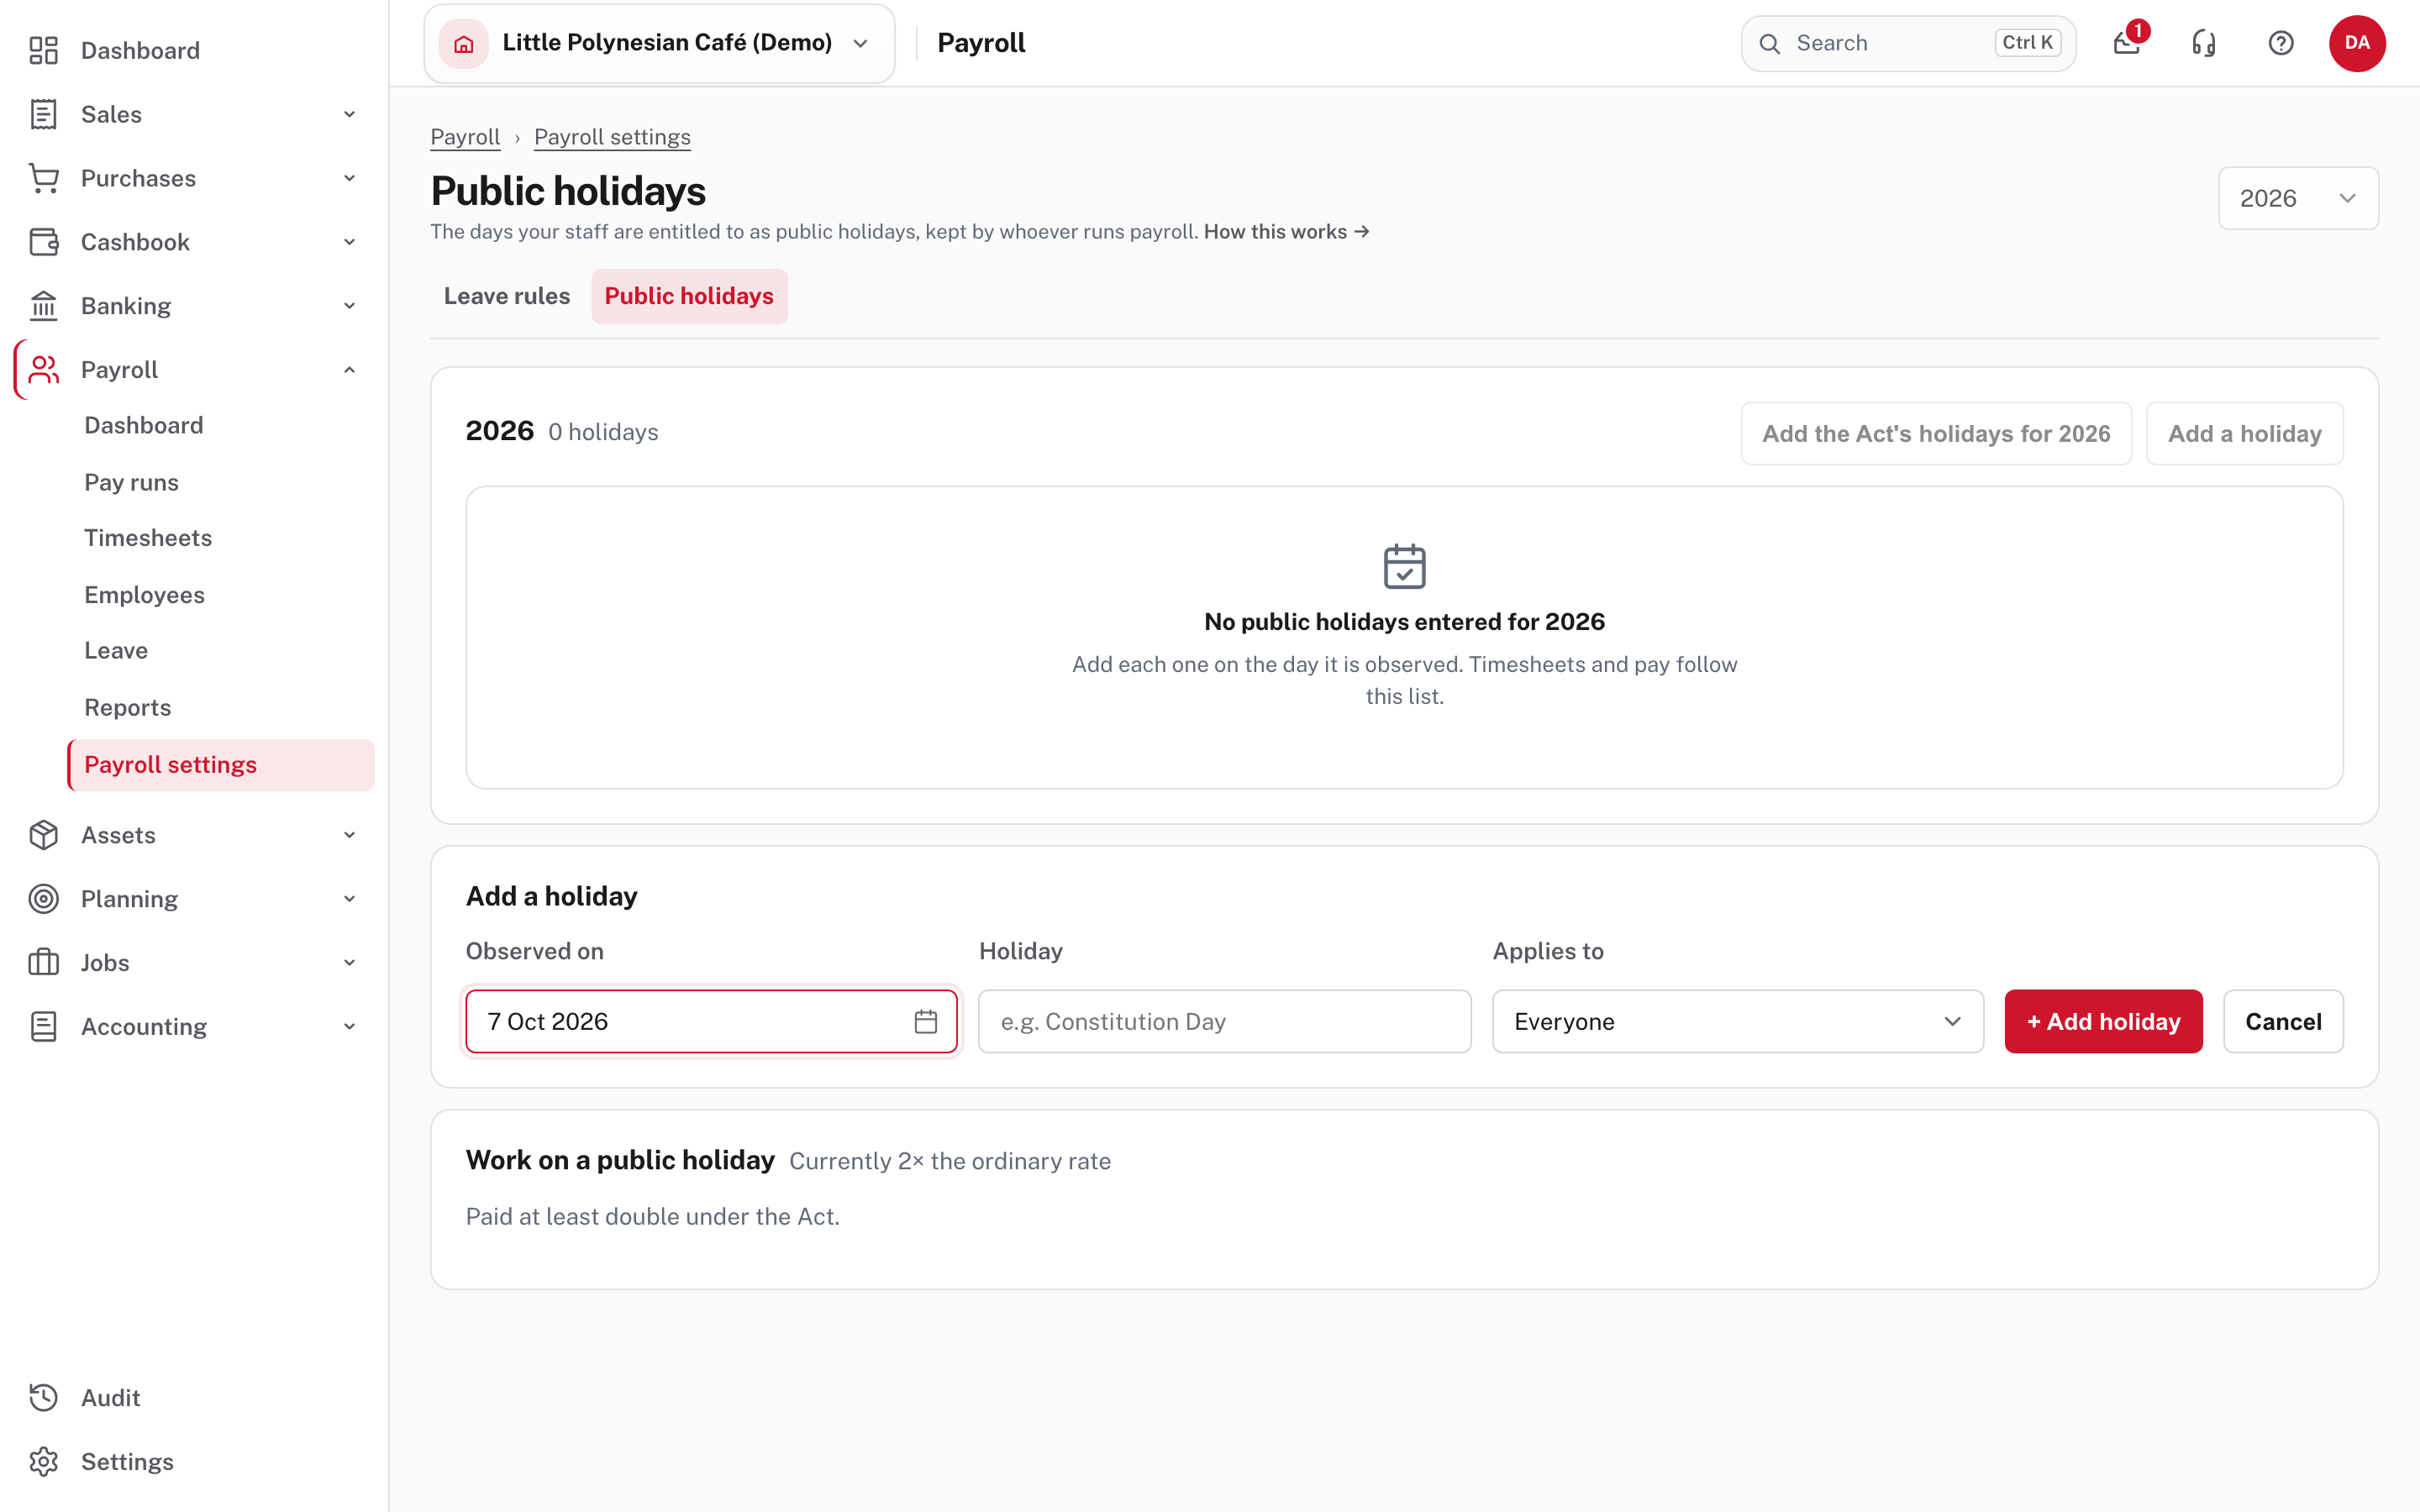
Add a holiday asks for the day it is observed, its name, and who it applies to (everyone, Rarotonga or the Pa Enua).
Work on a public holiday sets the multiplier for people who work the day. It can't go below 2×.
More detail: Public holidays.
Step 7. Decide who approves what
Payroll settings → Approvals → Approval policies.
Each kind of request has a row: pay runs, bank-detail changes, leave requests, timesheets, expense claims, new employees and pay-rate changes. Choose Edit to set who decides, who it is routed to, and who is emailed.
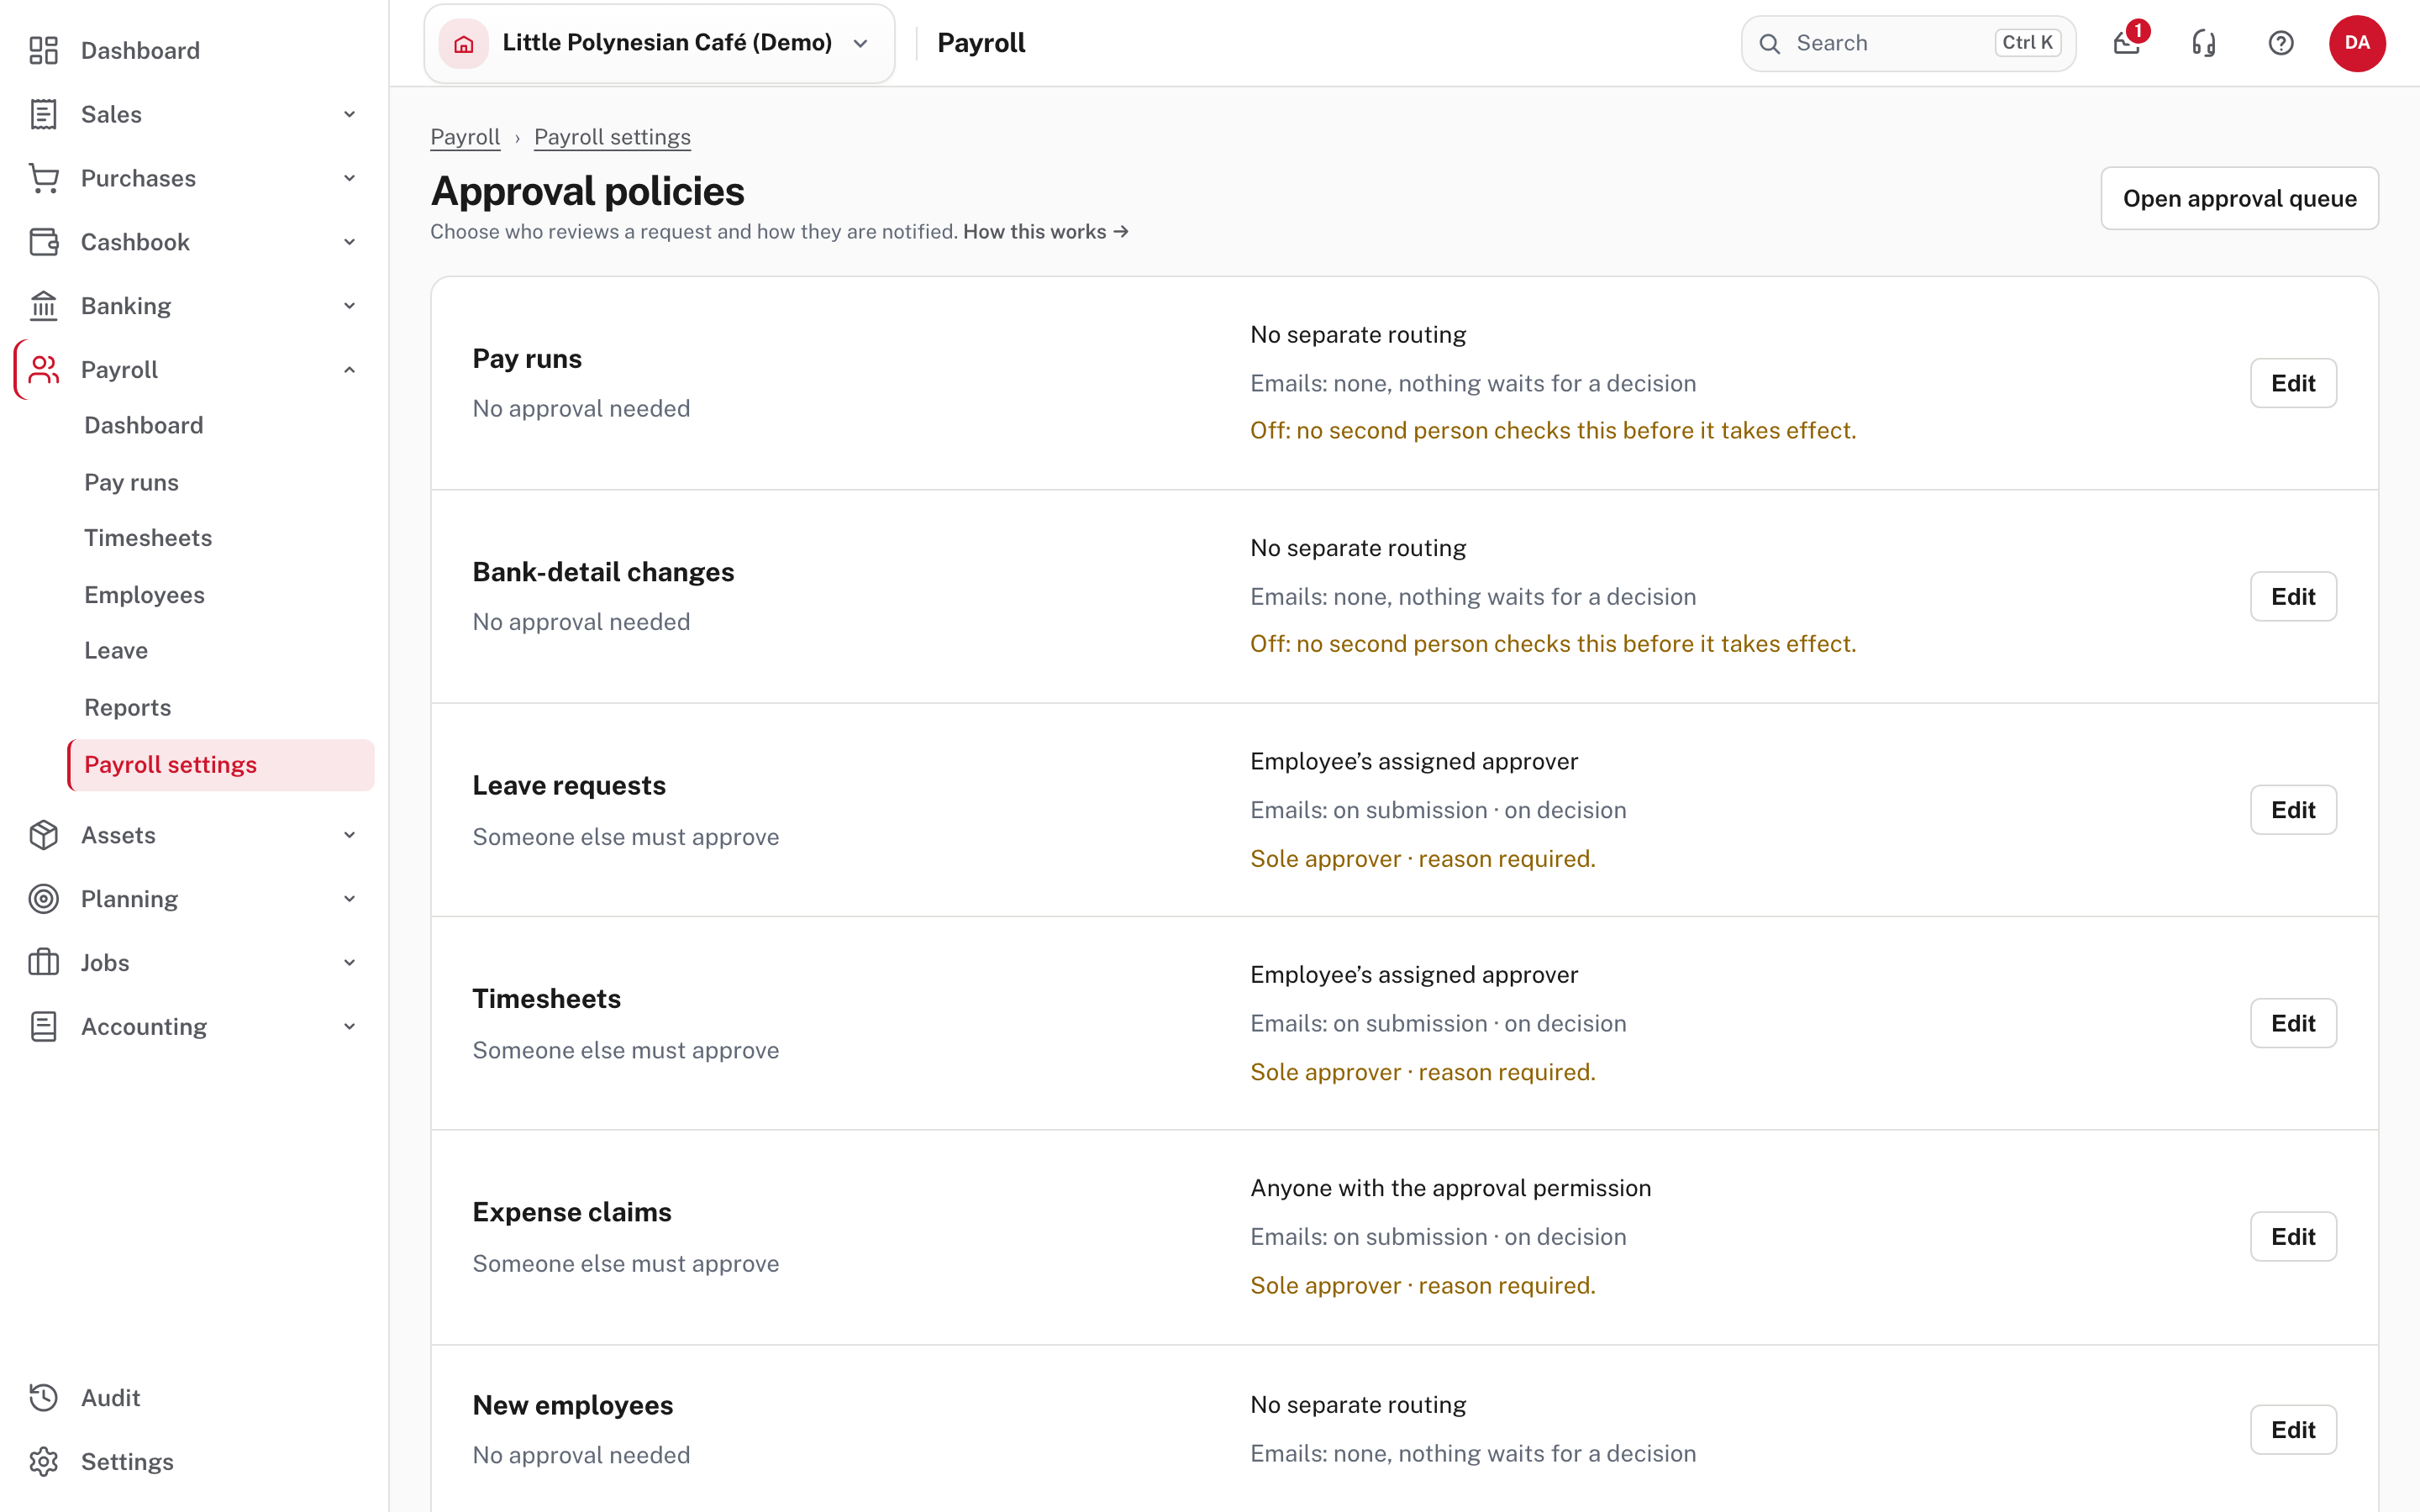
Two settings that matter most
A bank-detail change and a pay run are the two ways payroll fraud usually happens: a changed bank account, and a pay run nobody else looks at. Easy lets you set them to No approval needed (and warns you on the page), but if more than one person works on payroll, ask for a second person on both.
Leave and timesheet requests go to each employee's assigned approver, which you choose on the employee's record in step 9. If a person is the only approver in the company, Easy lets them approve their own entries and records why.
More detail: Payroll approvals and controls and How leave approval works.
Step 8. Employee access and emails
Two more sections of Payroll settings affect how a pay run behaves. Neither blocks setup, but decide them before the first run.
- Employee access & records: whether employees get a self-service login, whether employees enter their own timesheets (otherwise someone in payroll keys each person's hours), and how long a former employee's personal data is kept. Pay history and your accounts are not affected by that last setting.
- Emails & notifications: which payroll emails go out and their wording, and the delivery settings that actually send them. On a new company this can read Delivery not set up, in which case payslip and approval emails will not be sent until it is.
Step 9. Add your employees
Payroll → Employees → Add employee.
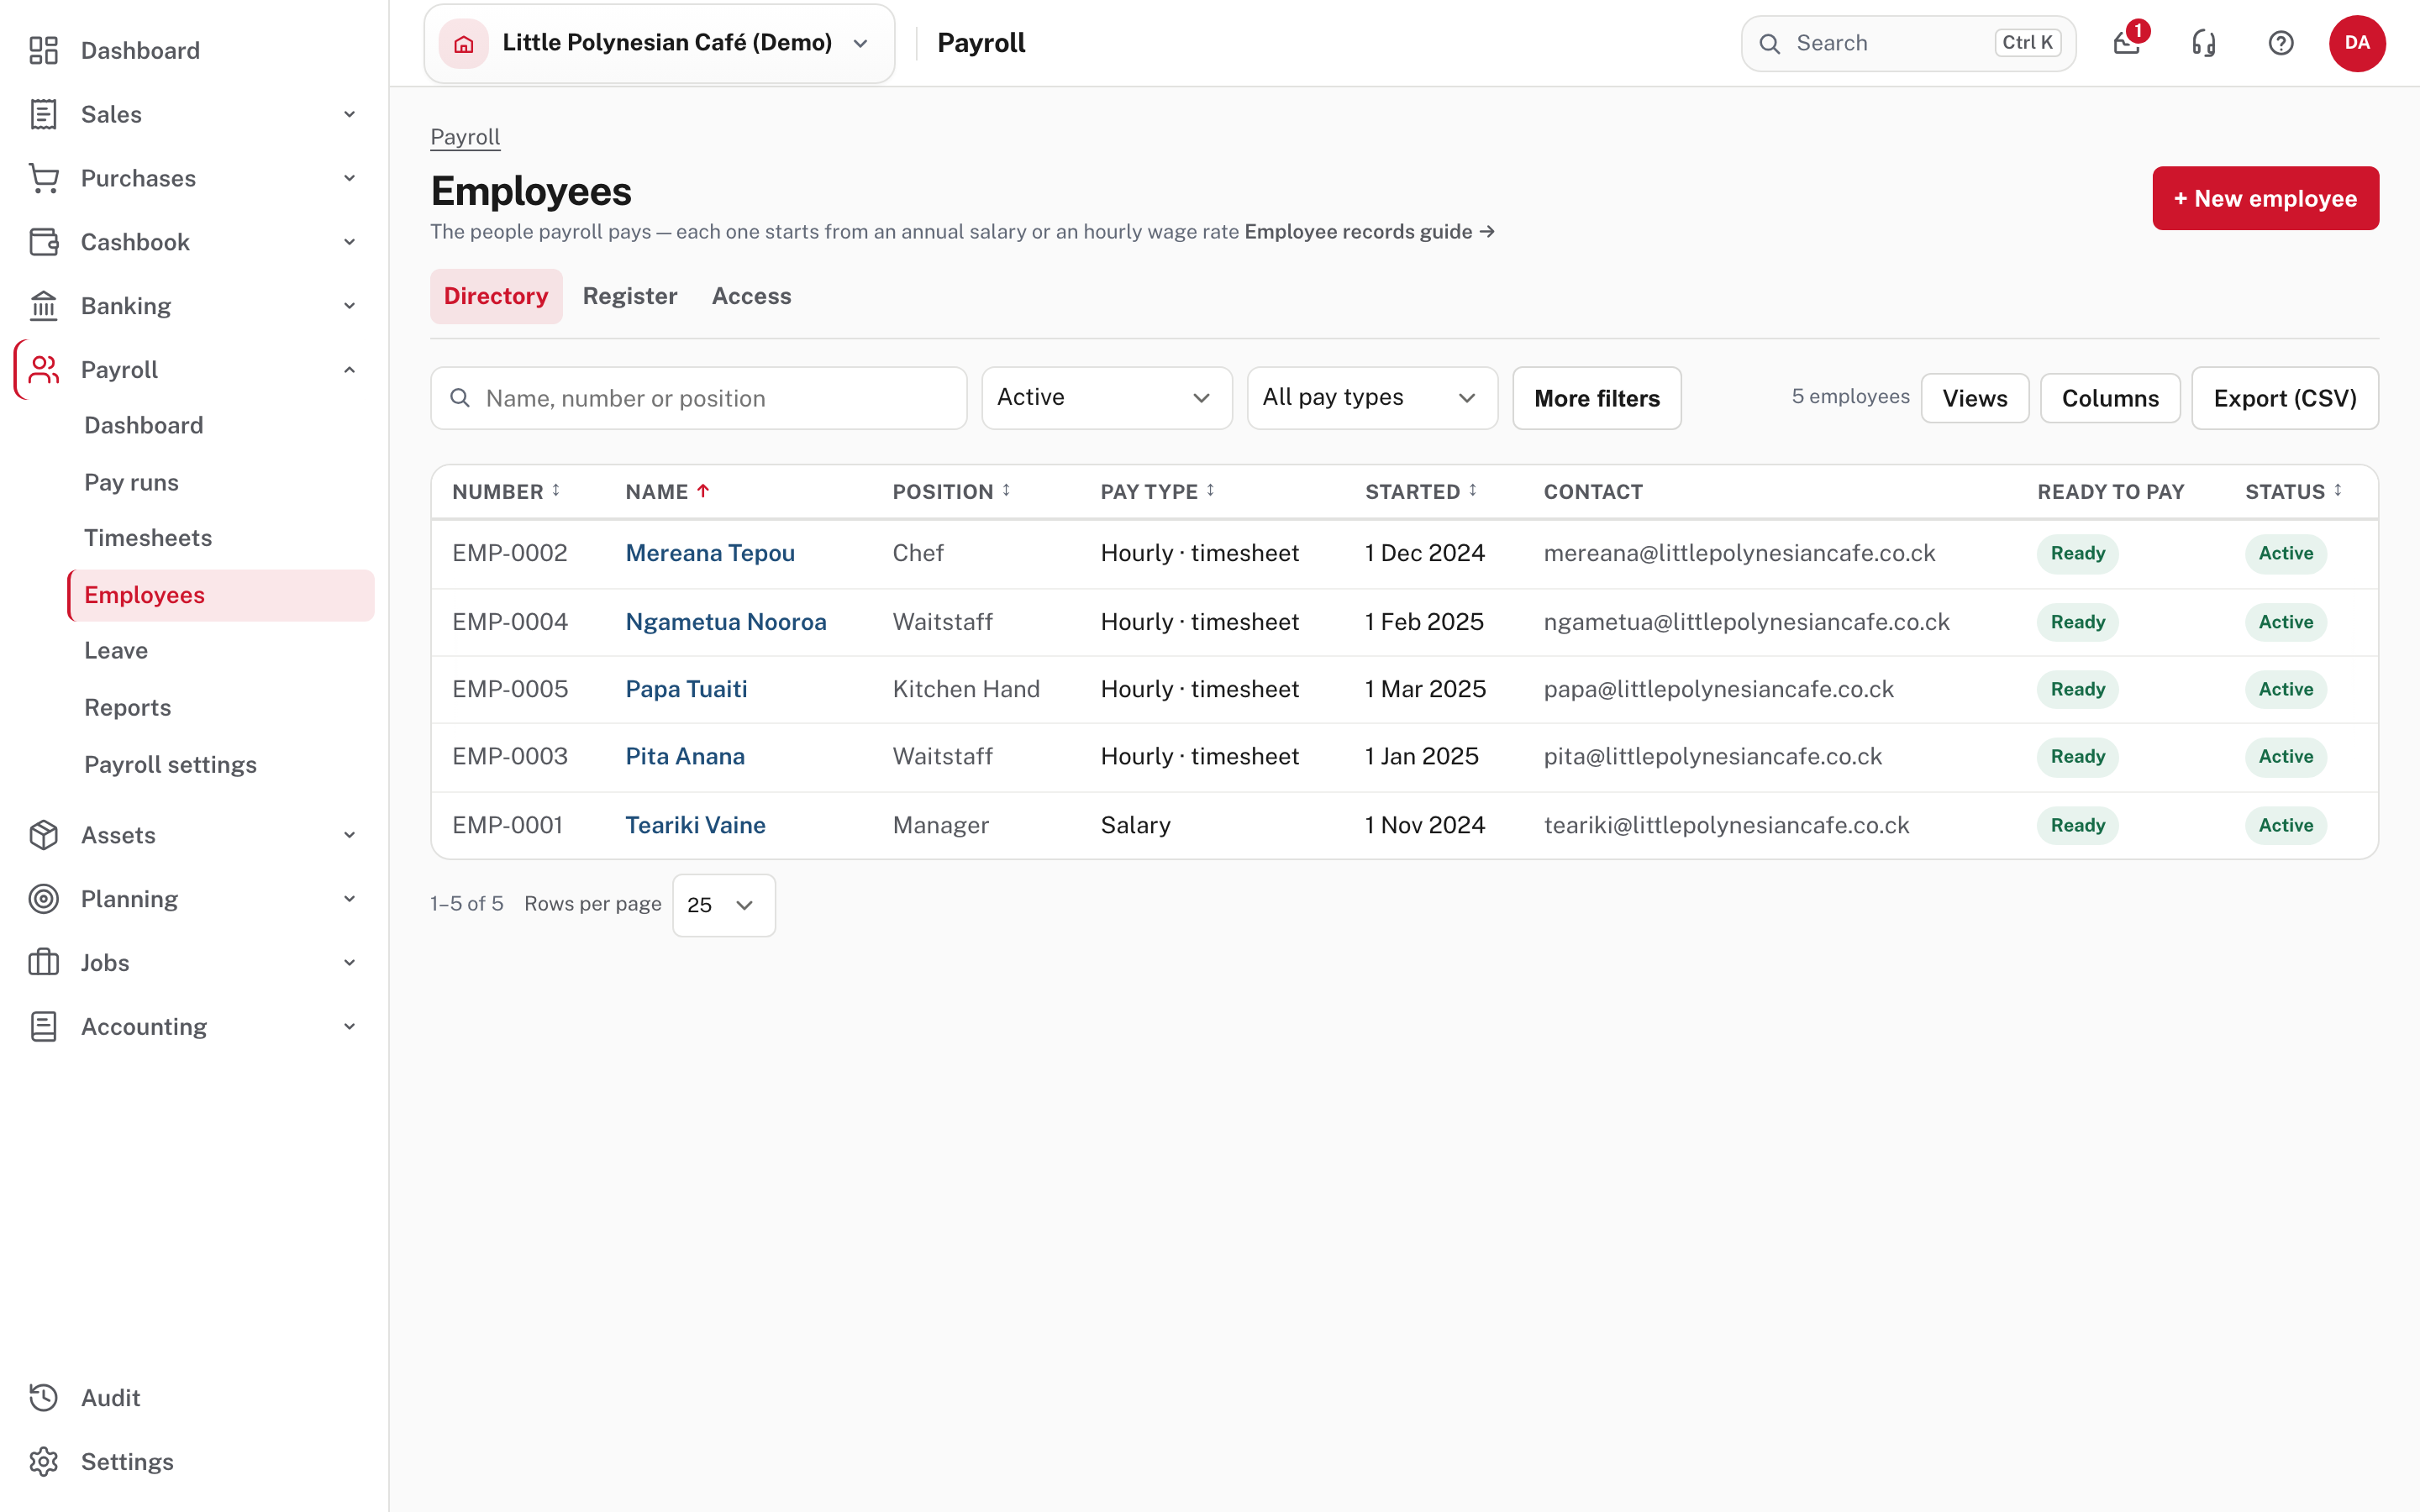
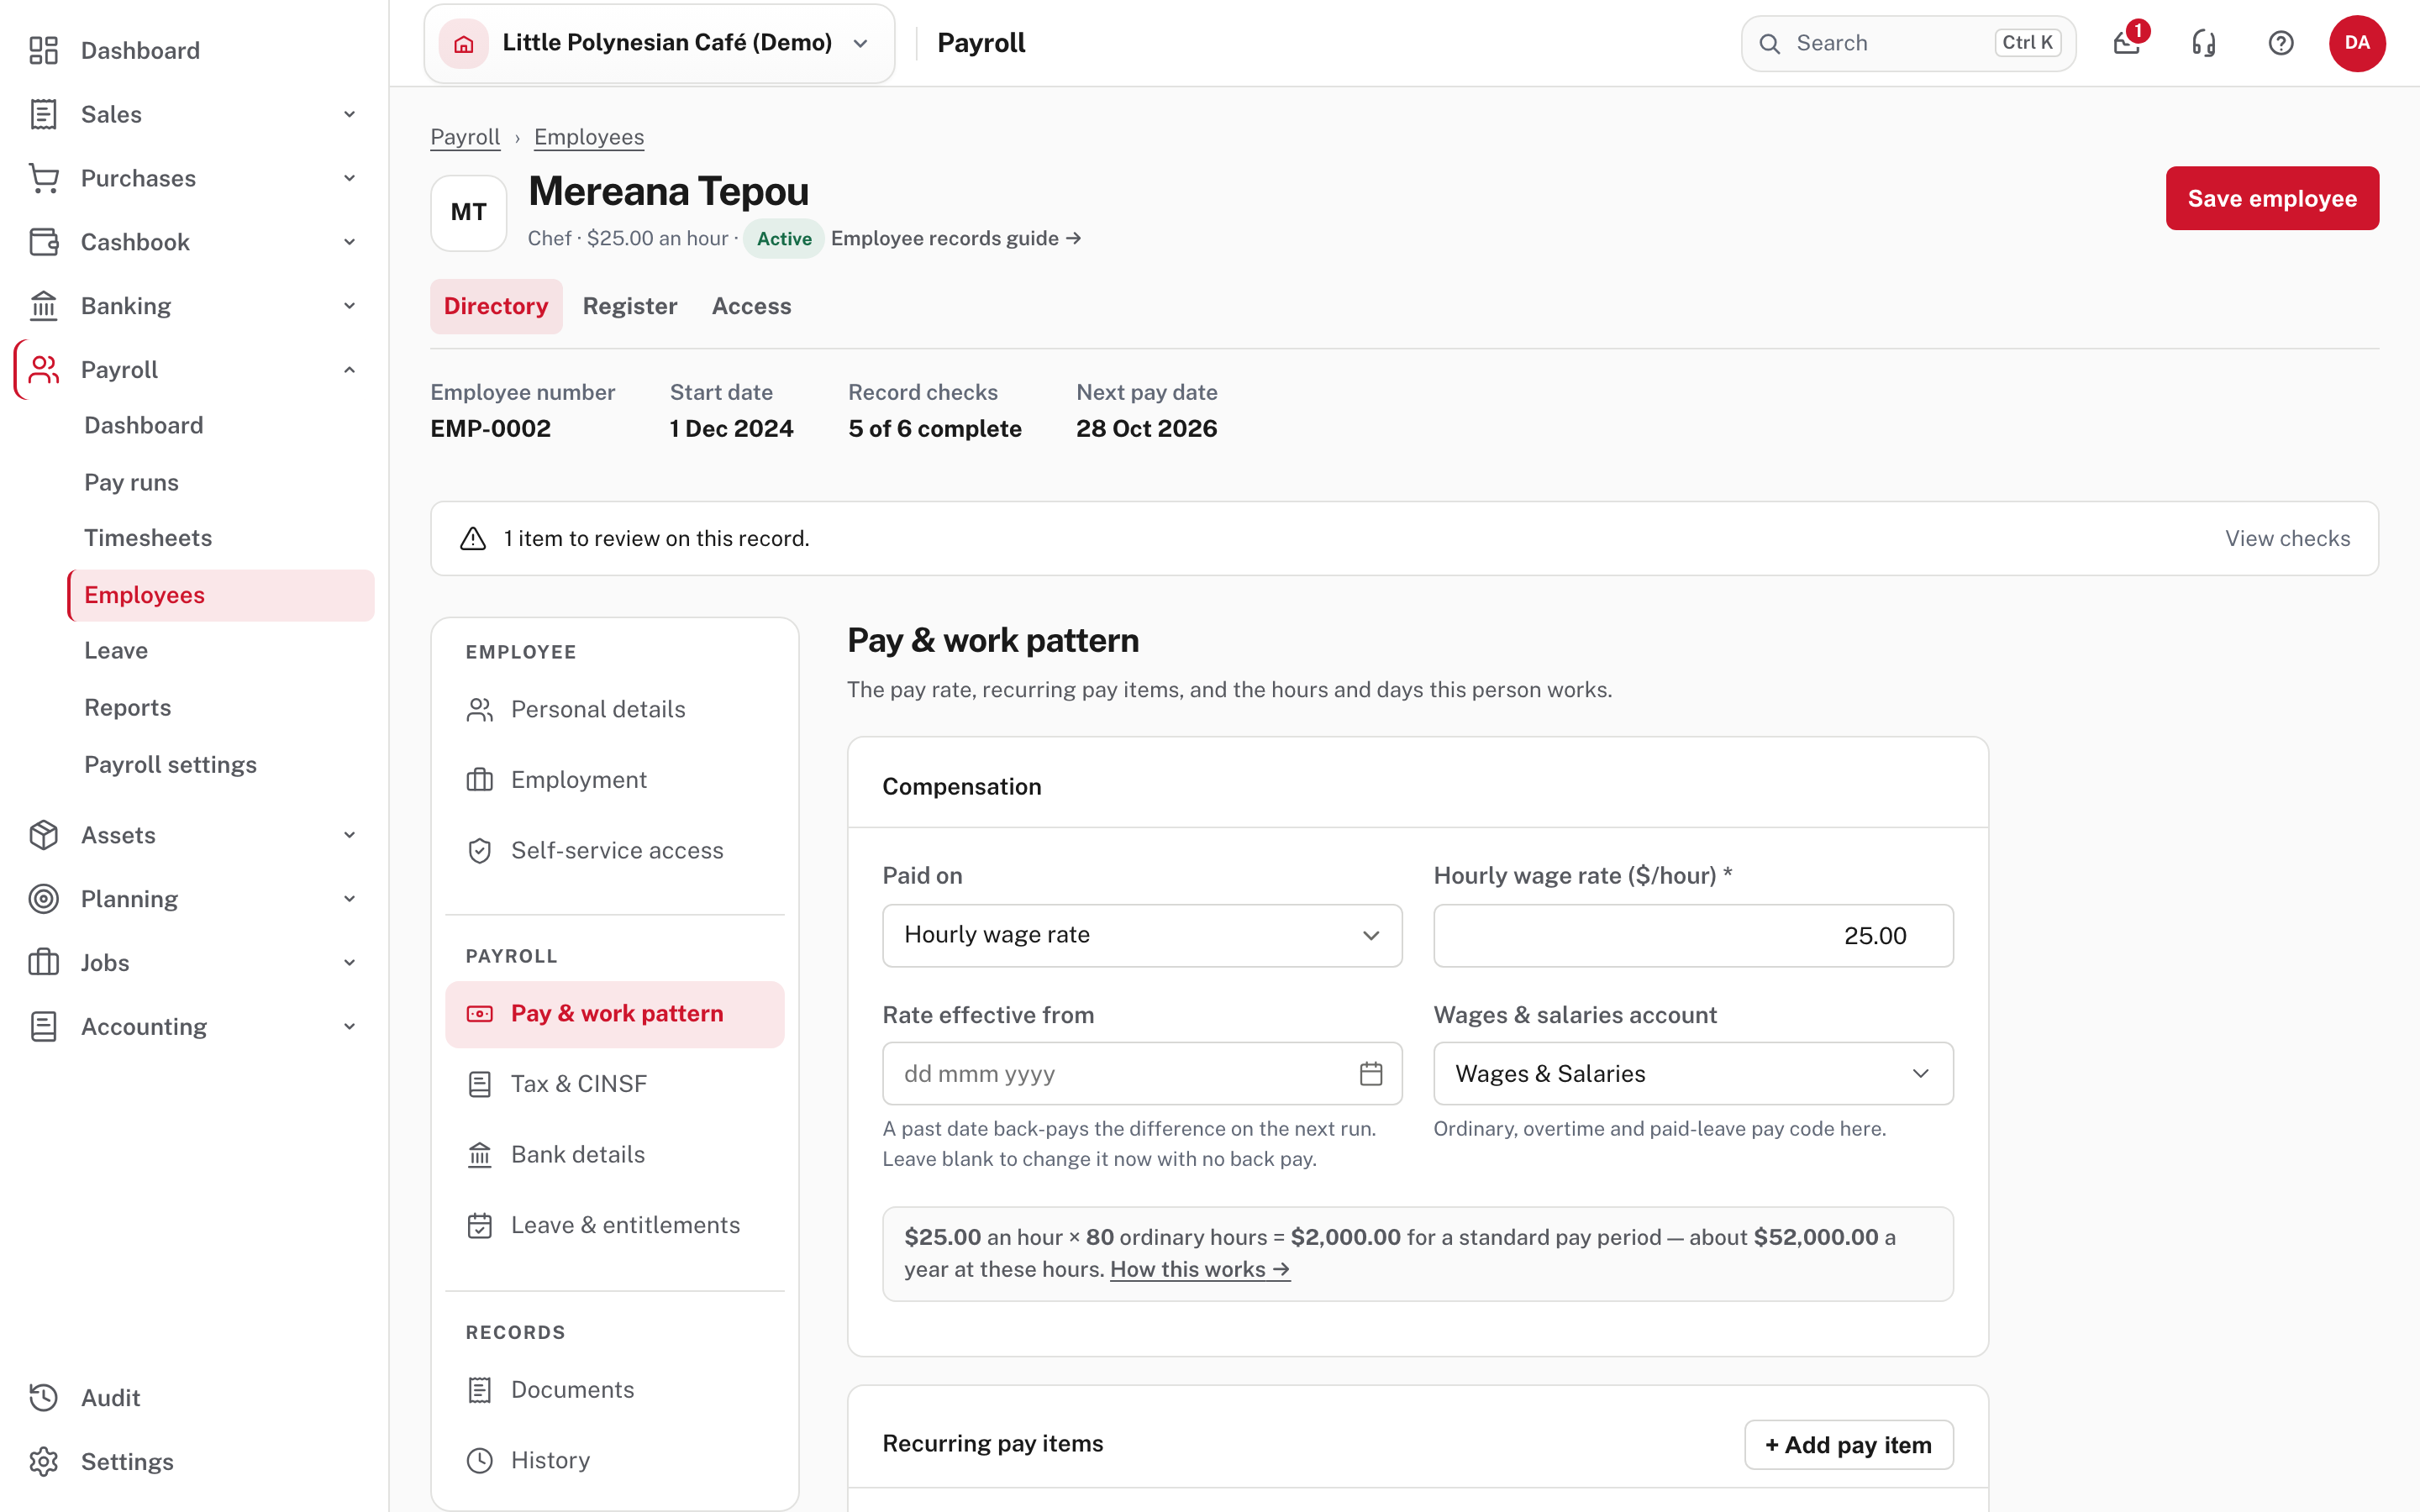
Fill in the essentials and save. Easy then opens the full record. Bank details, leave, documents and history only open after the first save, so set the pay on Pay & work pattern before you save. Work down the sections on the left:
- Personal details and Employment: name, contact details, start date, job title, department and branch.
- Pay & work pattern: how they are paid (hourly rate or salary), the date the rate takes effect, the wages account, their work pattern, and any recurring allowances or deductions.
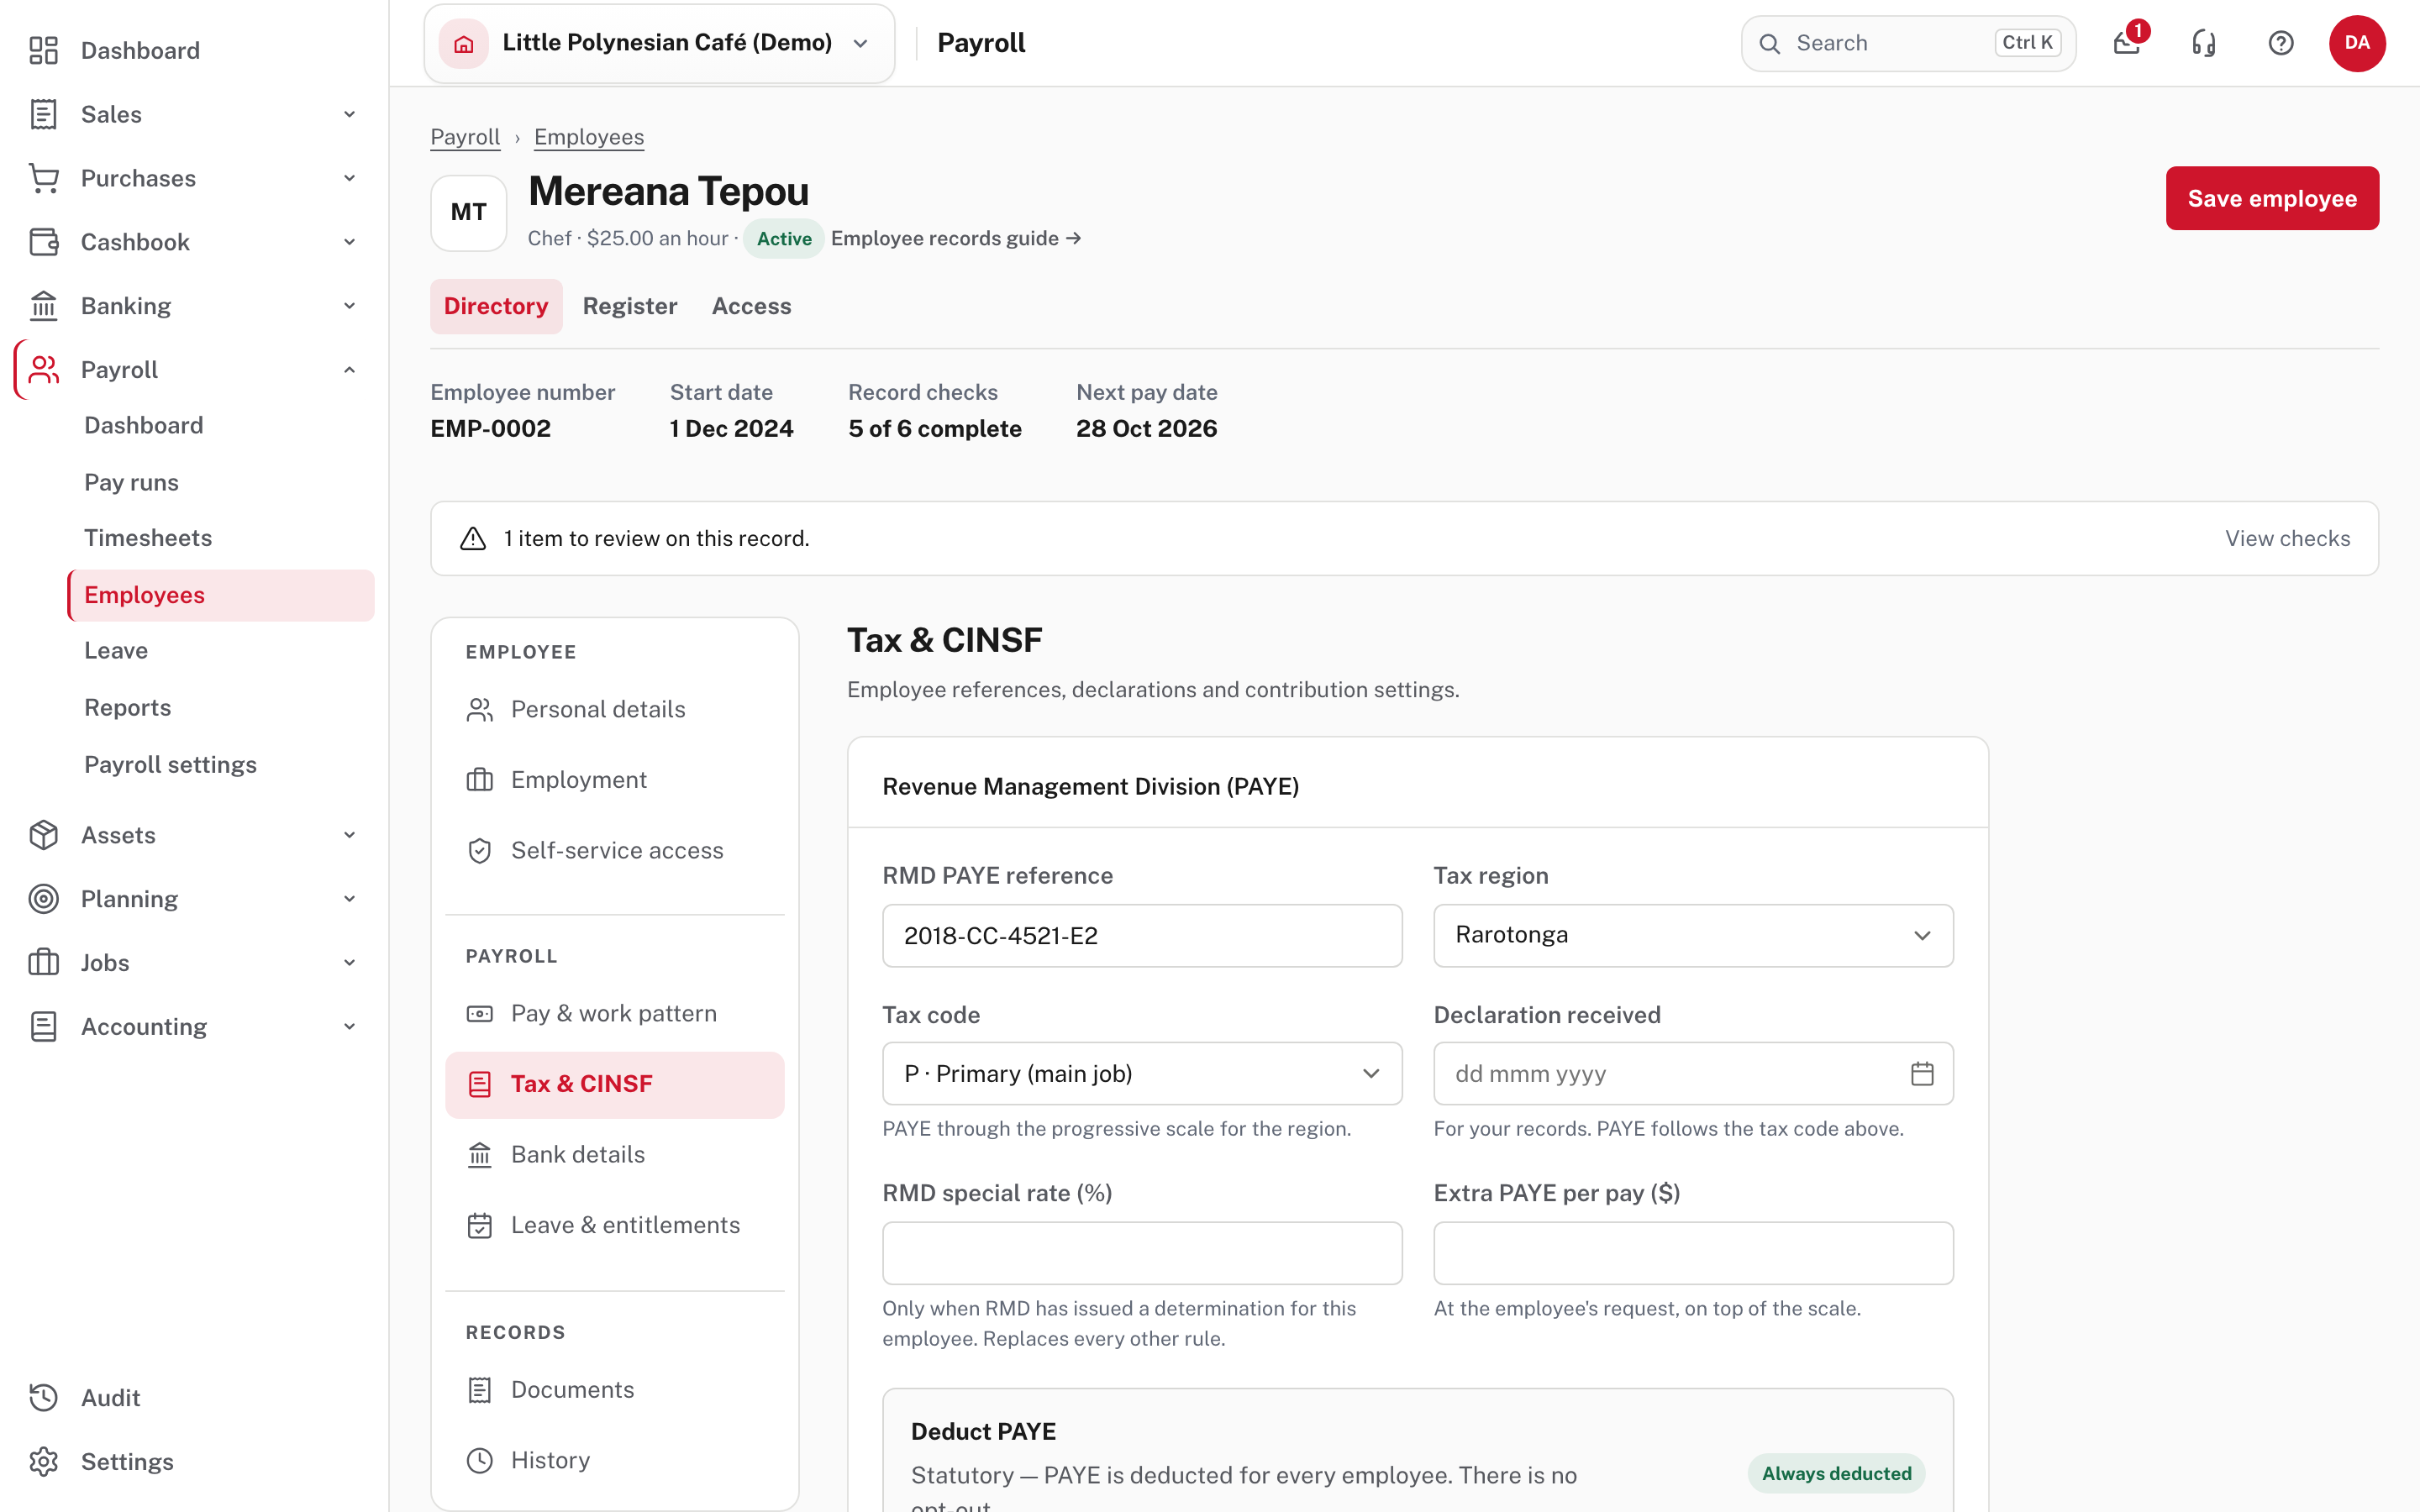
- Tax & CINSF: RMD PAYE reference, tax region, tax code, and the CINSF settings.
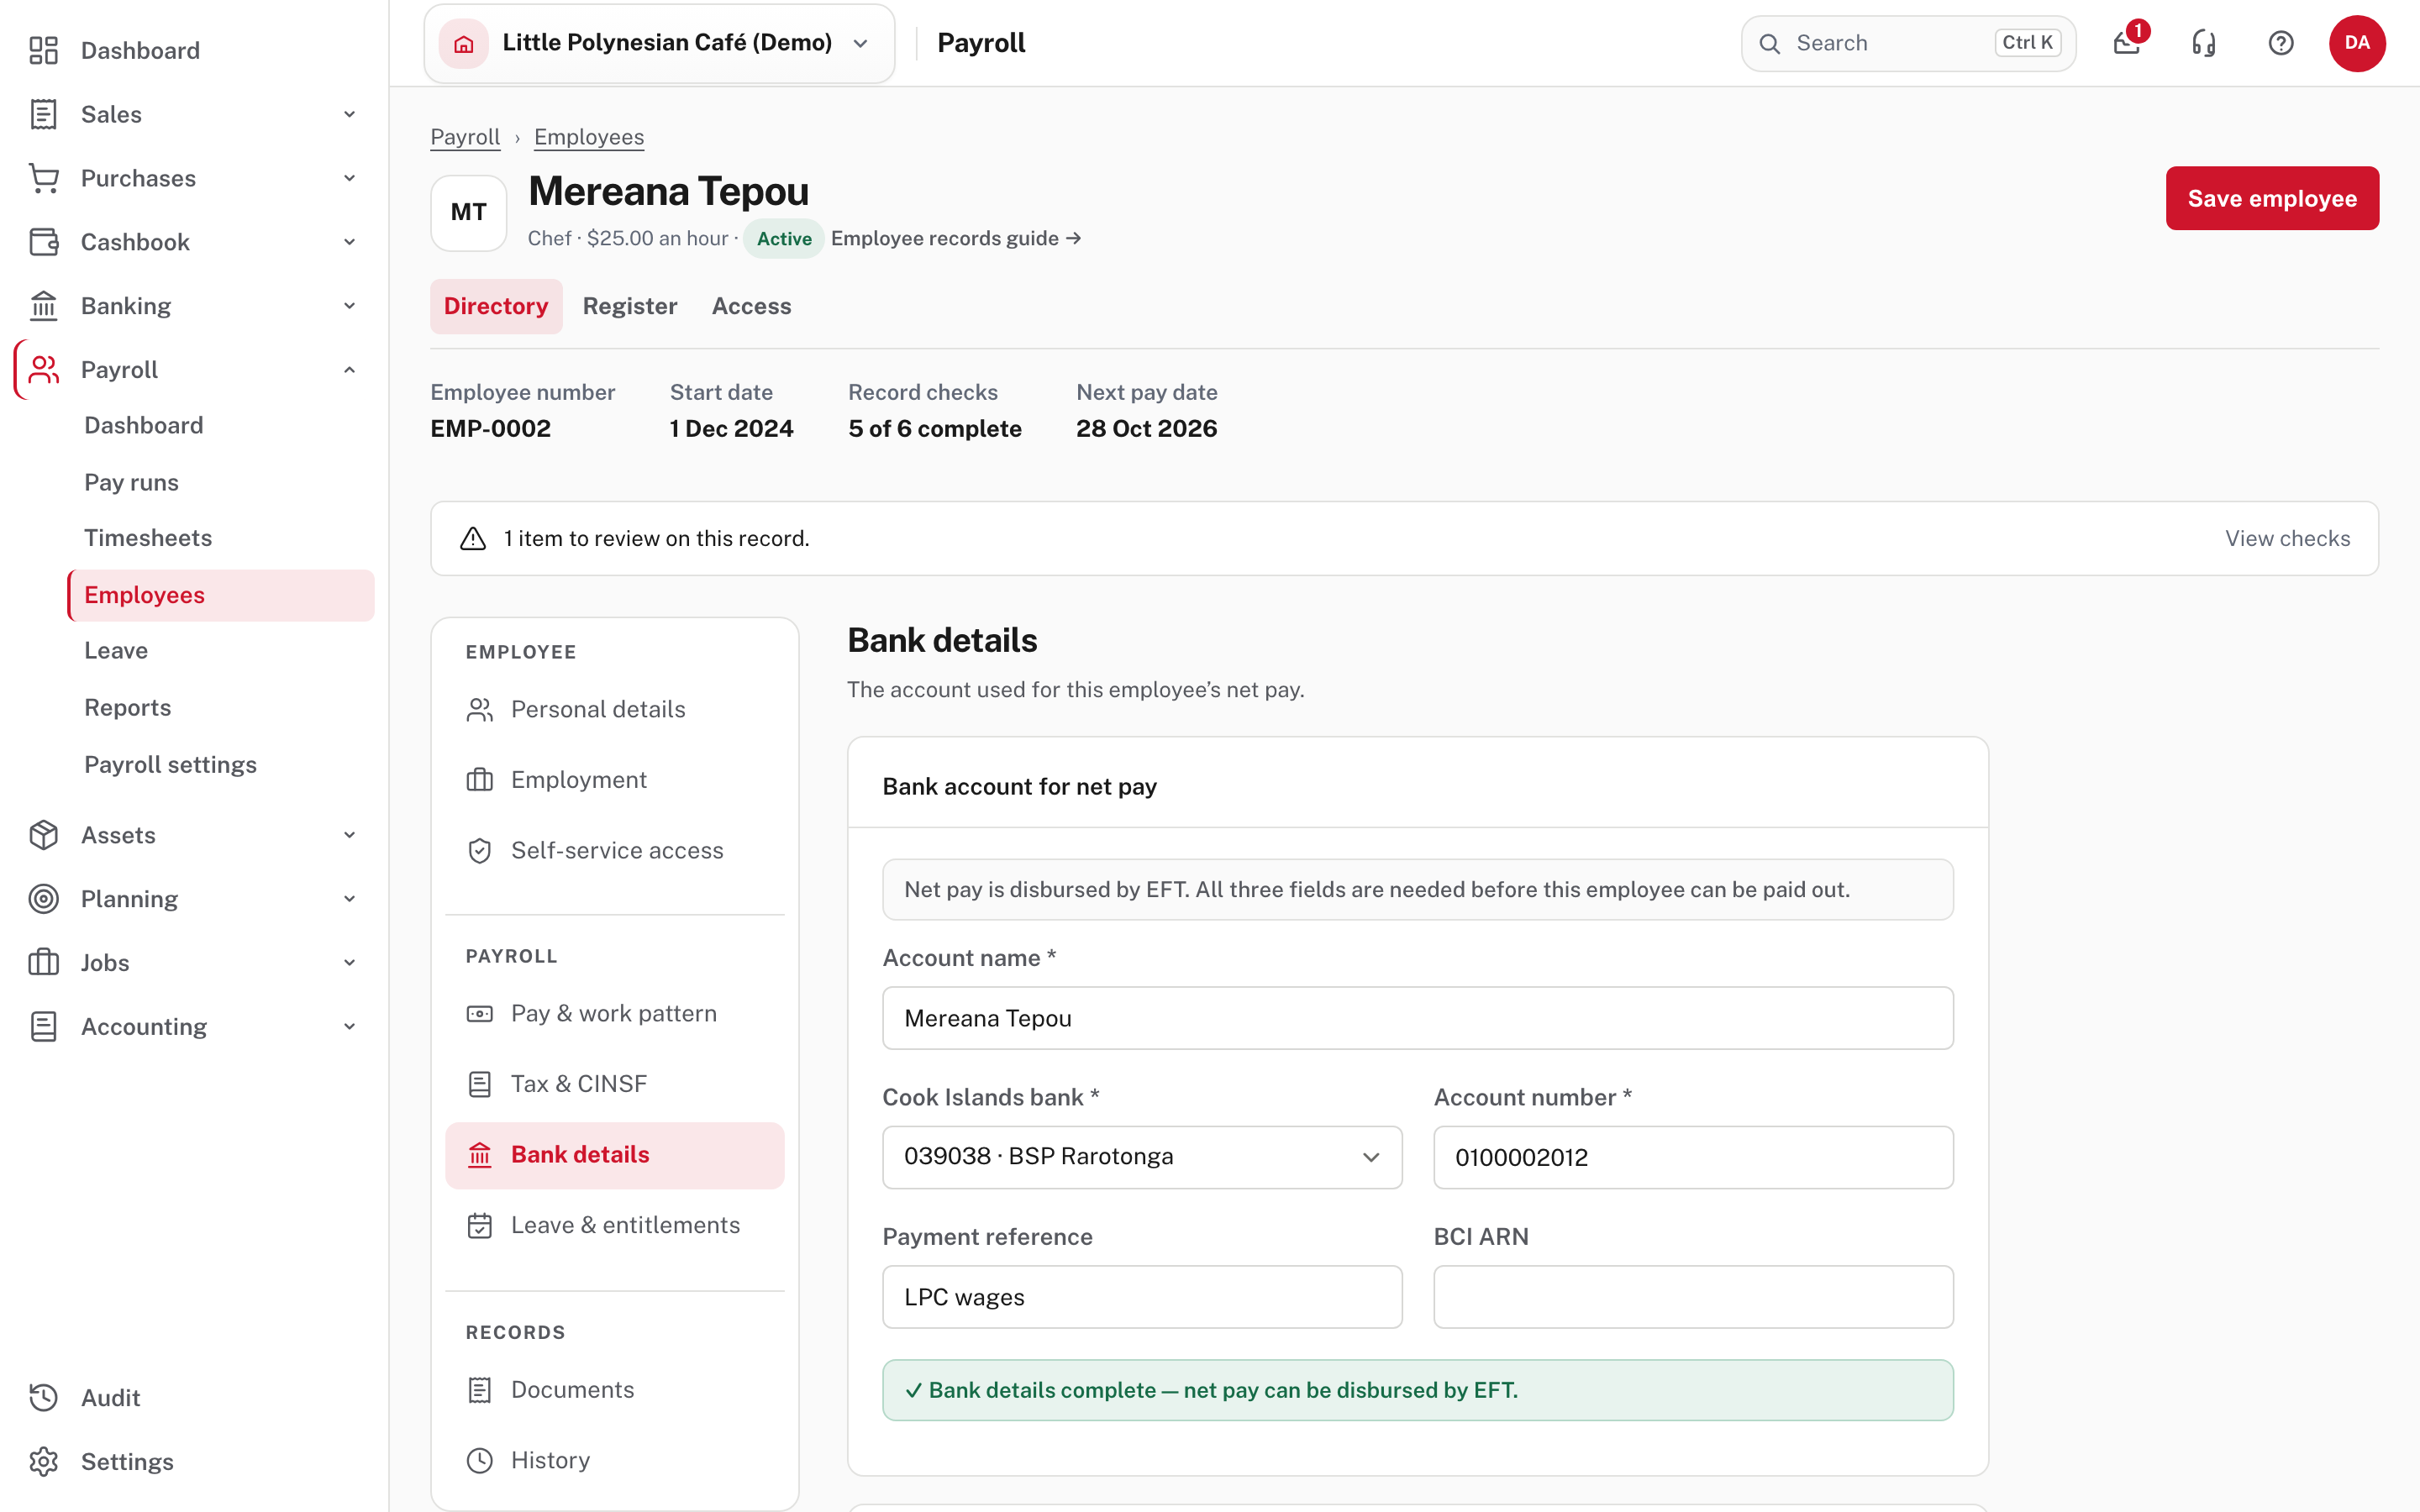
- Bank details: account name, bank and account number. All three are needed before the person can be paid by bank transfer.
- Leave & entitlements: their leave balances for the year in hours (opening, accrued, used and balance), with Adjust to set an opening balance if they are not starting from zero. The entitlement comes from the leave rules.
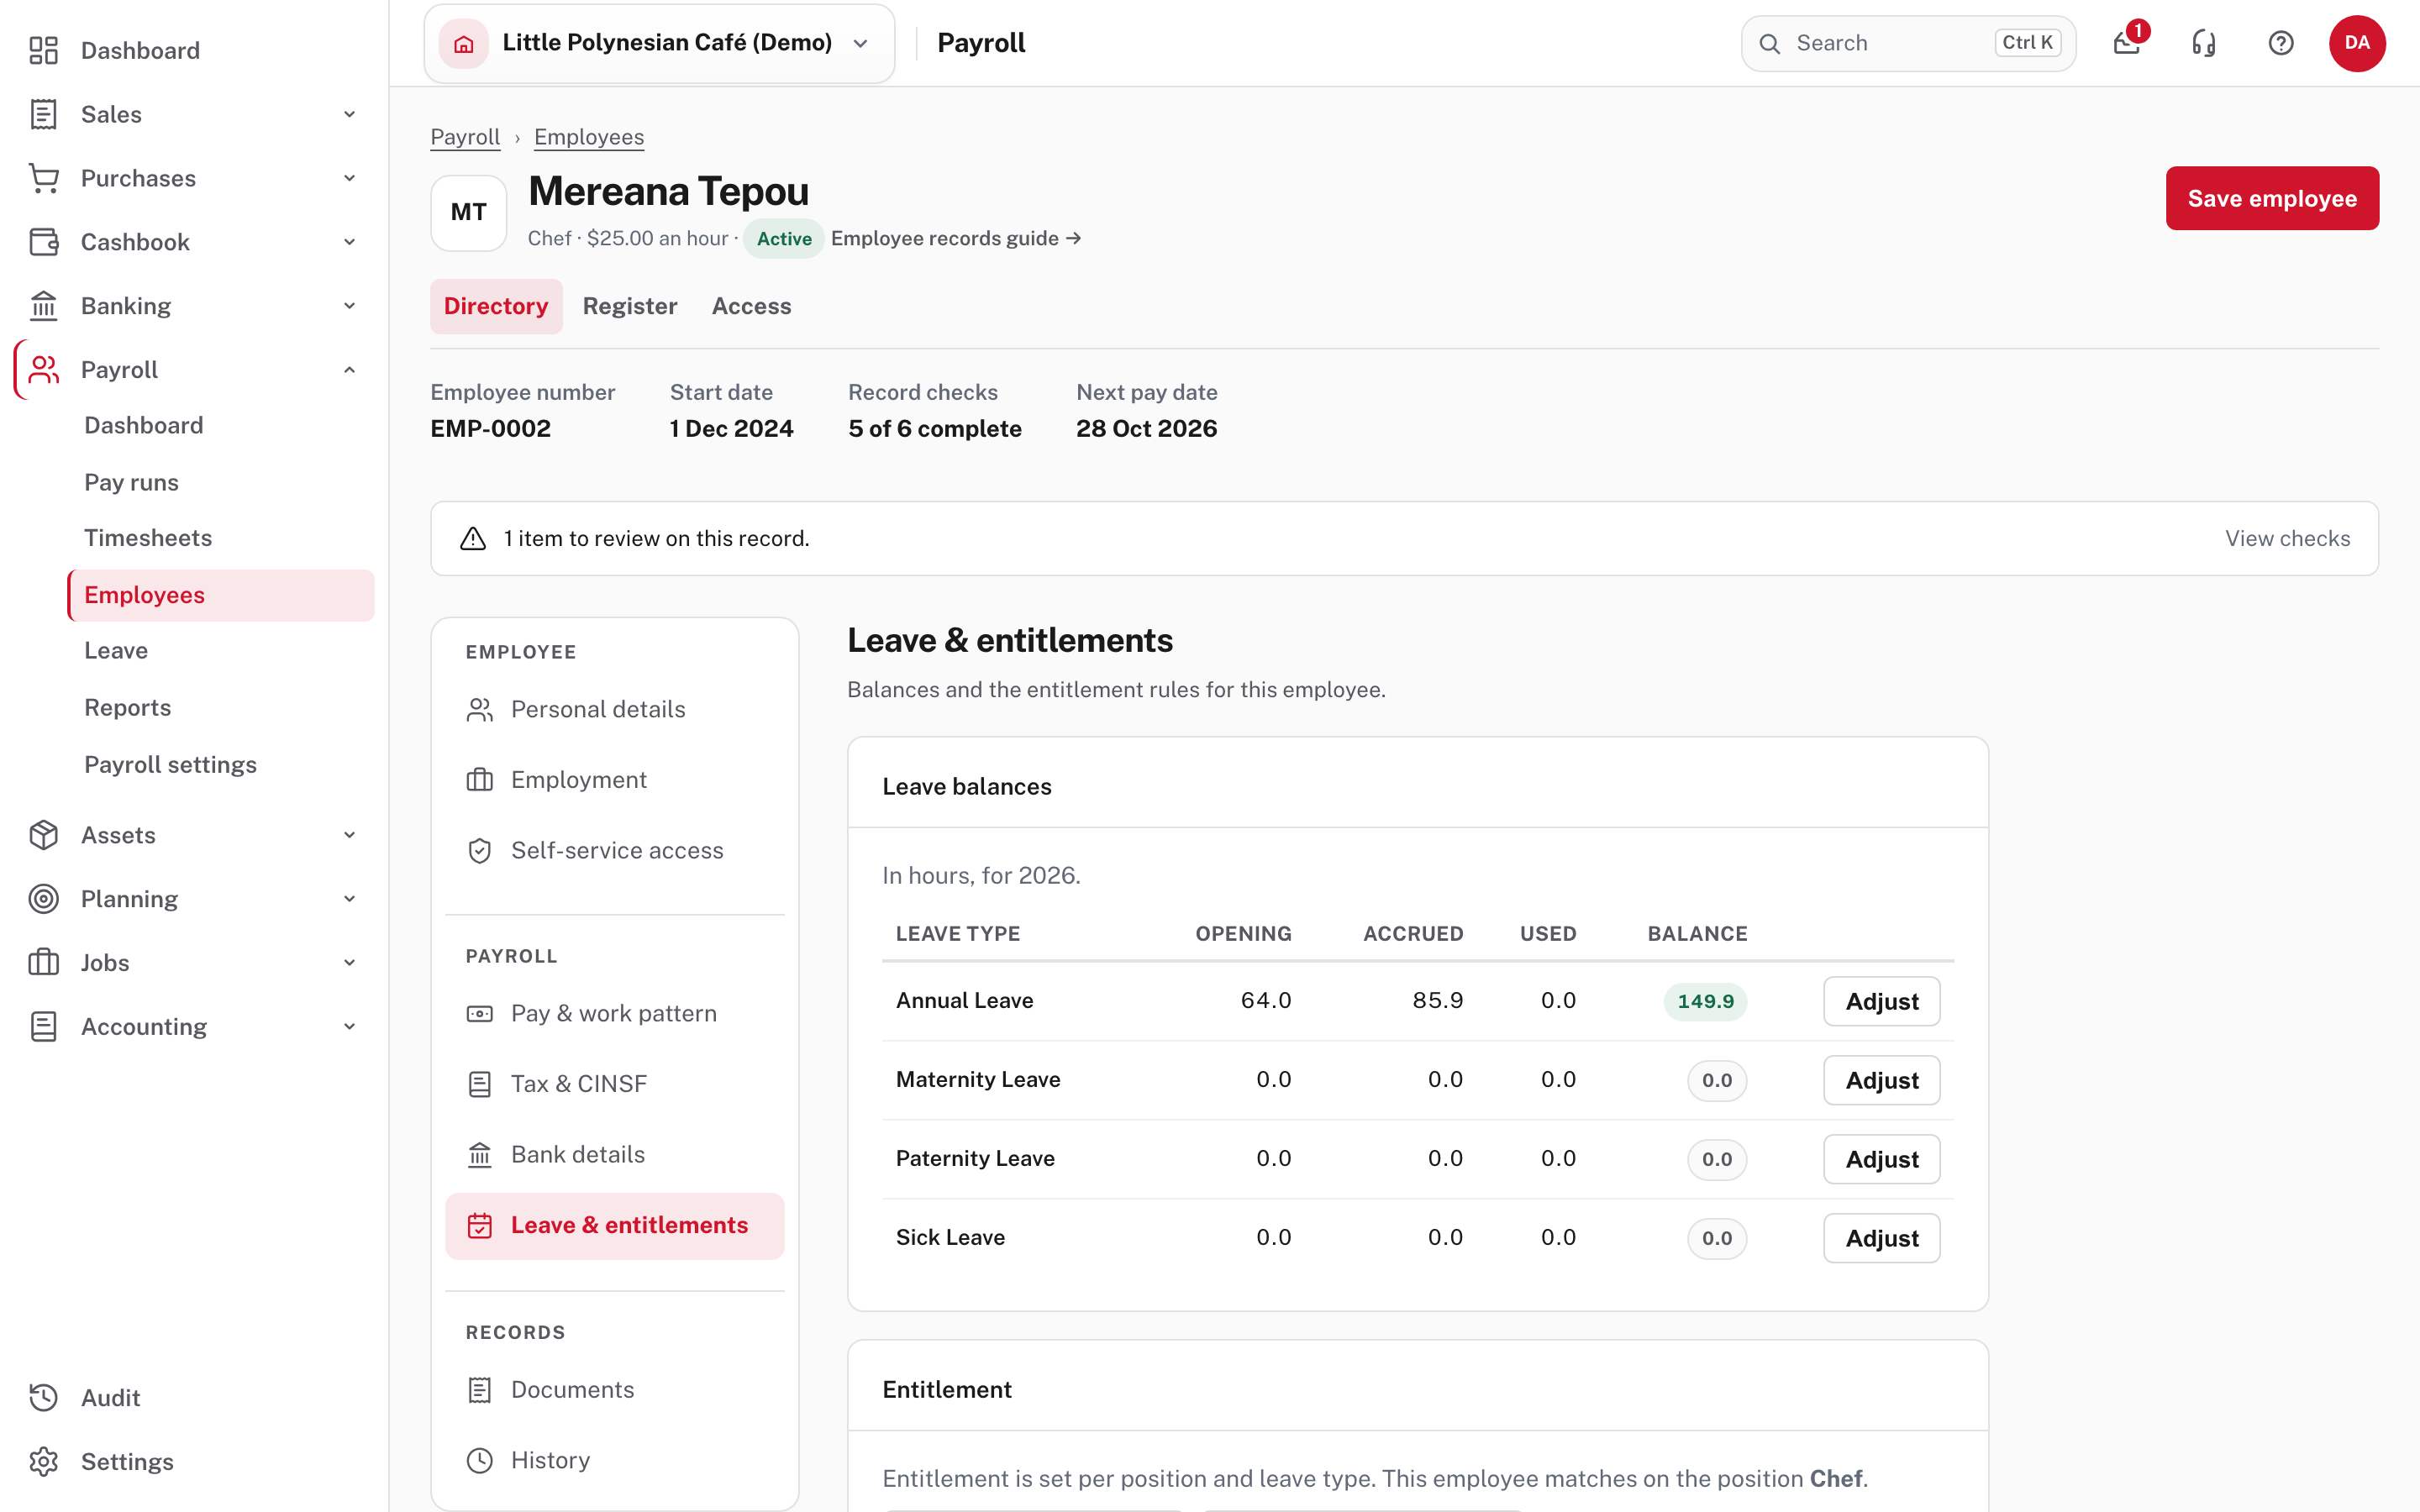
At the top of every record, Record checks shows how many of the six checks are complete (for example 5 of 6), and View checks lists what is missing. An employee with something missing can't be paid correctly.
Changing a bank account later
When bank-detail approval is on, a different person has to confirm any change to an employee's bank account before that employee can be paid by bank transfer. Until then, the old account is used.
More detail: Employee records.
Step 10. Run the readiness check
Payroll settings → Setup & switching → Check readiness.
This page lists everything payroll depends on and ticks it off live. It stays useful after setup, because it re-checks every time you open it.
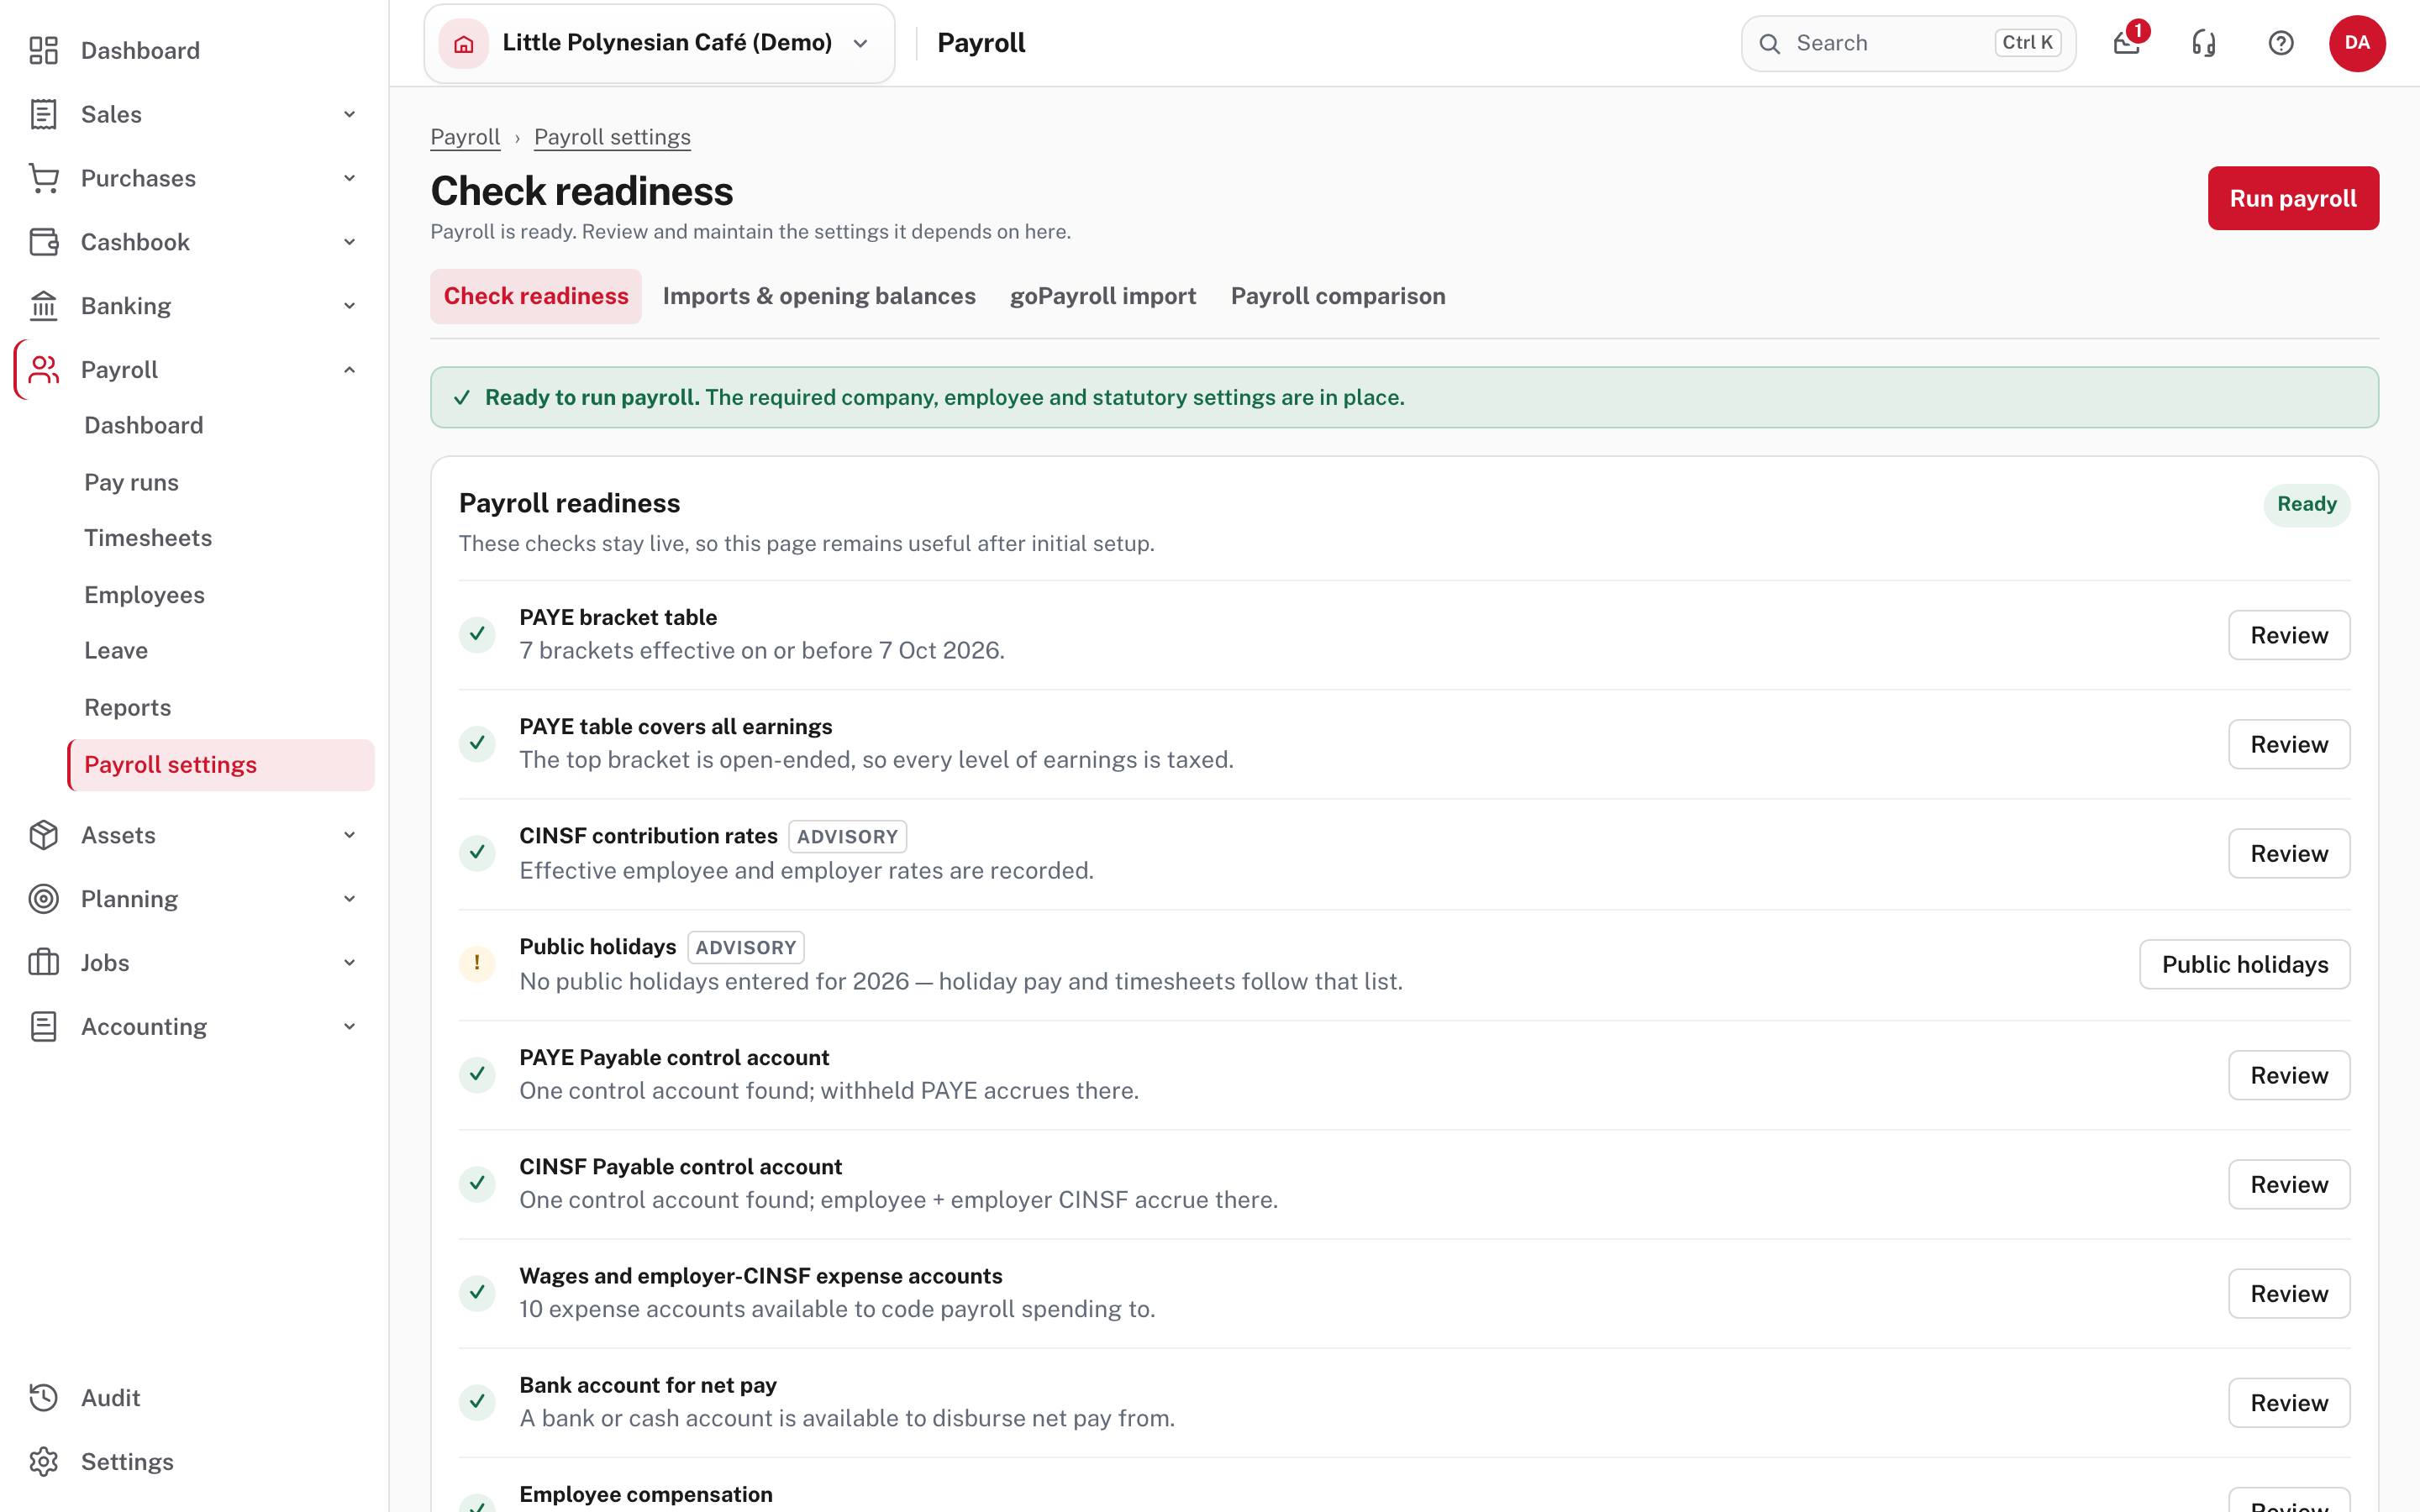
A green banner reading Ready to run payroll means the required company, employee and statutory settings are in place. A yellow warning marked Advisory does not block payroll but is worth acting on. In the picture the company is ready, but the page warns that no public holidays are entered for the year, which is the step 6 job still to do.
Check before you continue
Check before you continue
- Full Payroll is on, and the company's RMD number is entered in Business details.
- The pay calendar shows All clear, and Payroll starts is the first period you will really run.
- Pay run accounts point at the right bank, wages and CINSF accounts.
- The PAYE table's top bracket has no upper limit, and the PAYE and CINSF rates match the current notices.
- Public holidays are entered for the current year, including each outer island's own Gospel Day if you have staff there.
- Approvals: a second person is required for pay runs and bank-detail changes, if you have more than one person on payroll.
- Email delivery is set up, if you will email payslips, and you have decided who enters timesheets.
- Every employee shows all record checks complete, including bank details.
- Check readiness says Ready to run payroll.
Next
Chapter 2, Run a pay period, covers timesheets, leave, reviewing the run, approval, the bank file and payslips.