Purchase orders and expense claims
Two ways money leaves the business before a supplier's bill exists. A purchase order is what you ask a supplier for: it records nothing in your accounts until the goods arrive or the supplier bills you. An expense claim is money a member of staff spent for the business and wants back: the employee files it, a manager approves it, and Easy turns it into a bill you pay like any other. Whoever keeps the books raises purchase orders and can enter a claim for someone; whoever the request is routed to approves a claim. Both end in a bill, so read this beside Enter, approve and record a bill and Pay suppliers: payment runs and bank files; stock that arrives from overseas continues in Landed costs and import VAT.
About the screenshots
Purchase orders are pictured in Easy's demo company, Little Polynesian Café: the supplier is Island Beverages Distributors and the stock item, Manual PO Vanilla pods 100g, is a made-up example. Expense claims are pictured in a separate practice company, because the employee's own screens (My expenses) need an employee who can sign in, and the demo's employees can't; the employee pictures are cropped below the top bar, and the people are made up (Dev Employee). Email isn't set up on the demo, so the email buttons are greyed out, and approval of purchase orders is switched off, so that card never appears.
Before you start
- Both are features a company can switch off (Settings → Modules: Purchase orders and Expense claims are among them), so a company that doesn't use them won't show them in its Purchases menu (Turning modules and features off).
- For a purchase order: the supplier exists. To receive stock against an order, the item must be a tracked item (a Good with Track stock on hand ticked in Sales → Items). A line for anything else can be billed but not received.
- For an expense claim: the employee has a sign-in account linked to their employee record (they file in My expenses), or a manager enters the claim for them. The approver must be a different person: Easy's Help says the person deciding must hold the permission, must not be the person who asked for it or the employee it is about, and must be whoever it was routed to (Payroll approvals and controls).
- The expense accounts exist for the approver to choose from (the demo's chart offers Repairs & Maintenance, Rent, Insurance and so on).
Step 1. See your purchase orders
Purchases → Purchase orders.
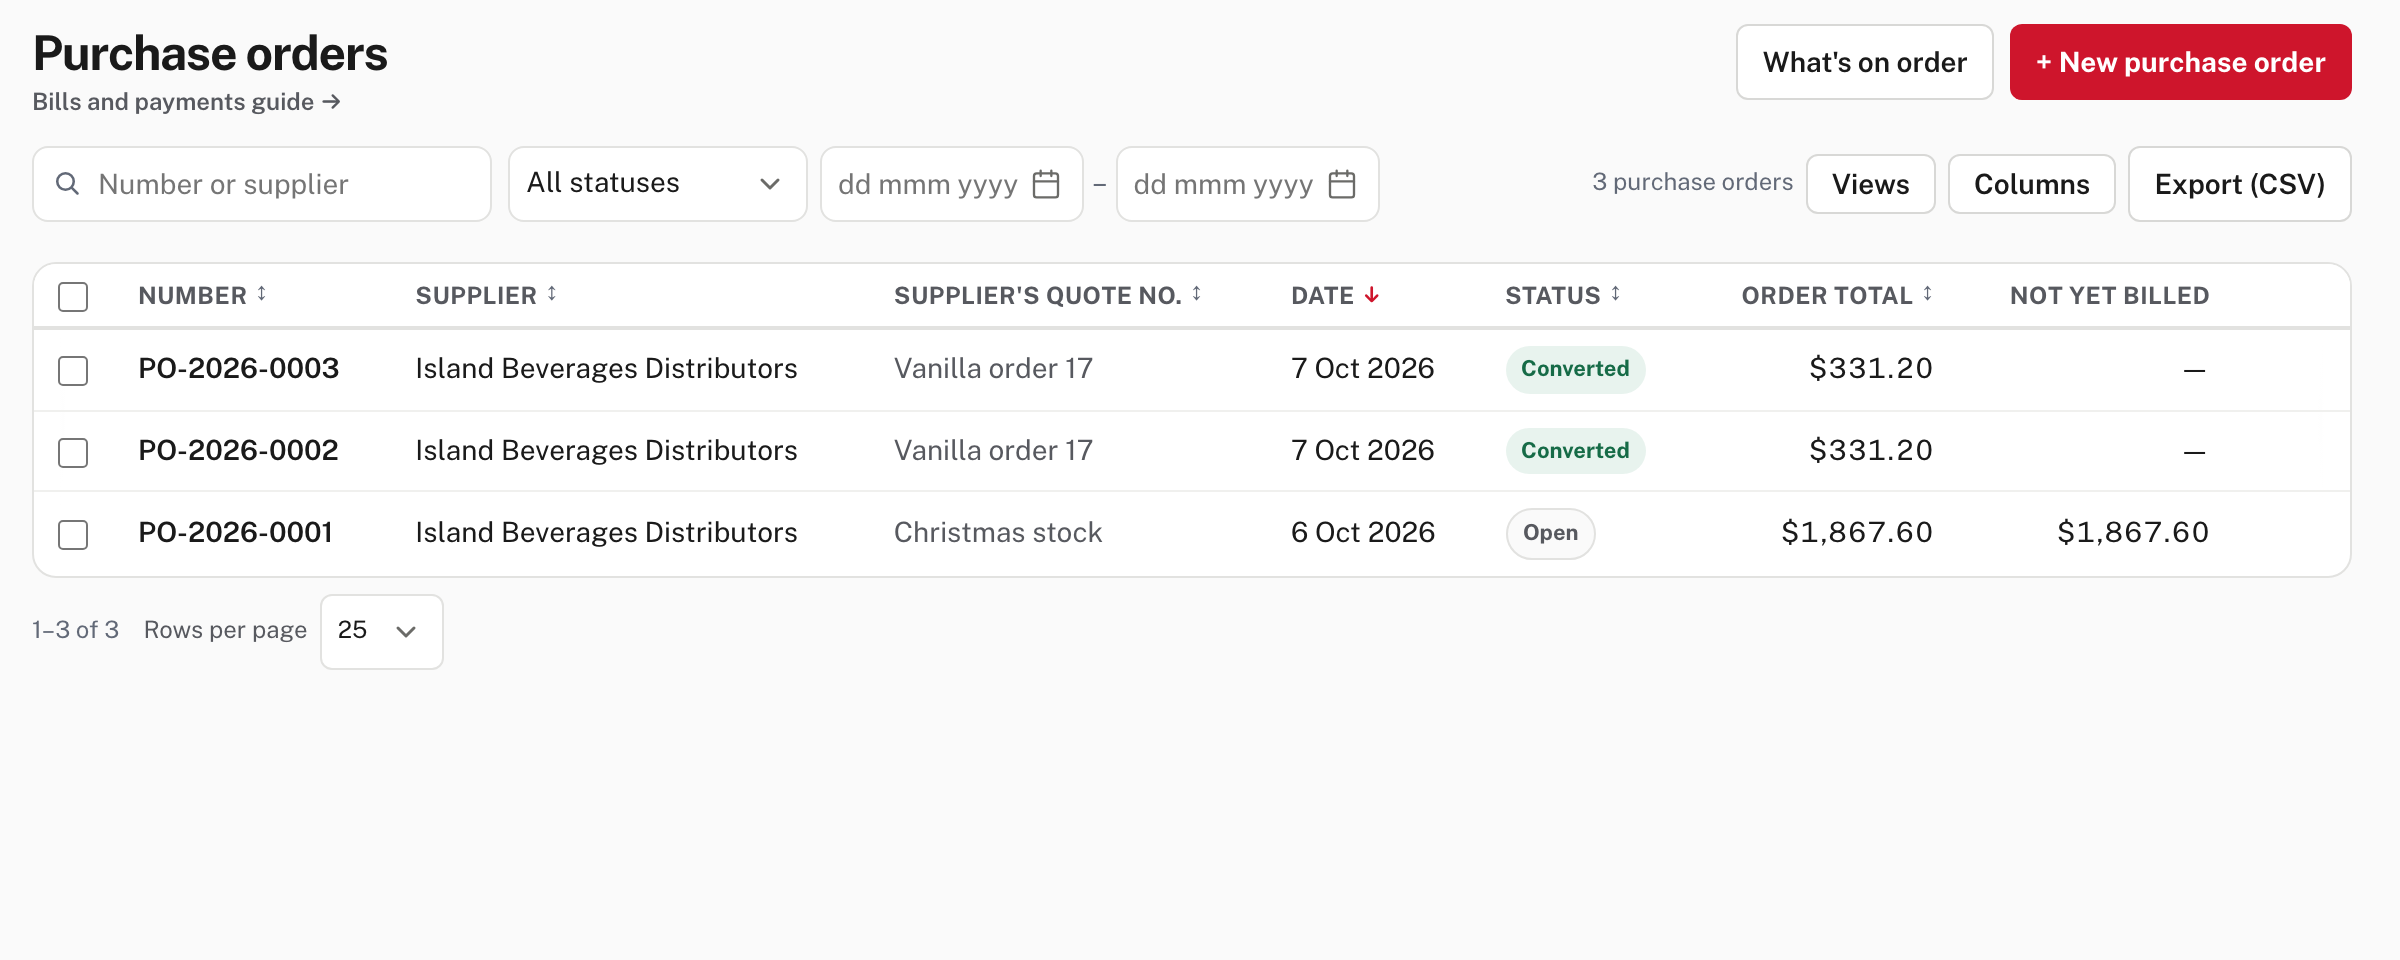
Each row shows the number (PO-2026-…), the supplier, the supplier's quote no., the date, the status, the order total and what is not yet billed. The status filter offers Open, Waiting for approval, Partially converted, Converted and Closed. What's on order (top right) is the commitments report: what you have ordered and not yet been billed for. More detail: Purchase orders.
Step 2. Write the order
Purchases → Purchase orders → + New purchase order.
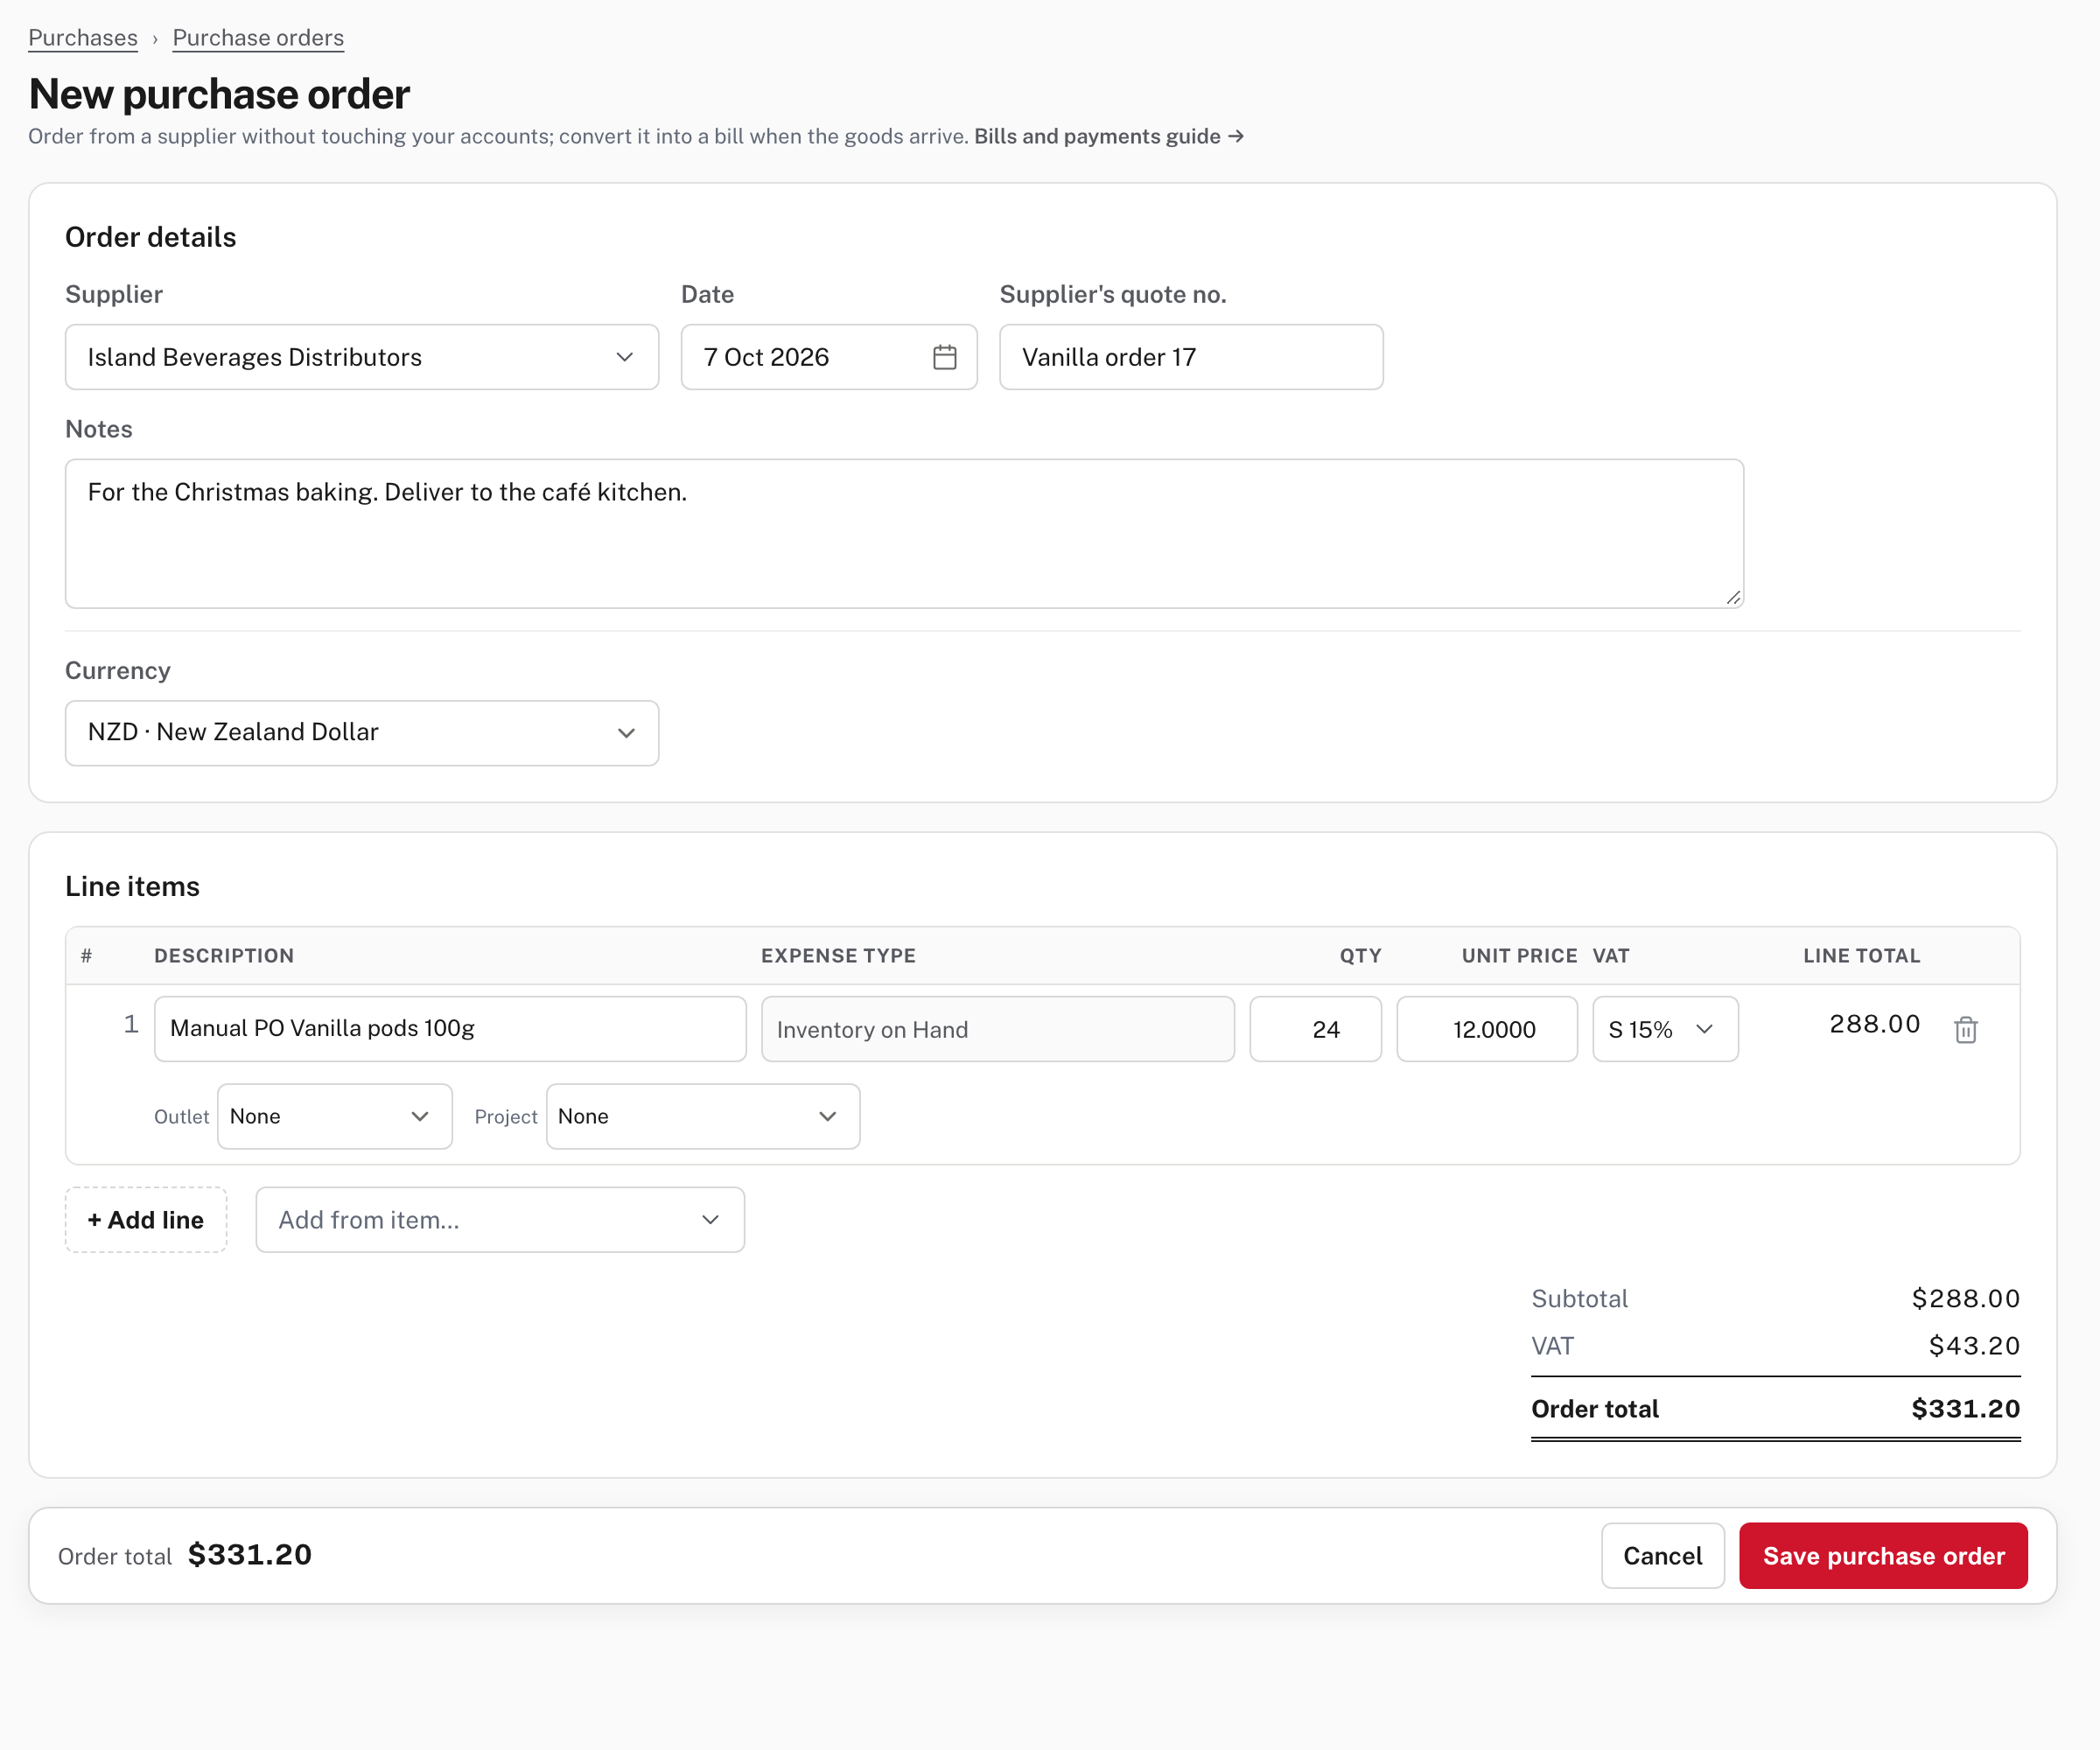
| Field | What it does |
|---|---|
| Supplier | Search and choose. |
| Date | Today unless you change it. |
| Supplier's quote no. | Optional. The supplier's own reference for what they offered. |
| Notes | Optional. Printed on the order. |
| Currency | The company's currency, or another if foreign currency is on (the demo offers AUD). |
| Line items | Description, expense type, quantity, unit price and VAT code. Add from item… fills a line from a saved item. |
A tracked item brings its buy price and shows Inventory on Hand as the account, which you can't change: stock is received into it. Here 24 packs at $12.00 with the standard VAT code give $288.00 plus $43.20 VAT, an order total of $331.20. The subtitle says what this is: Order from a supplier without touching your accounts. Choose Save purchase order.
Step 3. Check it and send it
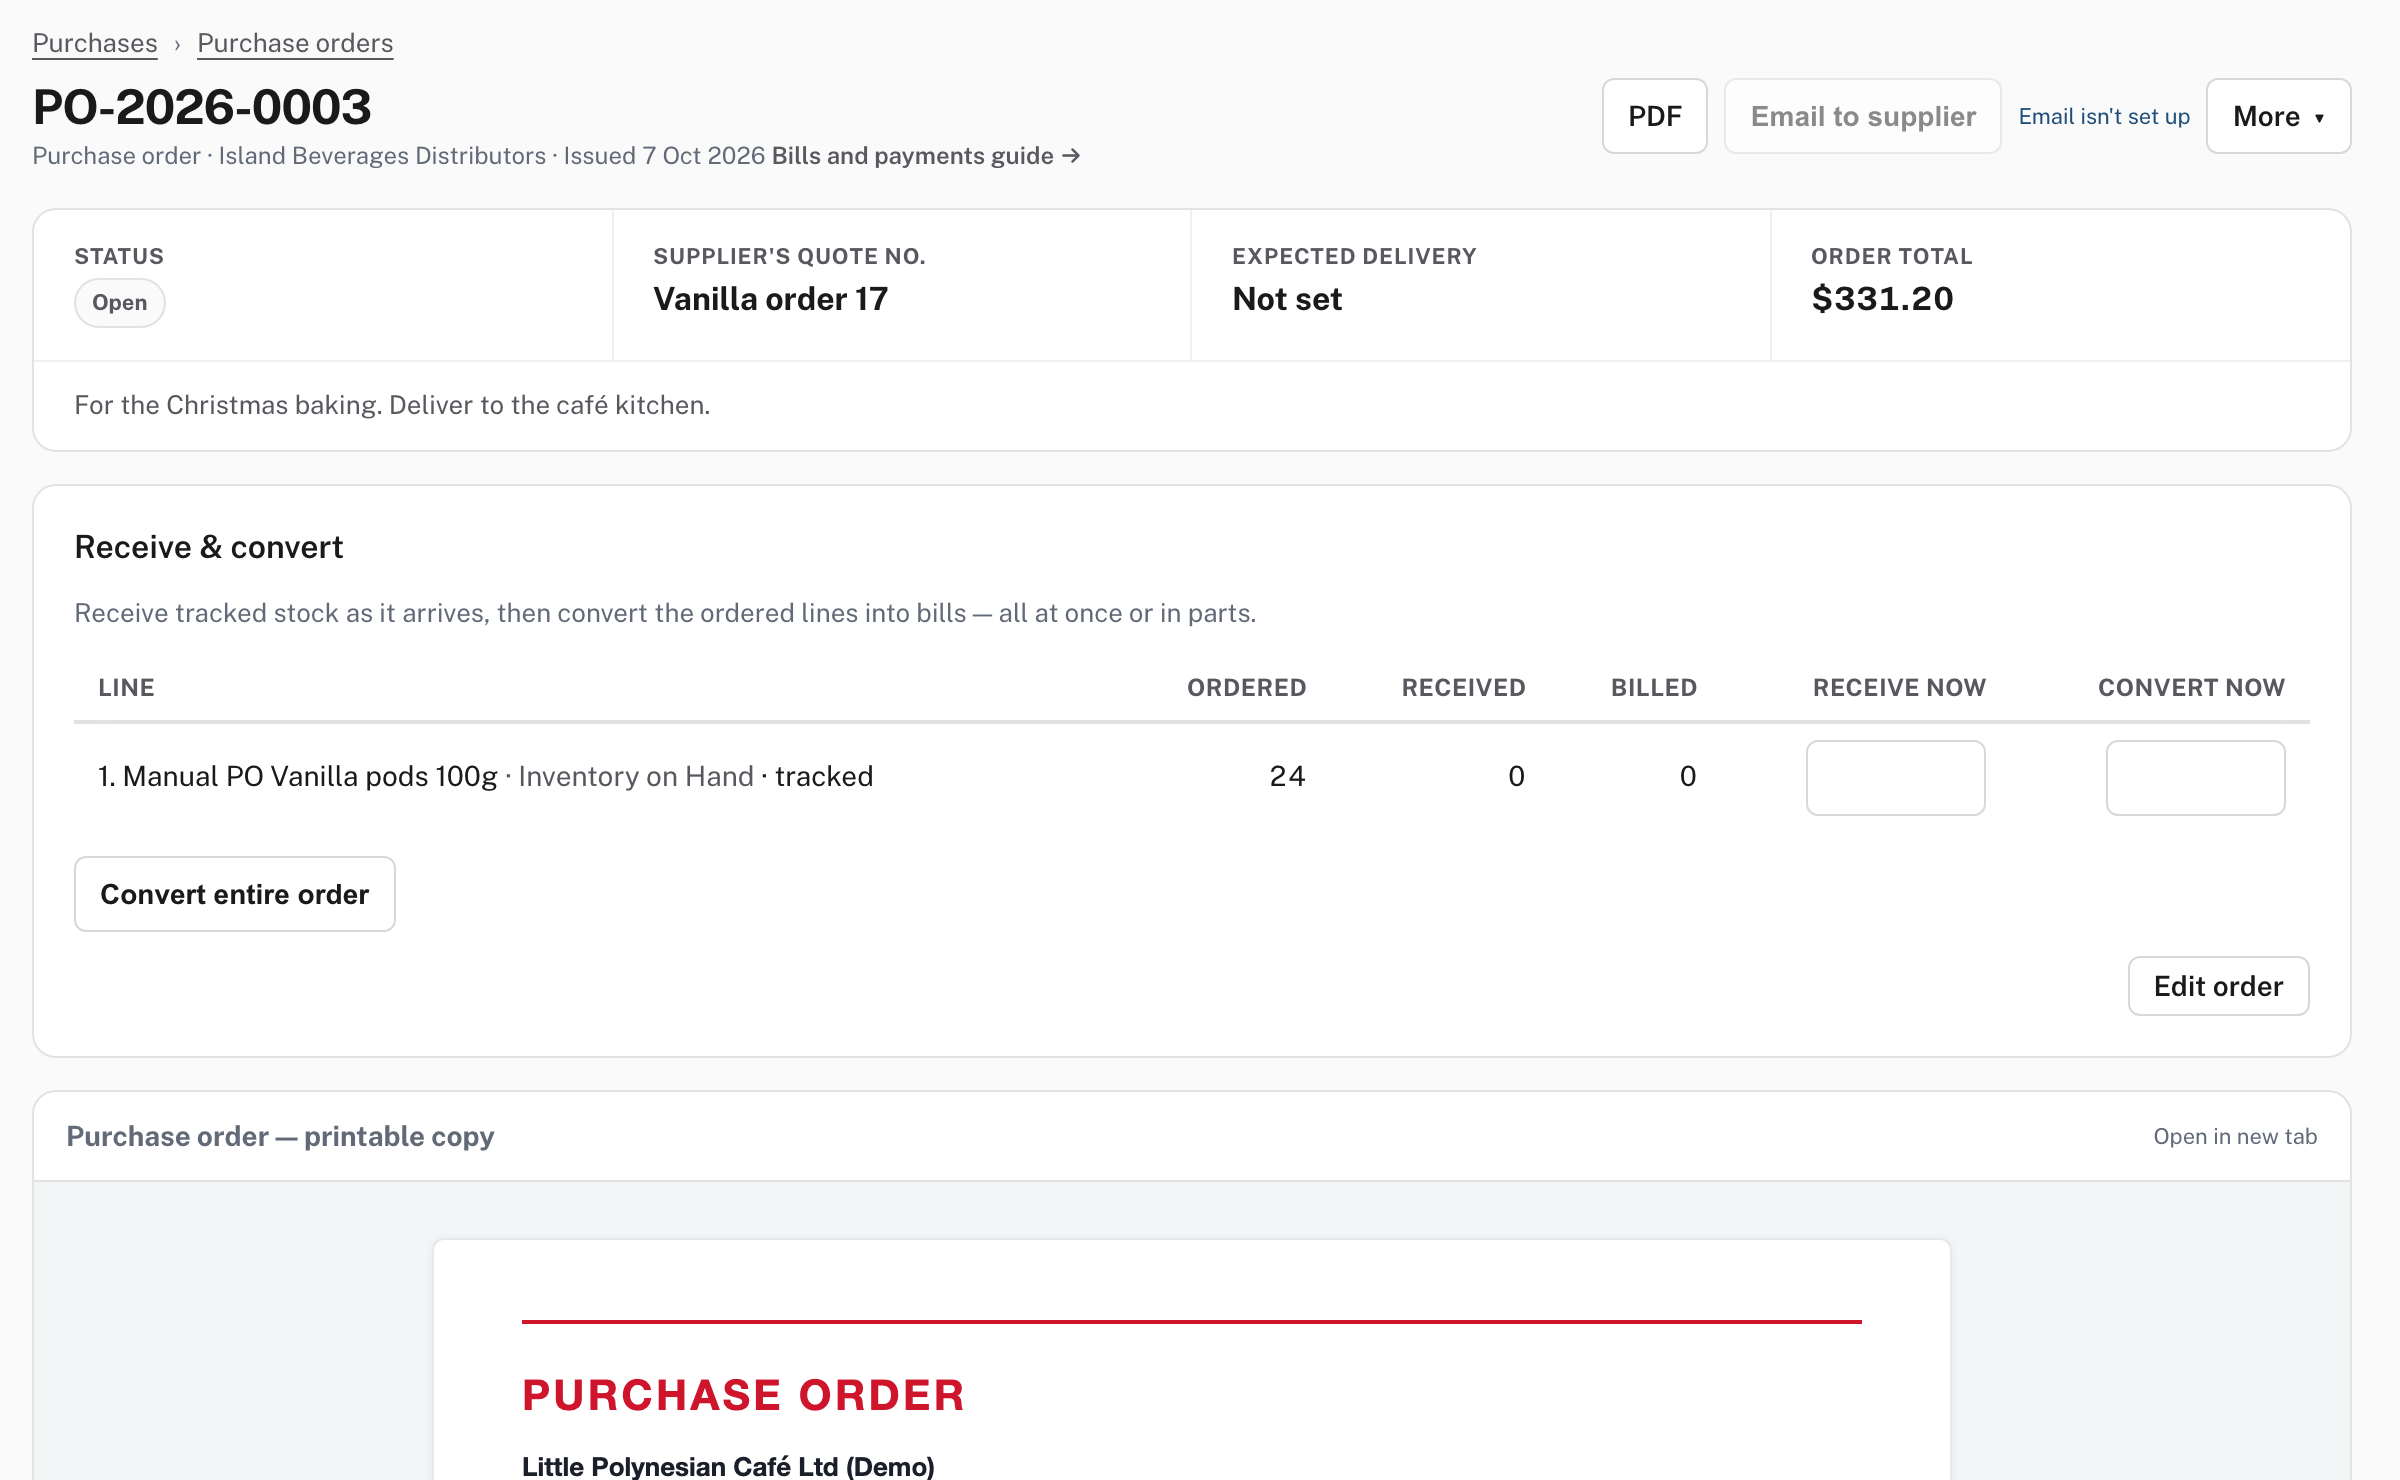
The order's page shows the Status (here Open), the Supplier's quote no., Expected delivery (here Not set), the Order total and your notes. PDF is what the supplier would get, and Email to supplier sends it with a message you can change. Not shown in the demo: email isn't set up, so send the PDF yourself.
If the rest of an order will never arrive, More → Close order asks for an optional reason and shows what it does (it stops counting as a commitment, and can be reinstated). What was received and billed stays as it is; Reinstate order opens it again (from Easy's Help and source; not completed in the demo).
If your company asks for approval of purchase orders (Settings → Purchases approvals), the order can't be sent, received or billed until it is approved; the card on the order says so. Not shown in the demo: that approval is switched off.
Step 4. Receive the goods
When the stock arrives, use the Receive & convert worksheet on the order.
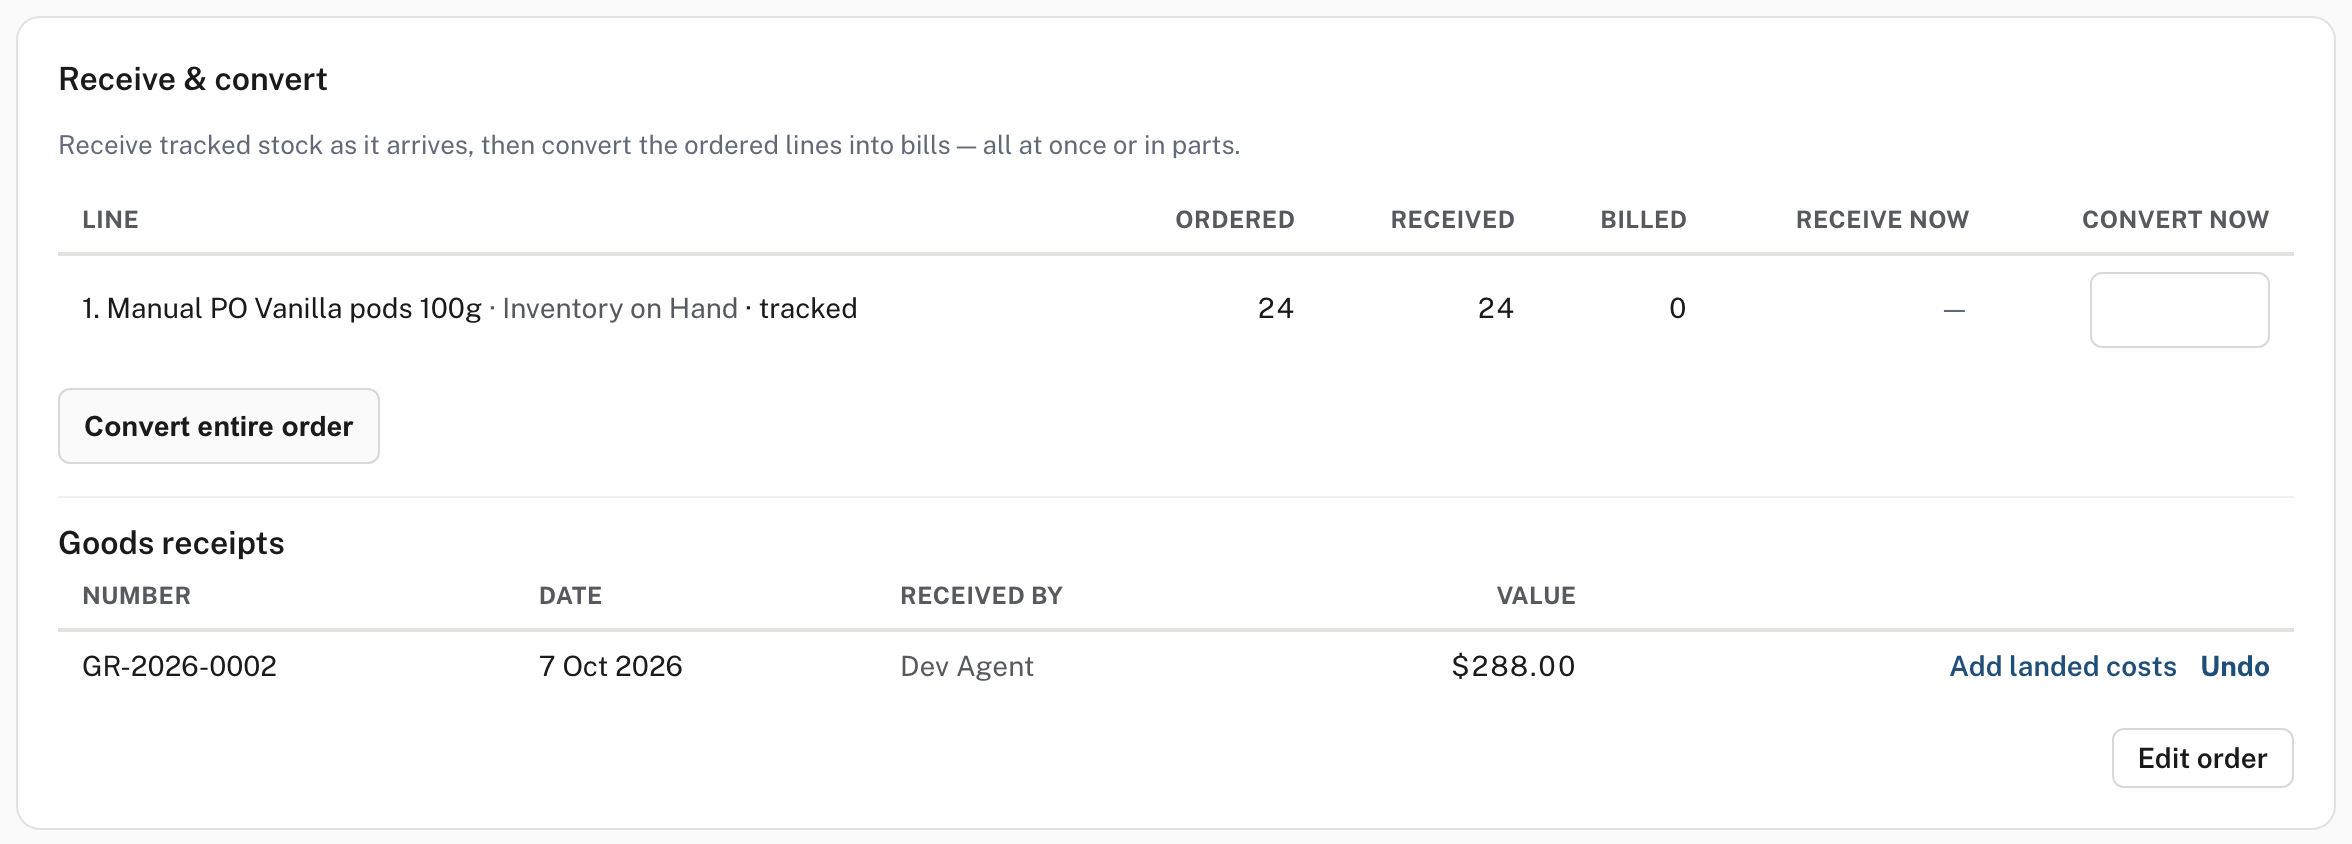
For each line the worksheet shows Ordered, Received and Billed, and two boxes: Receive now (for tracked stock) and Convert now. Type the quantity that actually arrived in Receive now and choose Record goods receipt (24 units). The receipt gets its own number (here GR-2026-0002) and appears under Goods receipts with its date, who received it and its value ($288.00).
From Easy's source: the receipt puts the stock into Inventory on Hand at the order's cost and records the same amount on Goods Received Not Invoiced; when the supplier's bill comes, it clears that amount instead of receiving the stock twice. Two links sit on the receipt: Add landed costs (freight and duty on an import: Landed costs and import VAT) and Undo, which puts the stock back after a confirmation. For an order in a foreign currency, the worksheet says receiving stock isn't available yet: convert the lines to a bill instead.
Step 5. Turn the order into a bill
Convert as the supplier invoices you. To bill everything, choose Convert entire order. To bill part, type the quantities in Convert now and choose Convert to bill: the order then reads Partially converted until the rest is billed.
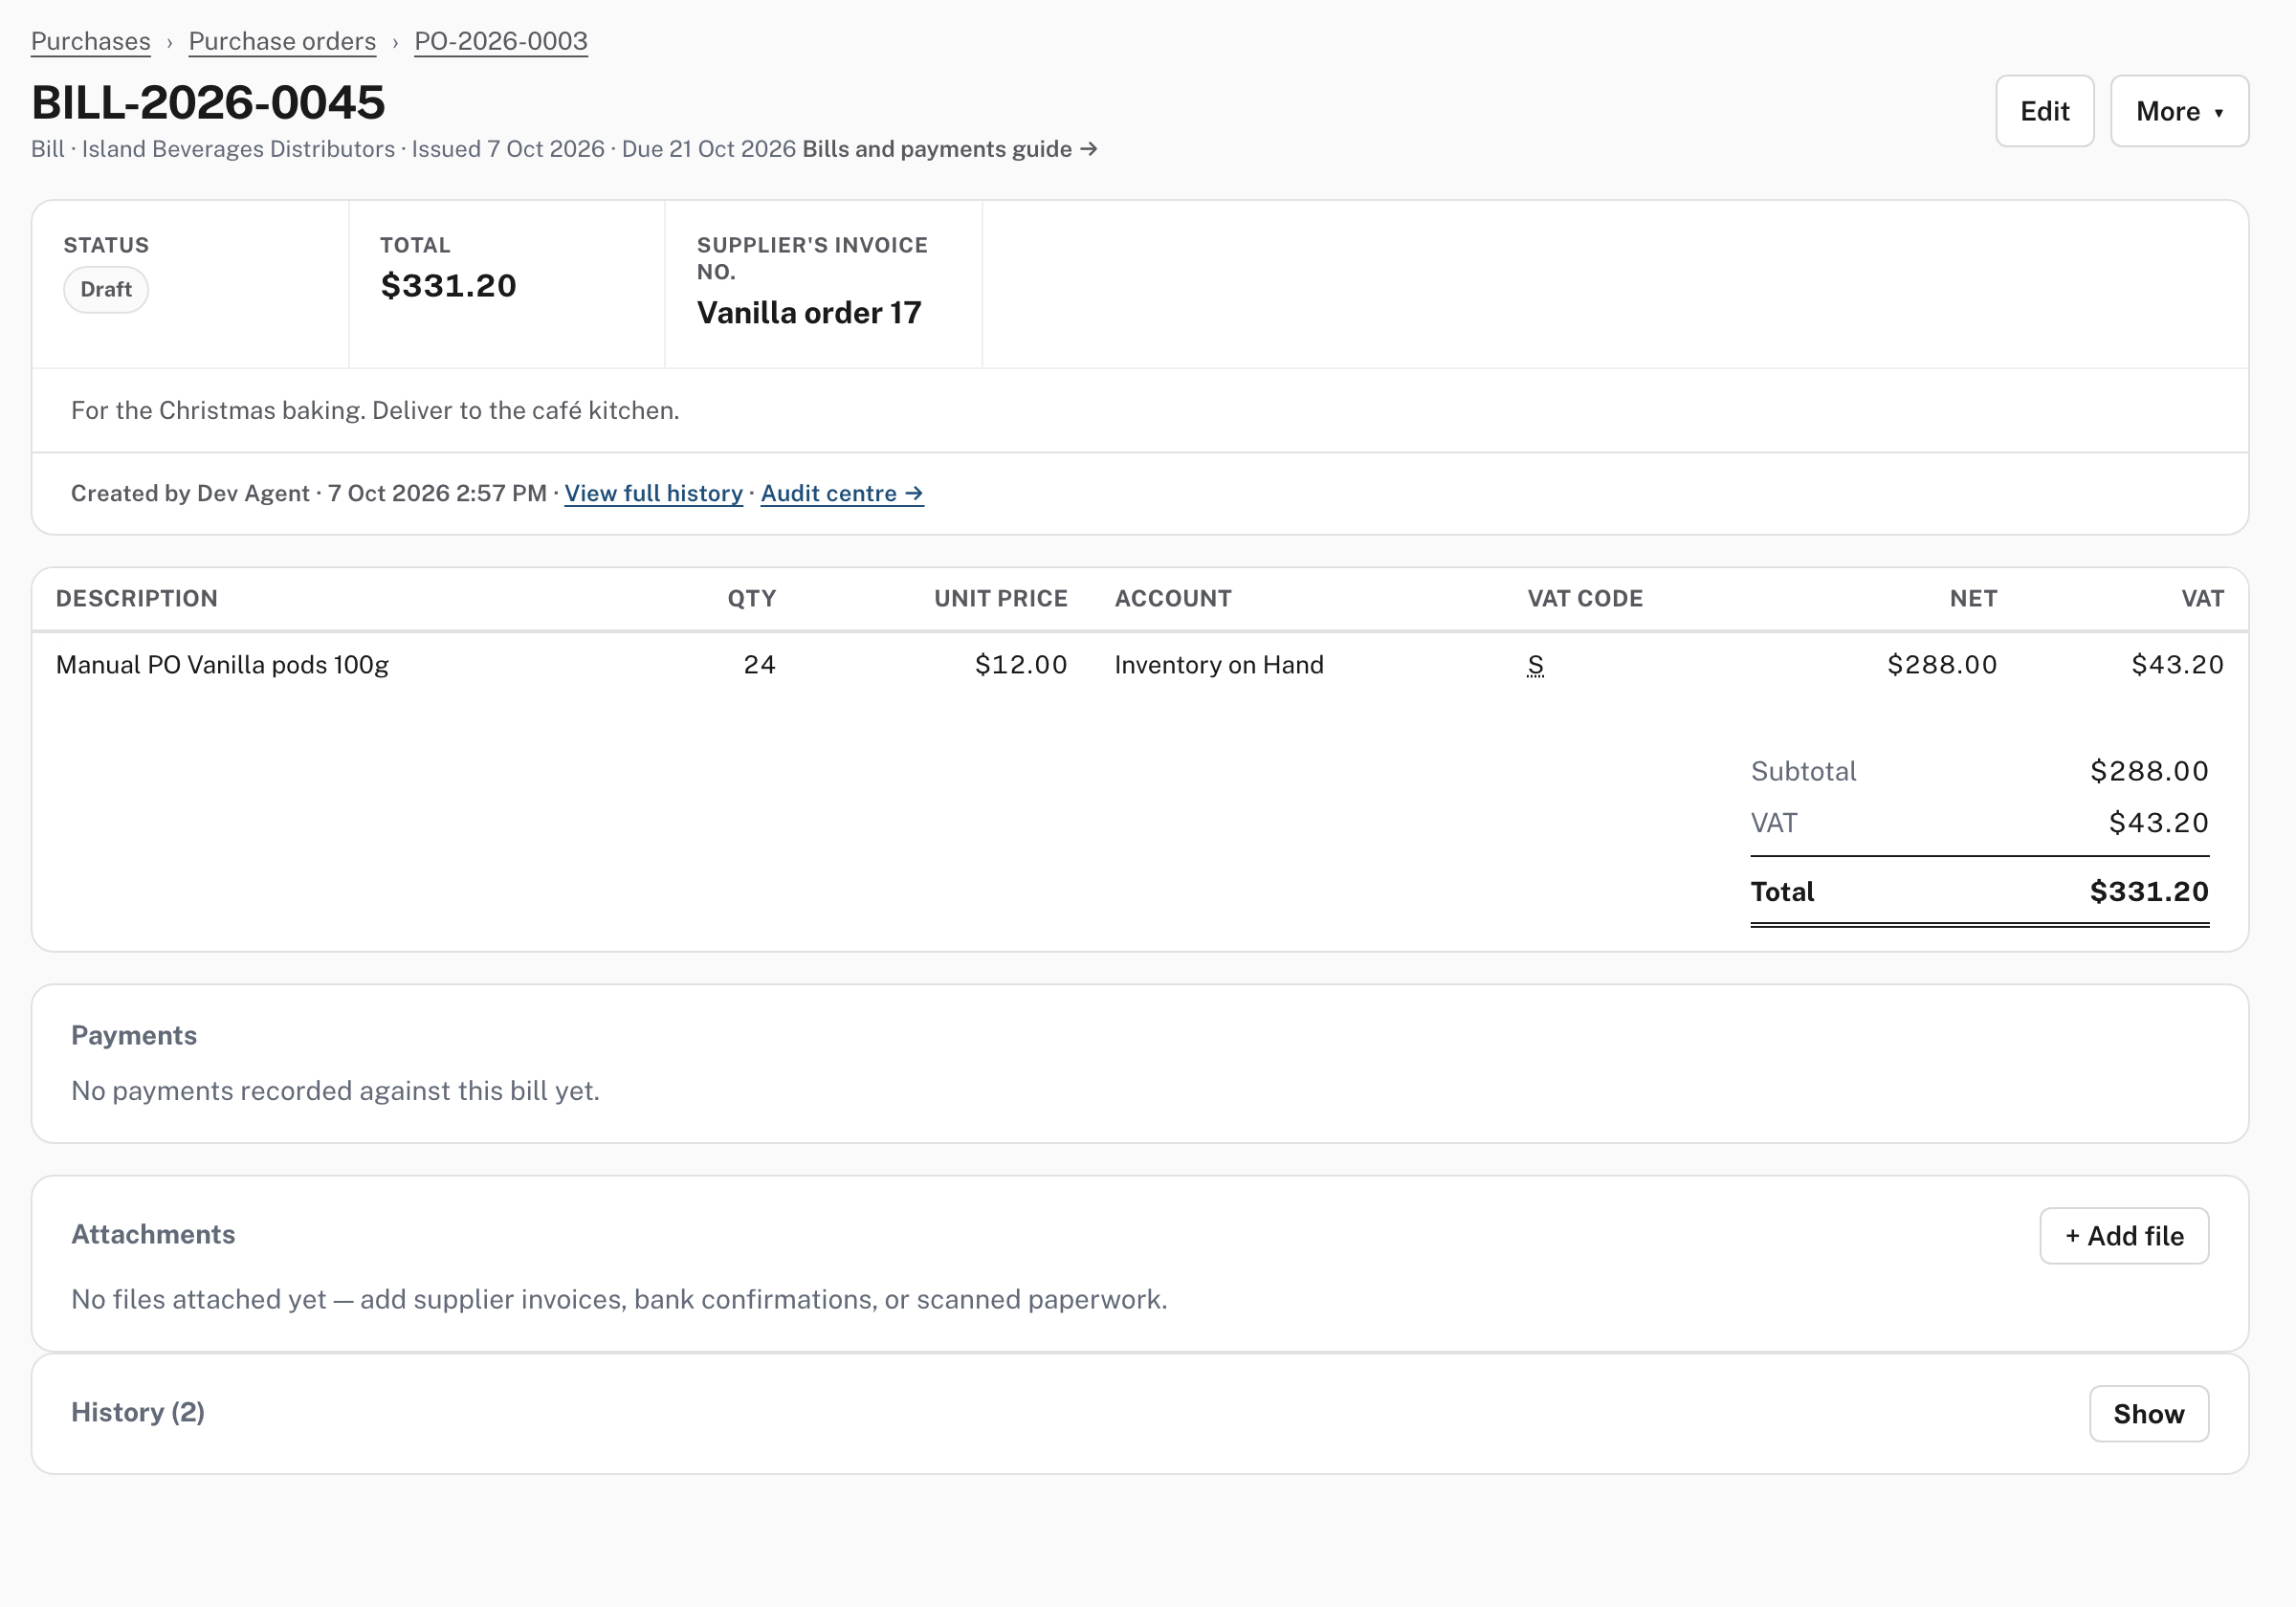
You land on a draft bill, with the trail Purchases › Purchase orders › the order above it. It carries the supplier, the lines, the account, the VAT and a due date (14 days on in the demo). Check the supplier's invoice number: it starts as the order's Supplier's quote no. (here Vanilla order 17), so replace it with the number on the supplier's real invoice. A draft bill is not in your accounts. Choose Edit, check it against the supplier's invoice, and record it as in Enter, approve and record a bill.
The order now shows Converted and nothing under Not yet billed (a dash in the list picture above). Converted means its lines have been turned into a bill, not that the bill is recorded: nothing is in your accounts until you record it.
Step 6. An employee files an expense claim
In My expenses, as the employee: My → My expenses → + New claim.
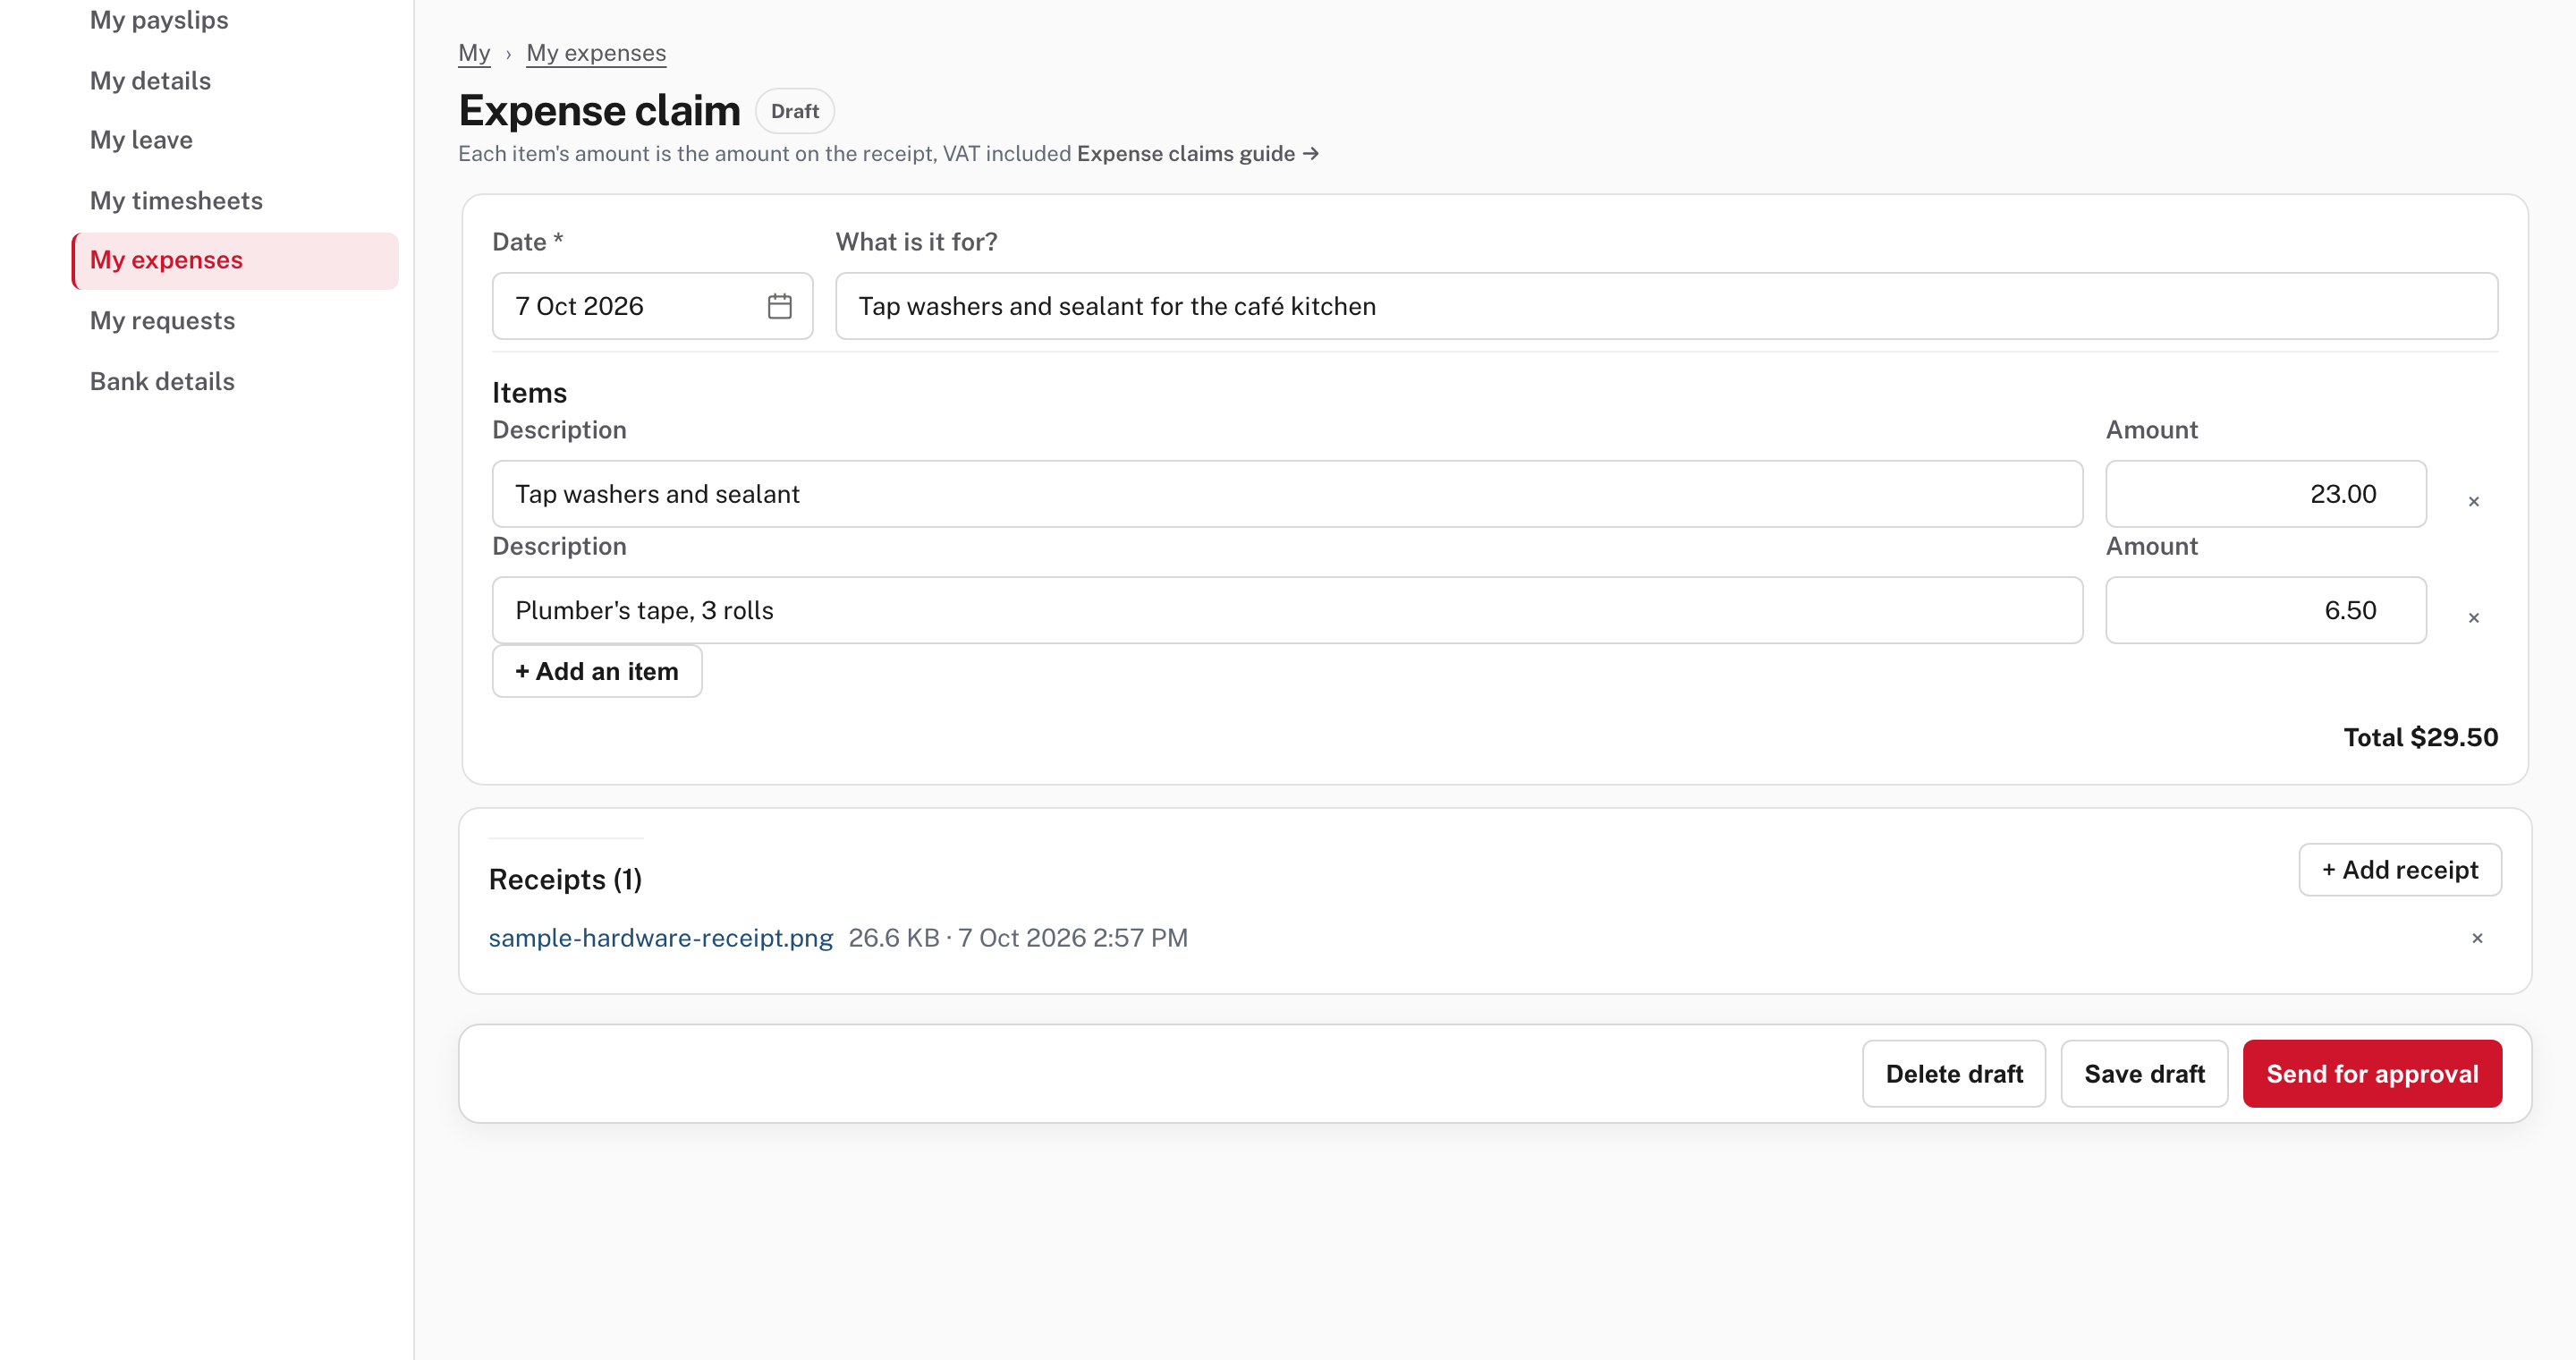
| Field | What it does |
|---|---|
| Date | When the money was spent. |
| What is it for? | A line the approver reads (here Tap washers and sealant for the café kitchen). |
| Items | One row per item: a description and the amount on the receipt, VAT included. + Add an item adds a row. |
| Receipts | Appears once the draft is saved: + Add receipt takes a photo or scan (PDF or image, up to 10 MB each; from Easy's Help). |
Enter each amount as printed on the receipt, with the VAT included: that is what the employee is paid back. Save draft keeps it unfinished (a draft can still be changed, and Delete draft removes it). Send for approval sends it, and the list shows it as Submitted:

A manager can also enter a claim for someone: Purchases → Expense claims → + New claim has an Employee box as well as the date, notes and lines (not shown in the demo: entering a claim there).
Step 7. The manager approves it
The claim waits in the approver's Mail under My actions (Find things and work faster).
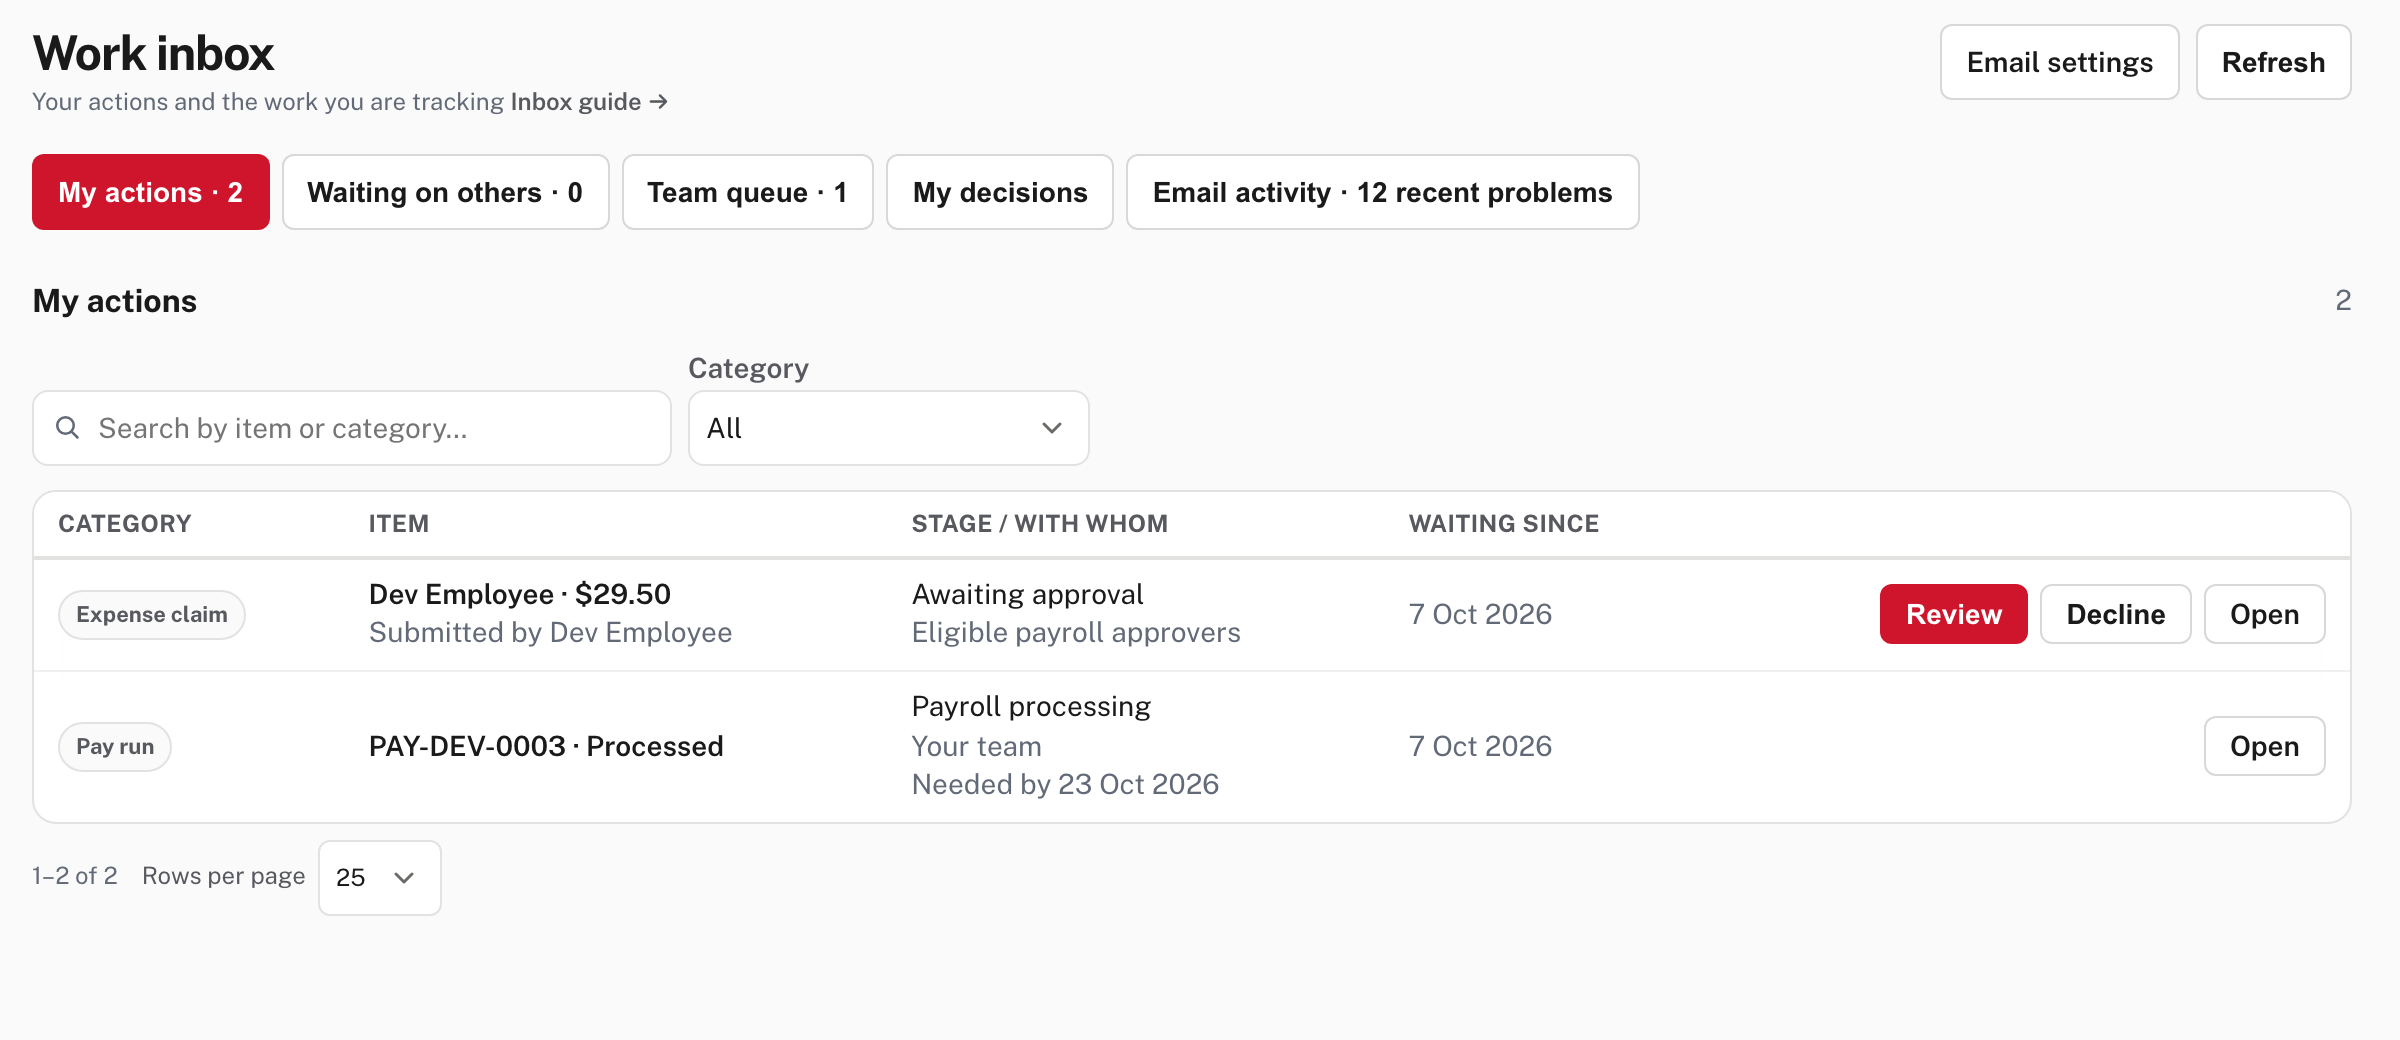
The row names the claim (Dev Employee · $29.50), who submitted it, that it is Awaiting approval and by whom, and gives Review, Decline and Open. (The pay run in the second row is unrelated.) Choose Review.
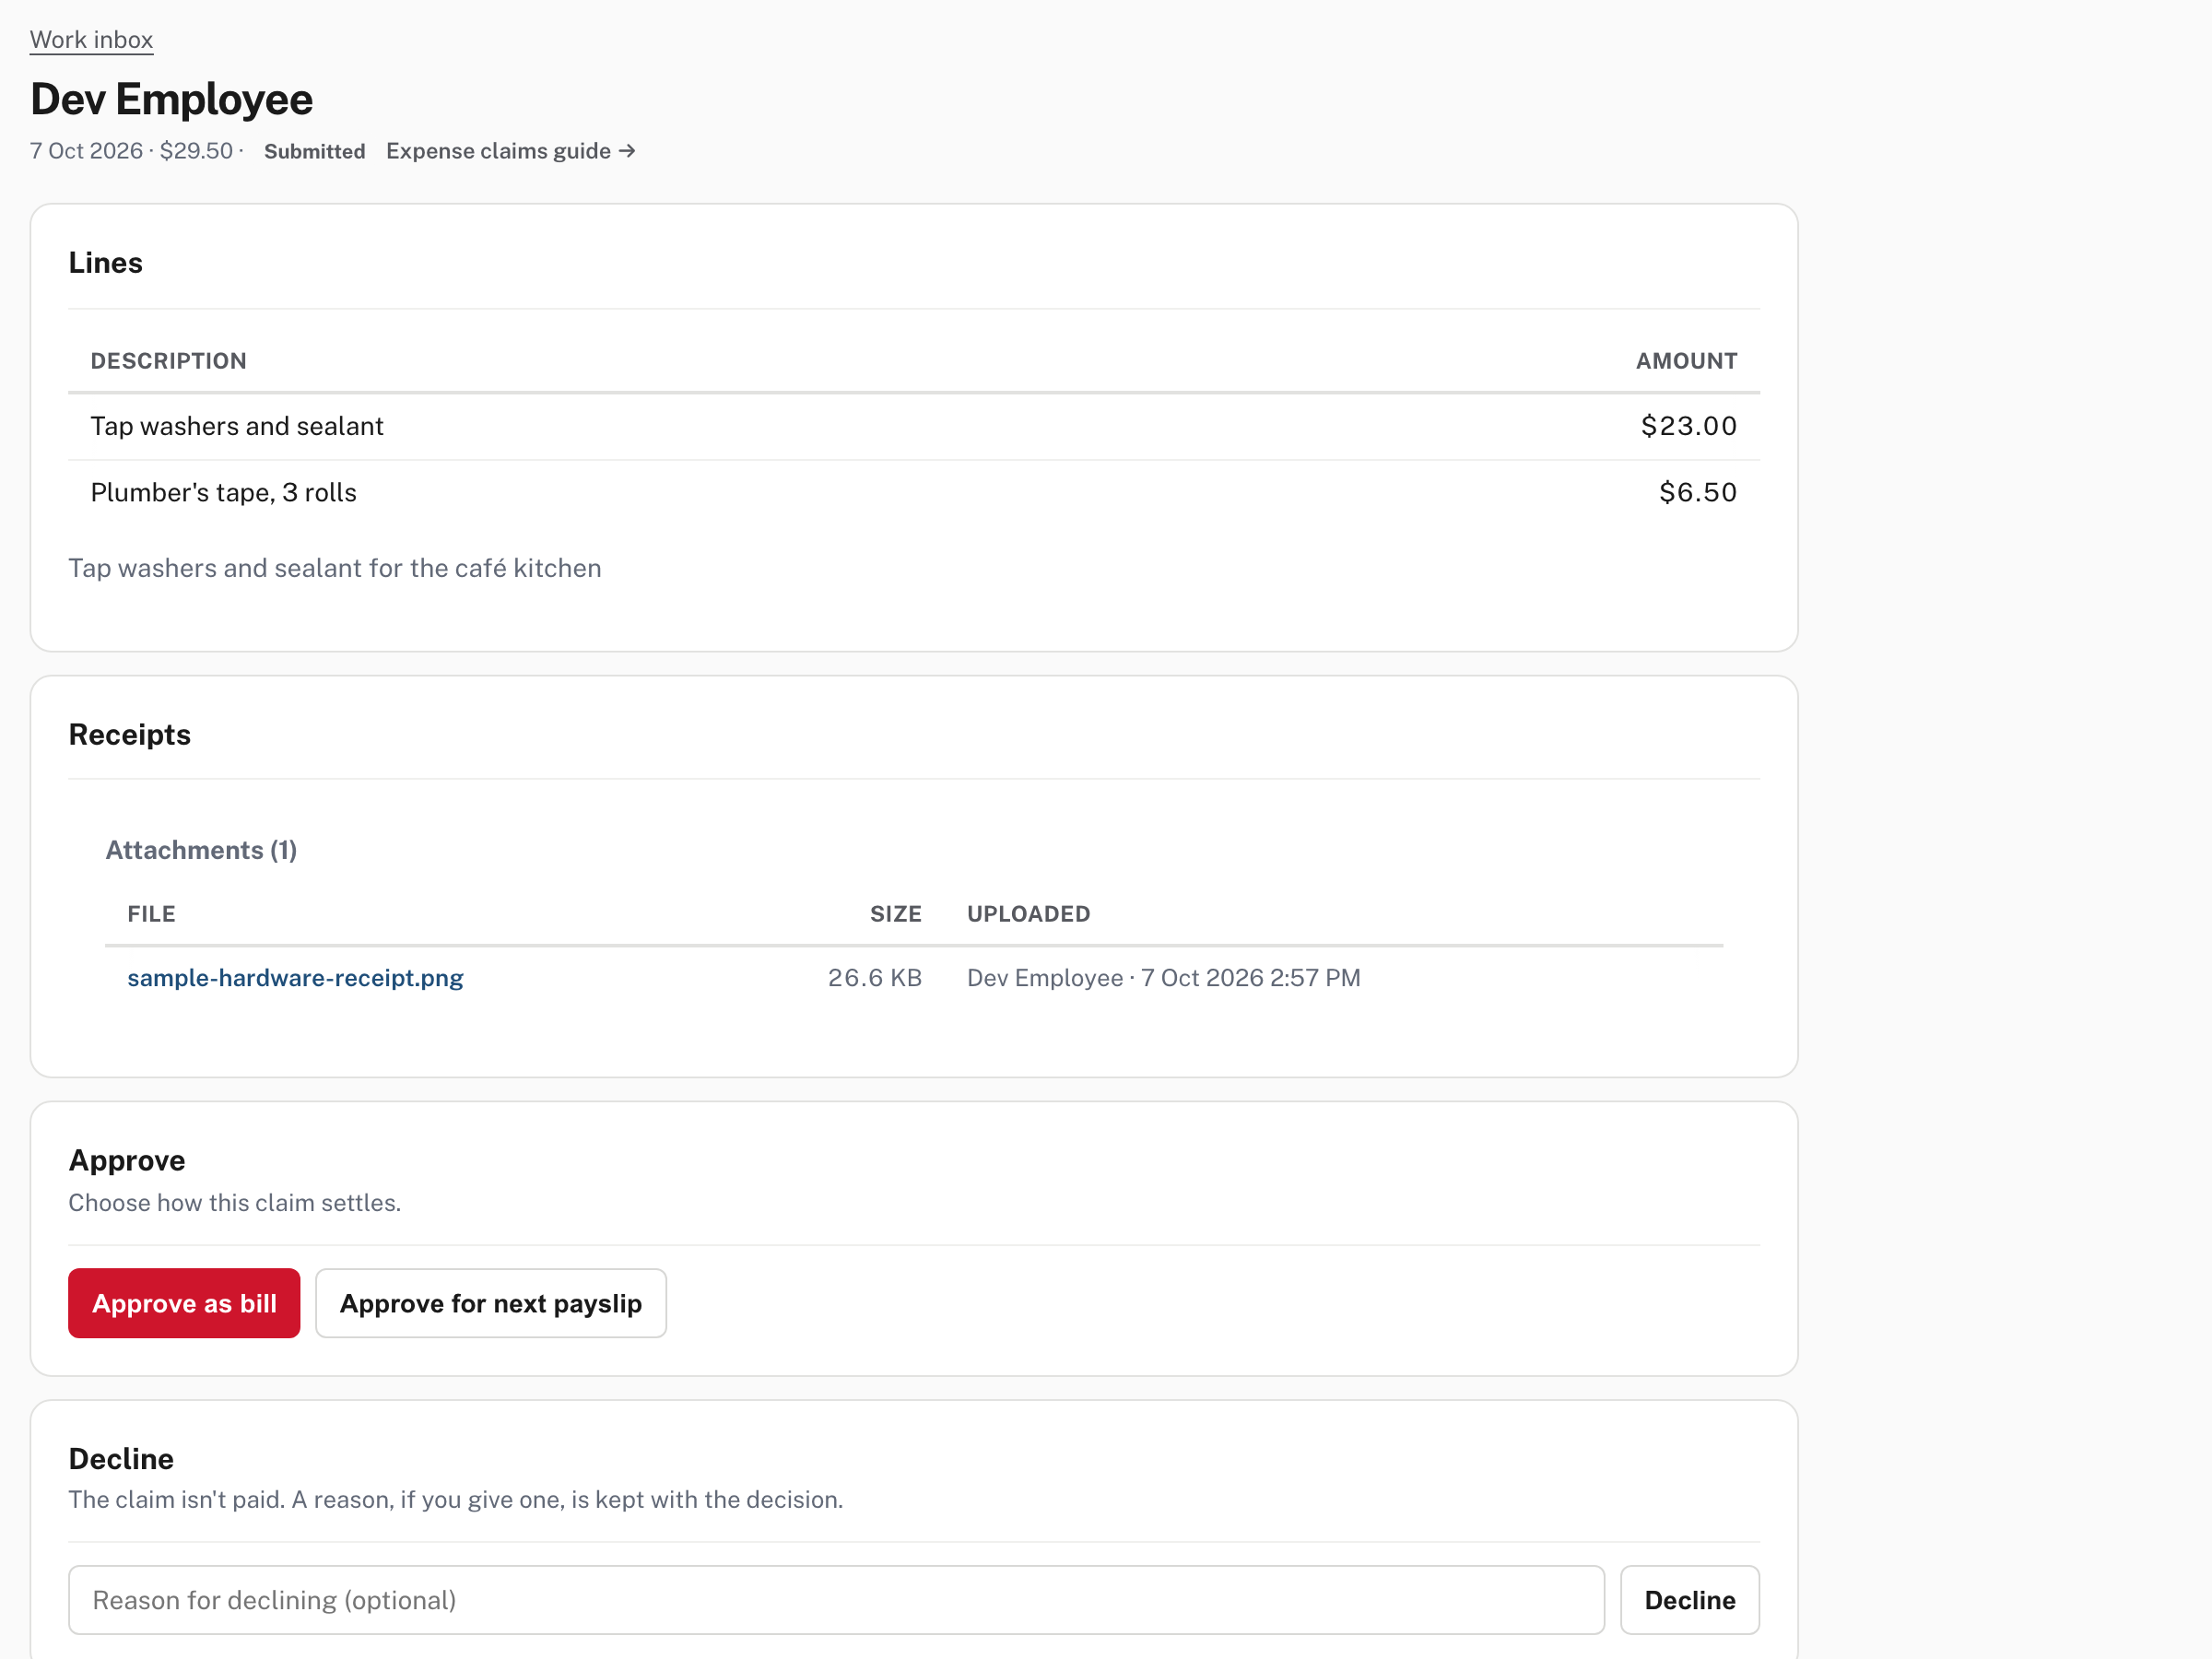
The approver sees the lines, the notes and the receipts (choose the file to open the picture). Two cards decide it:
- Approve has Approve as bill and Approve for next payslip. The first turns the claim into a bill to pay; the second adds it to the employee's next pay as a reimbursement, asking you for the expense account first (from Easy's source; not shown in the demo).
- Decline has a Reason for declining (optional) box and Decline (Easy asks Decline this claim? first; from Easy's source). The claim isn't paid, and the reason is kept with the decision.
Choose Approve as bill, and the approver codes each line:
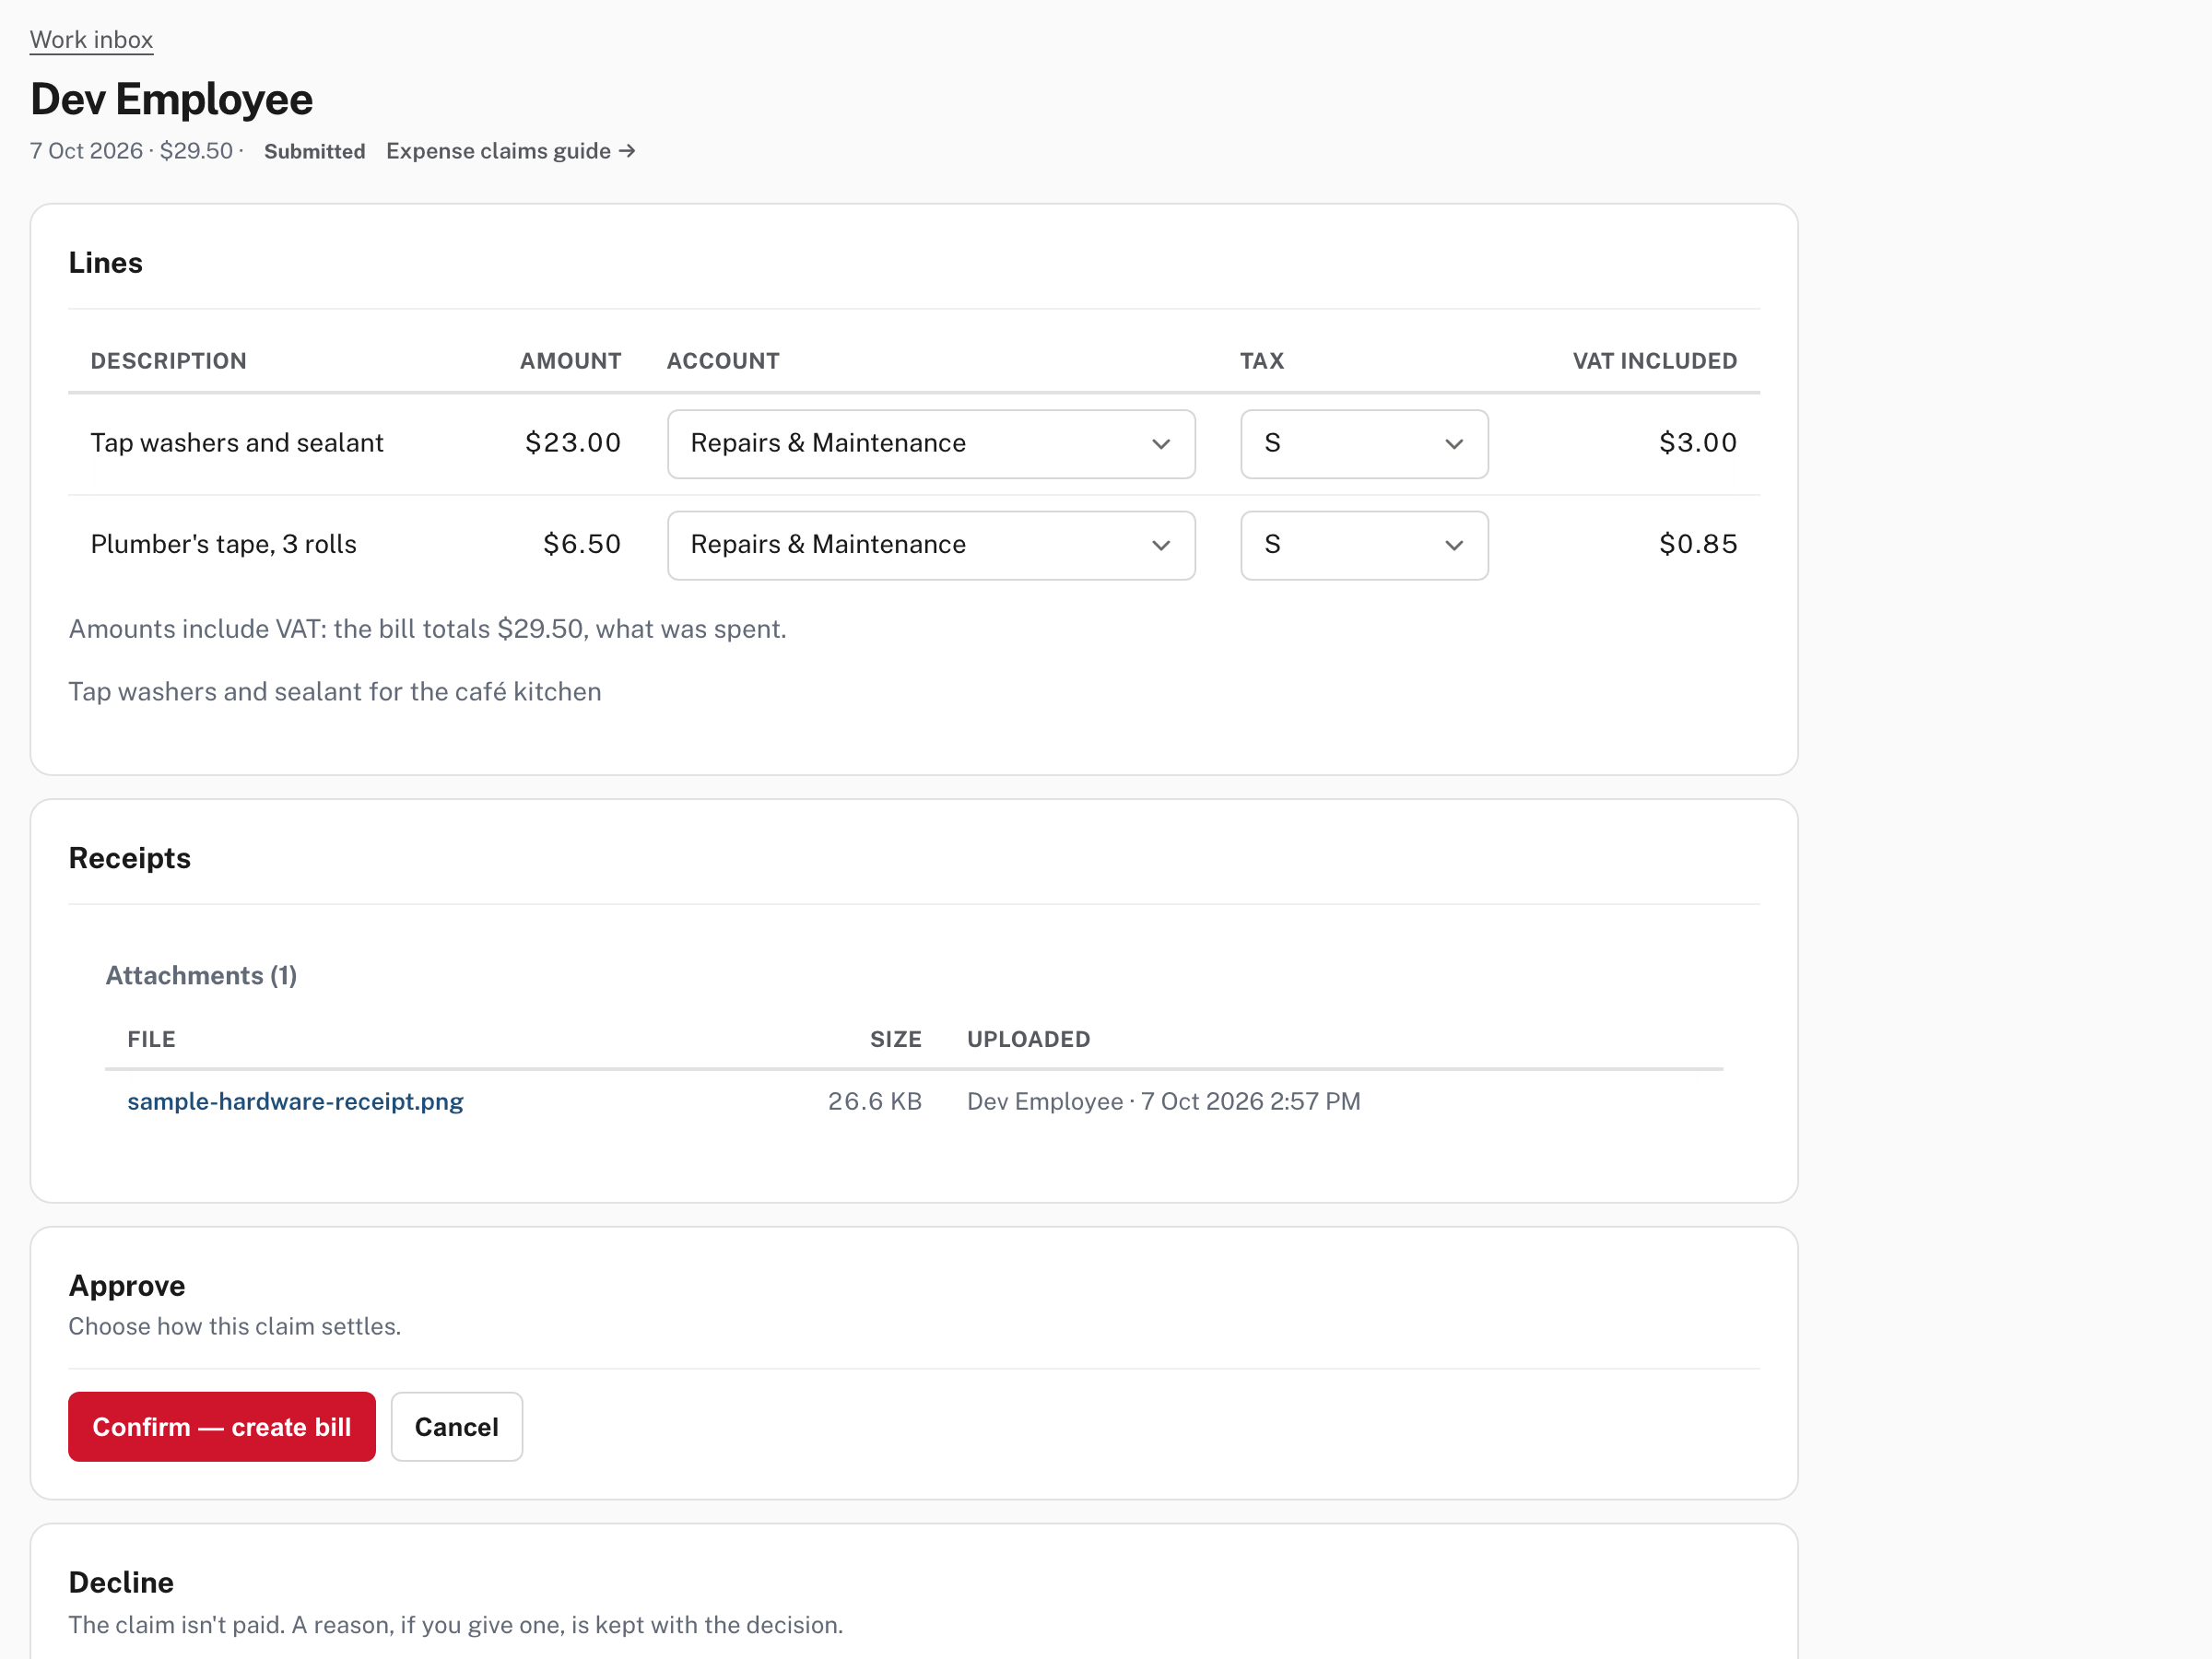
For each line choose the Account and the Tax code, and VAT included shows the VAT inside the amount. Easy says Amounts include VAT: the bill totals $29.50, what was spent. Here both lines go to Repairs & Maintenance at the standard code, so $23.00 splits into $20.00 and $3.00 VAT, and $6.50 into $5.65 and $0.85. Choose Confirm — create bill. The claim reads Approved and Approved and settled as a bill with a View bill → link.
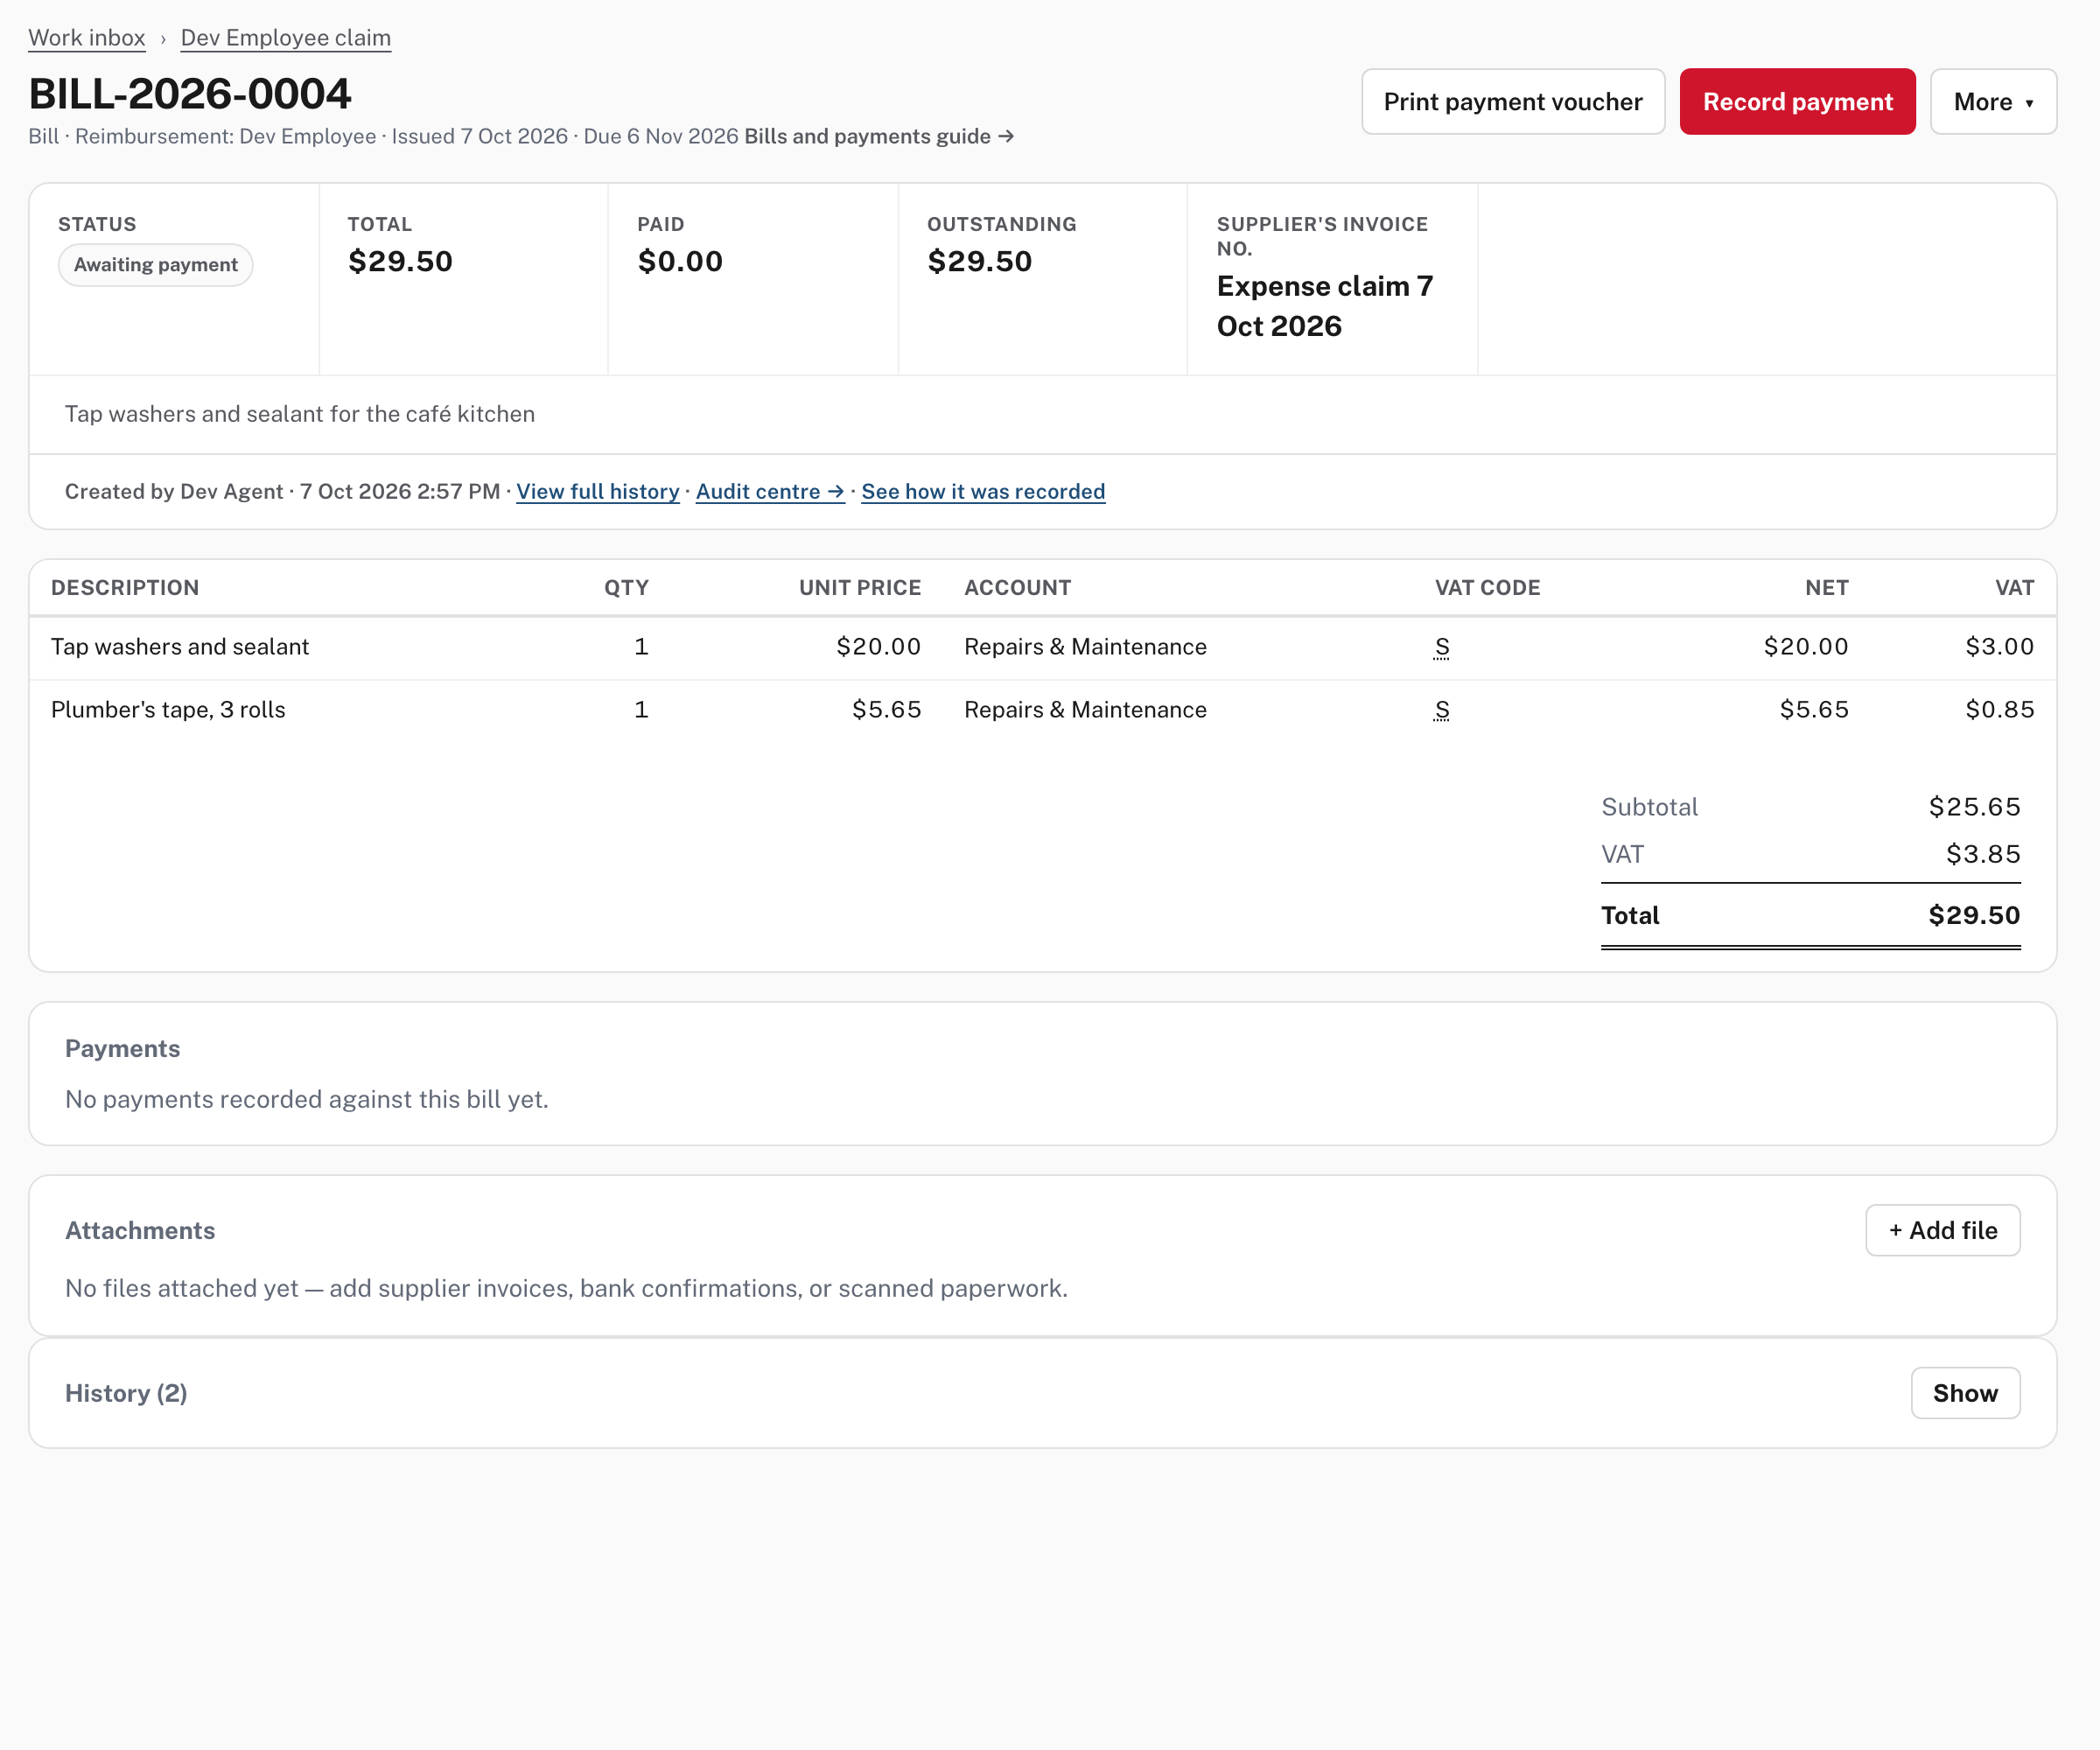
The bill is recorded and Awaiting payment, with the employee named as the supplier (Reimbursement: Dev Employee), the supplier's invoice number Expense claim 7 Oct 2026, and the claim's notes. The bill is dated on the claim's date, or on the first open day if that date is locked (Help). If you ever undo the bill, the claim goes back to Submitted to be decided again.
Step 8. Pay the employee
On the bill, choose Record payment. It opens the ordinary payment form with the supplier (the employee) and the bill filled in (from Easy's source; the form is not pictured): choose Paid from (the bank or cash account the money leaves) and record the payment. The details are in Receipts, payments and transfers and, for paying many at once, Pay suppliers: payment runs and bank files.

The manager's list now shows the claim as Paid.
When something goes wrong
- Receive now shows a dash for a line. That line isn't a tracked item, or all of it has been received, or the order is in a foreign currency. For stock you can't receive, convert the line to a bill instead.
- A claim says it can't be approved by you. You submitted it or it is yours, or the person it was routed to is someone else. A different person decides, unless you are the only person who can.
- The goods receipt was wrong. Choose Undo on the receipt (it asks first); the order's received quantity goes back down by the same amount.
Check before you continue
Check before you continue
- Each purchase order names the right supplier, quantities and prices, and has been sent or given to the supplier.
- Goods received are recorded as they arrive, against the right order, with the quantity that really came.
- A converted order's bill is checked against the supplier's real invoice (number, date, totals) and recorded.
- Every expense claim has its receipts, a clear description and amounts with the VAT included.
- The approver is someone other than the claimant, and each line is coded to the right account and tax code.
- Approved claims are paid, and the claims list shows them Paid.