Invoice branding and document themes
Do this once, before the first invoice goes to a customer, and again whenever the look of your documents changes. A
theme decides how your quotes, invoices, credit notes and customer statements look: layout, colour, logo, headings,
payment details and any extra wording. The numbers on them (INV-2026-0042) come from document numbering, covered at the
end.
About the screenshots
Screenshots are from Easy's demo company, Little Polynesian Café. It has no logo, so the pictures show the layout without one.
Before you start
- Business details are complete. A Cook Islands tax invoice must show your registered name and RMD number, and these fill every document header (Set up your company, step 4).
- A logo file, if you have one: PNG, JPEG, WebP or GIF, under 500 KB. SVG is not accepted, because it can carry script.
- The bank account customers should pay into, if they pay by transfer.
Step 1. Add your logo
Settings → Organisation → Business details, then scroll to Logo.
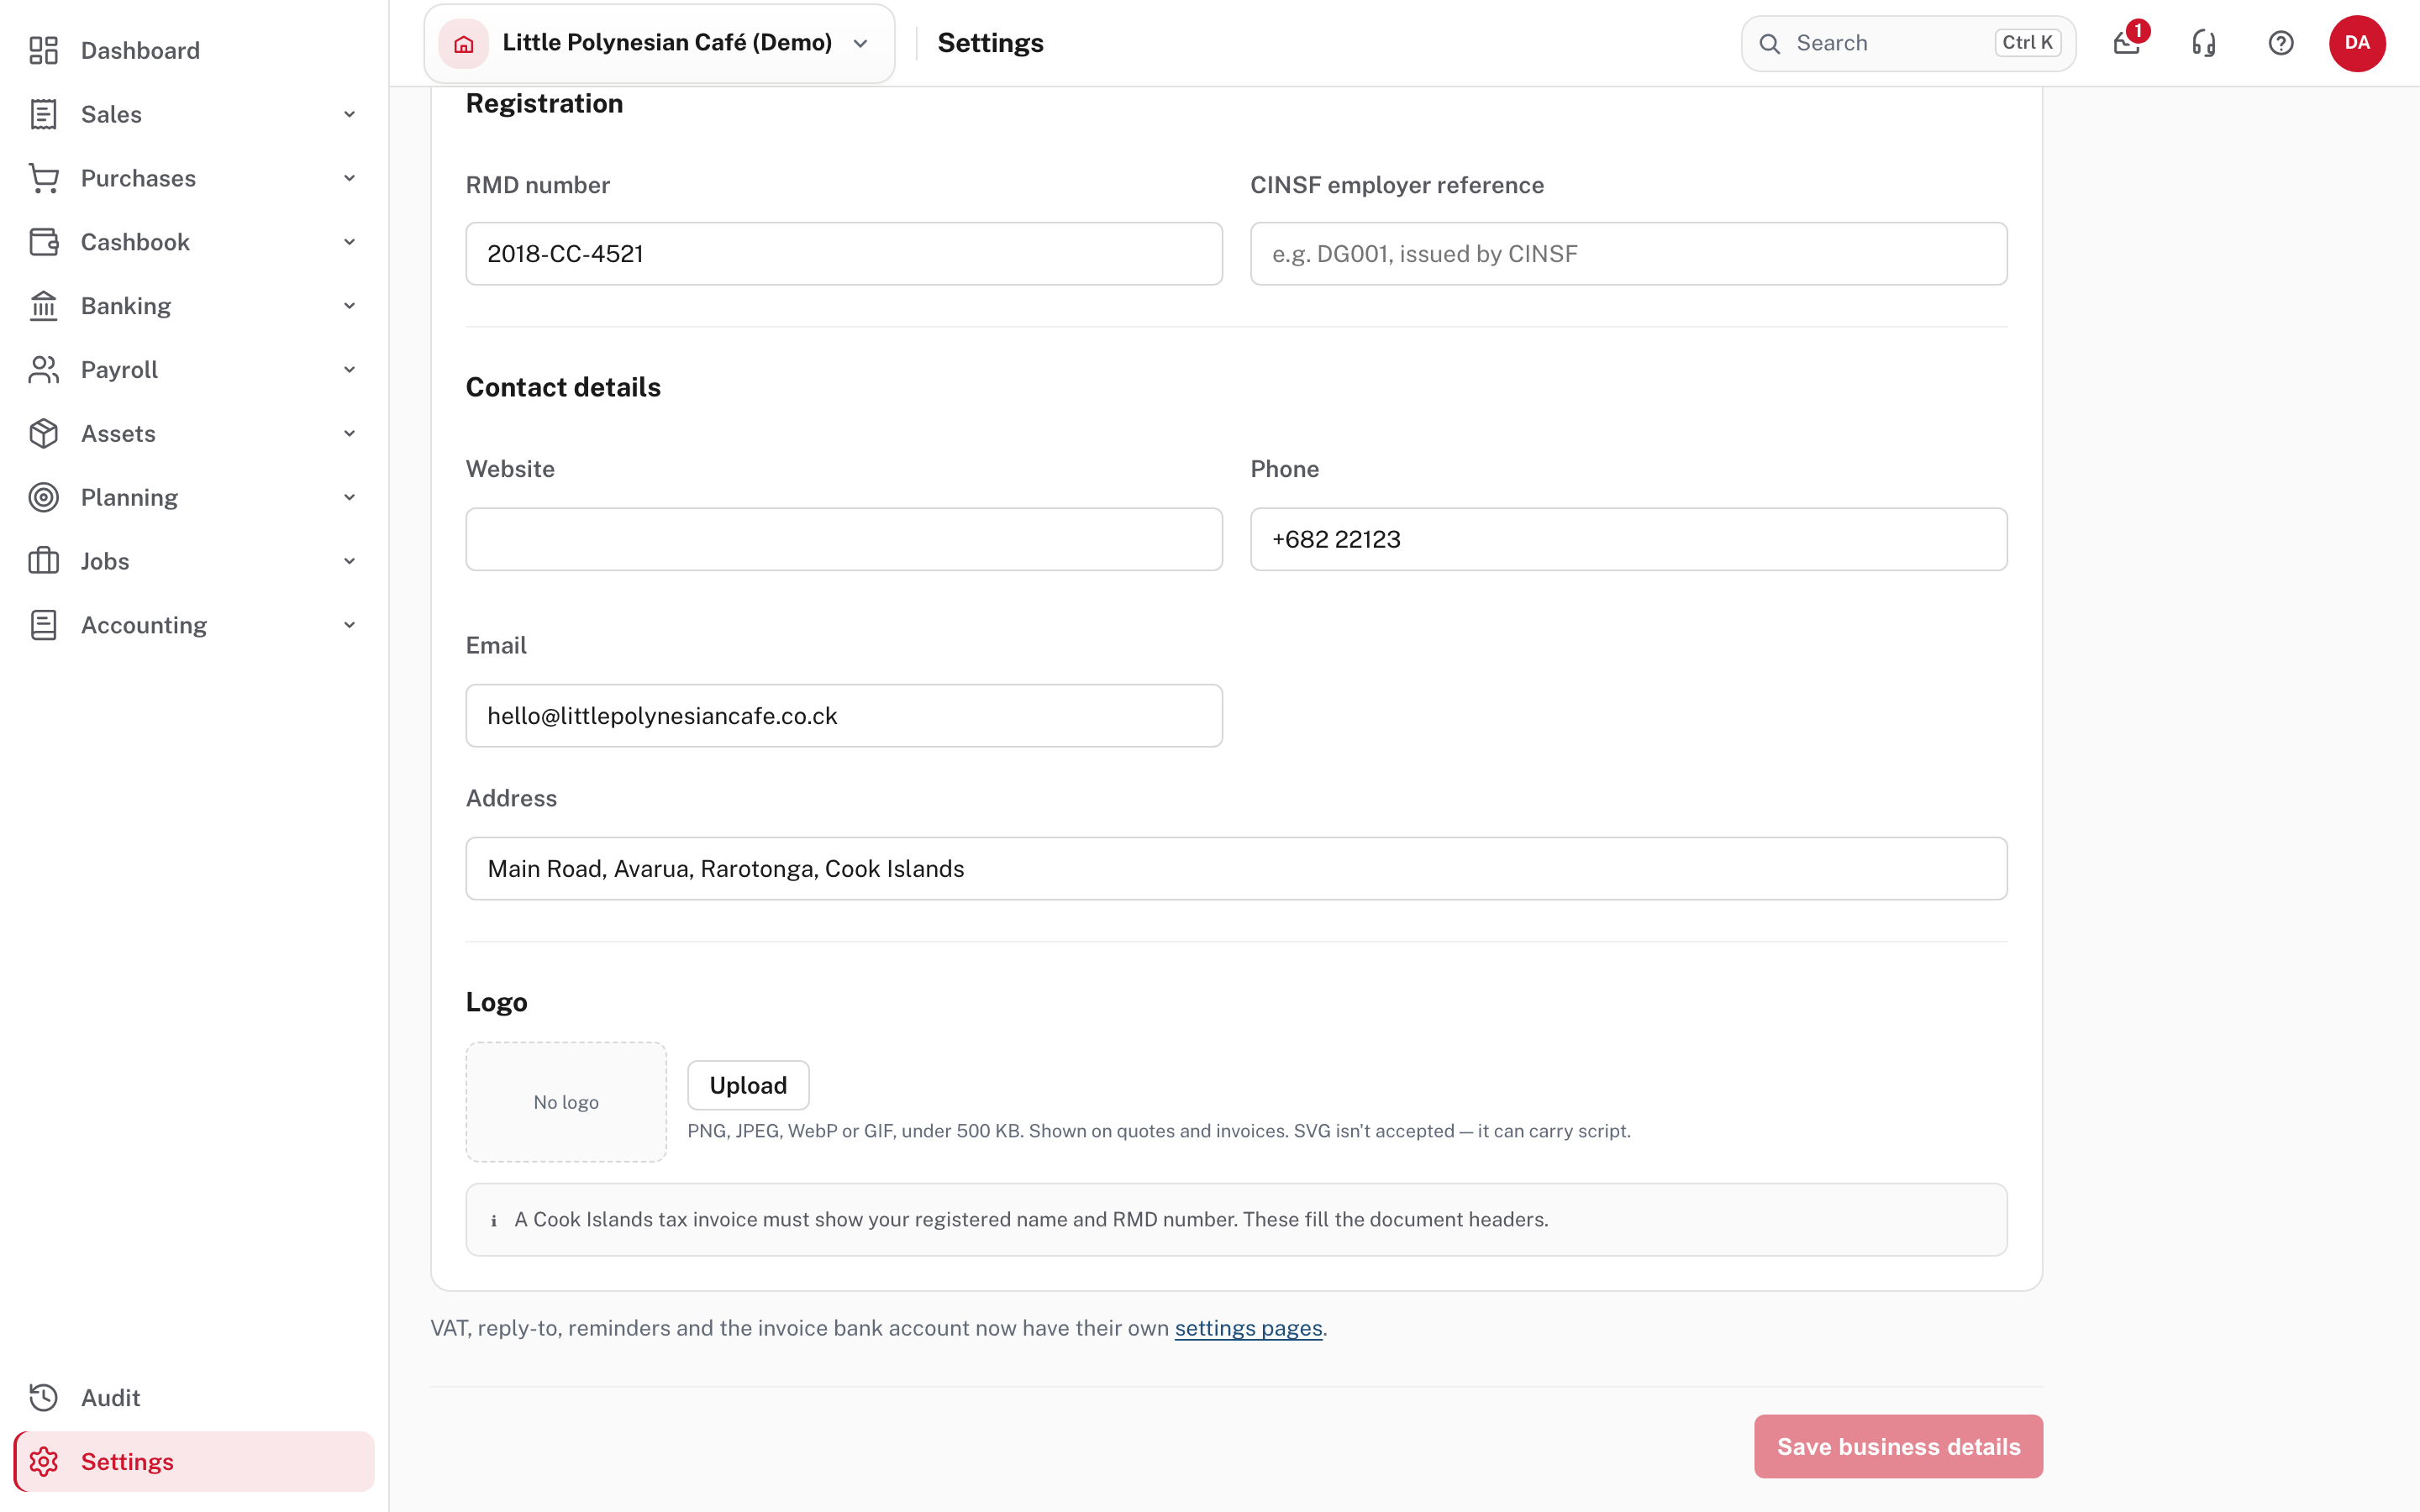
Choose Upload and Save business details. The logo appears on quotes and invoices wherever the theme places it (step 3). The same page holds the legal name, RMD number, address, phone, email and website that print in the header.
More detail: Business details.
Step 2. Open Document branding and choose a layout
Settings → Documents & email → Document branding. The tabs beside it are Document numbering and Email.
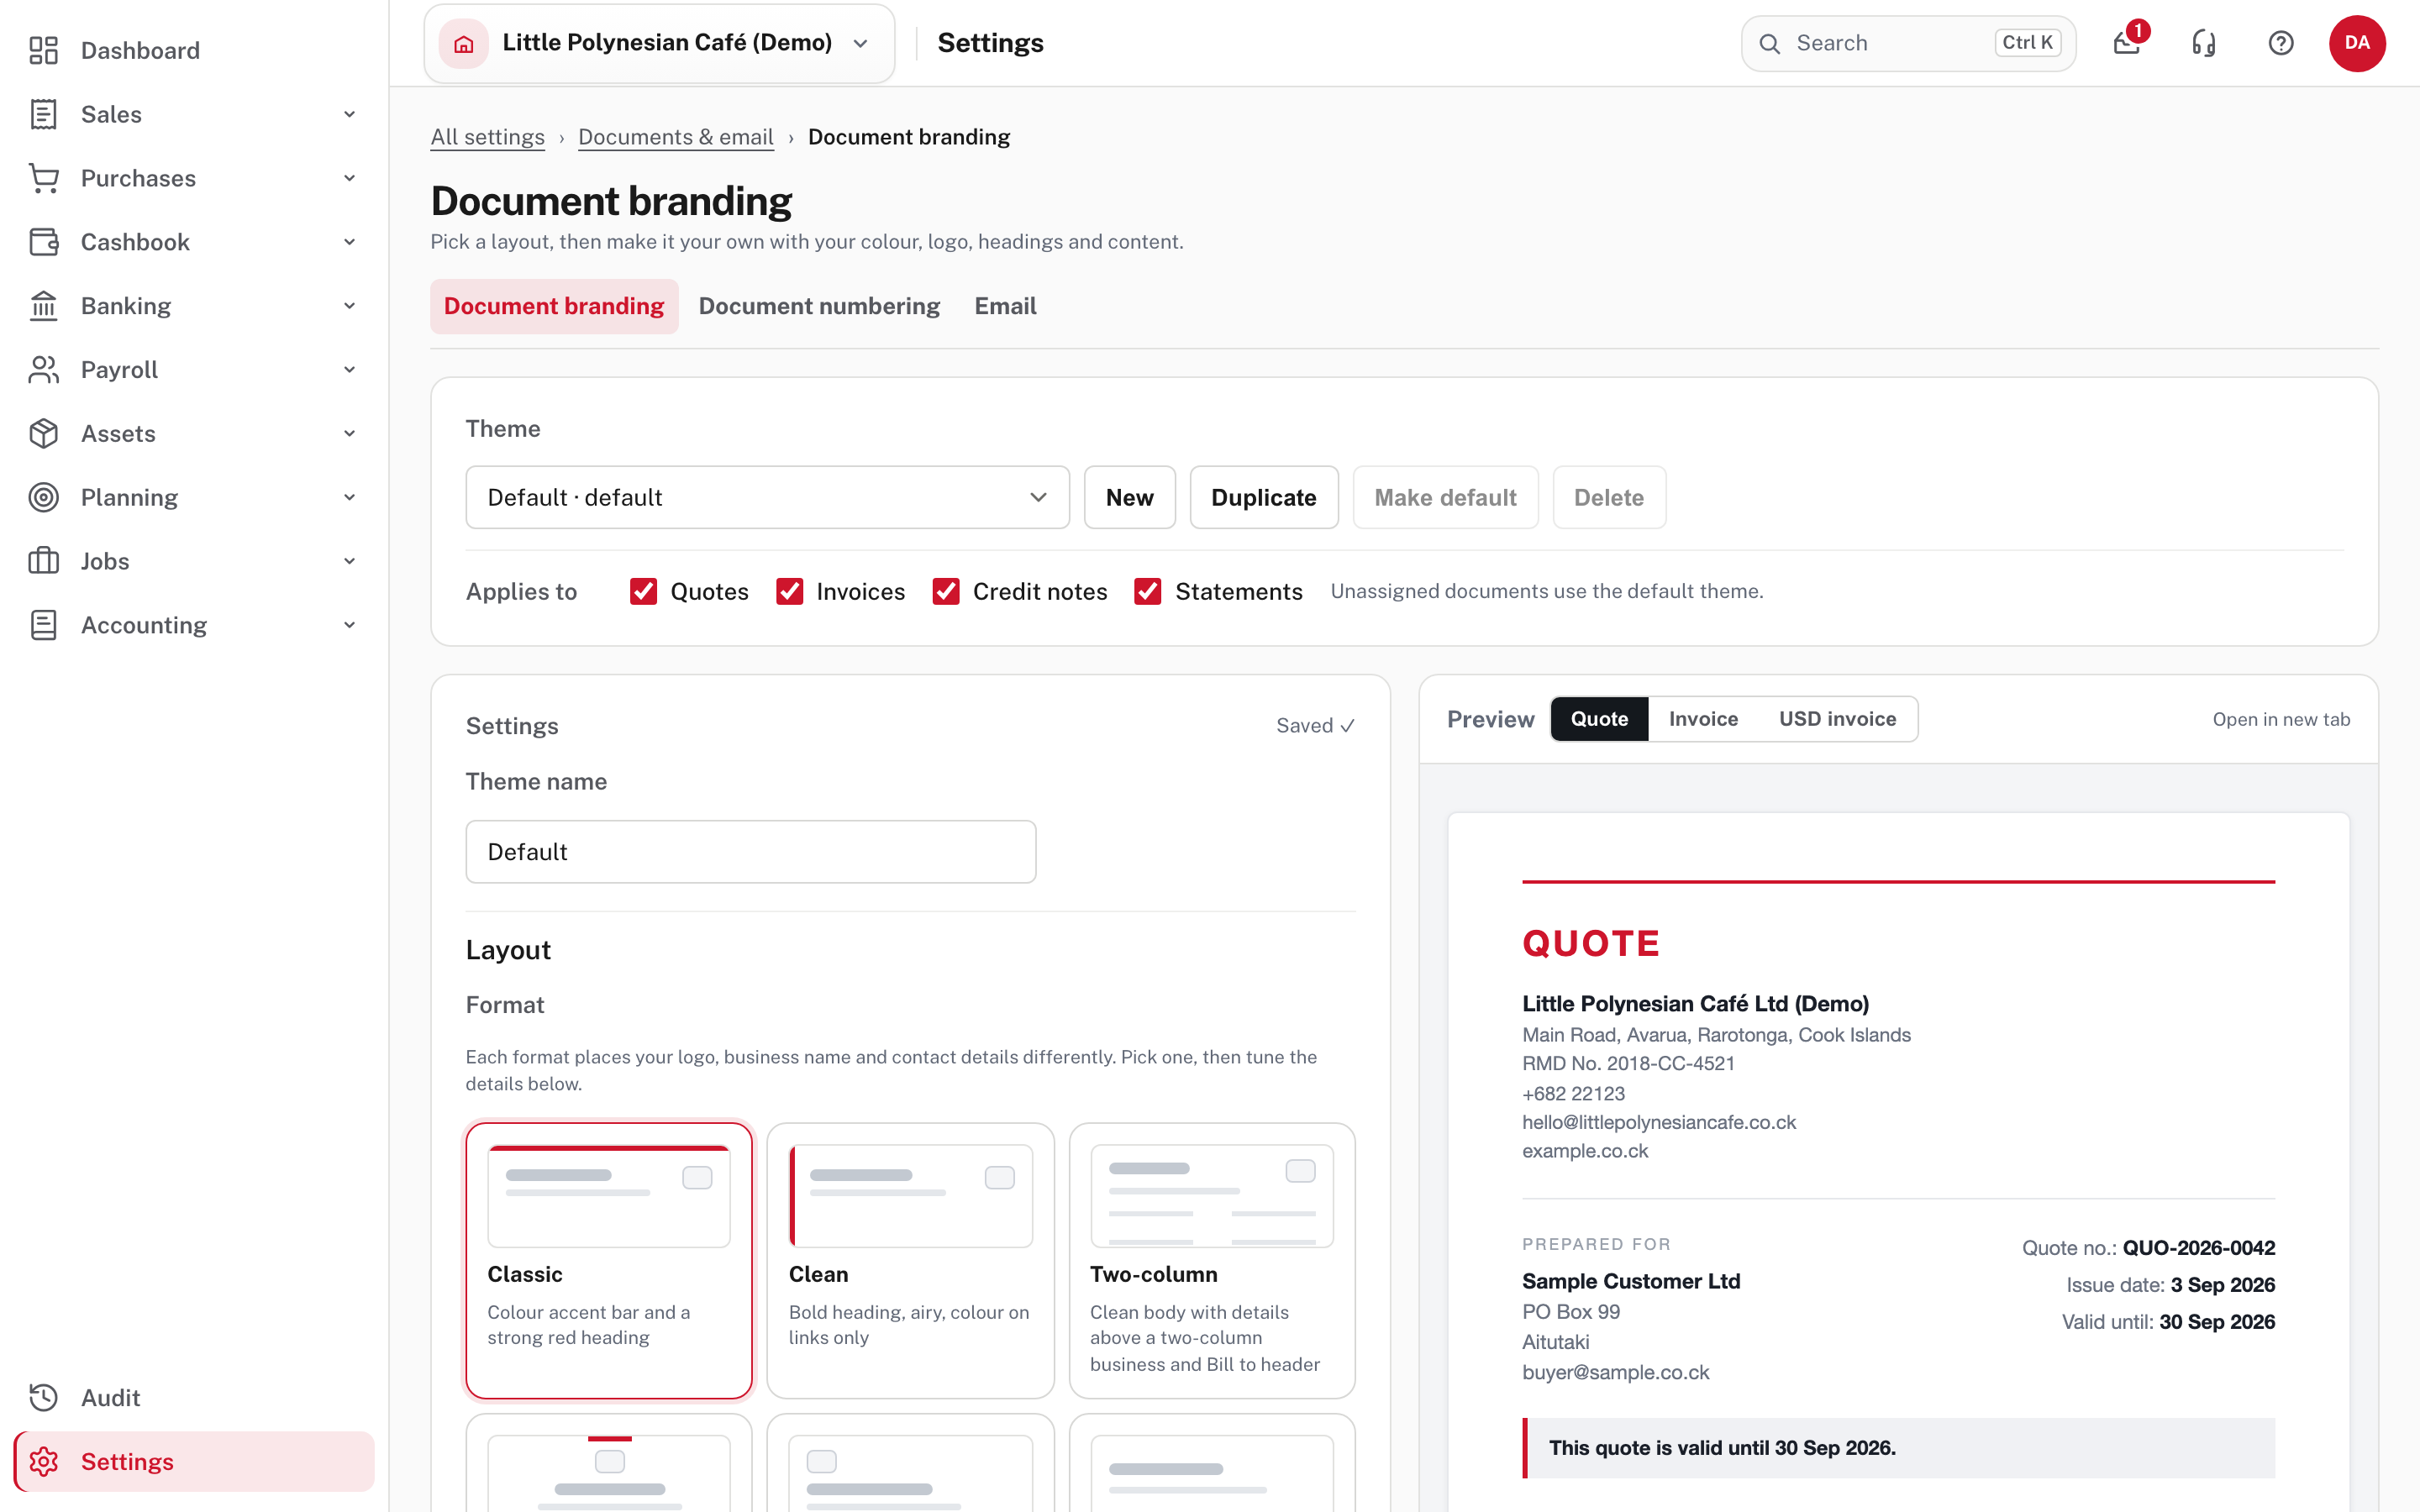
Every company starts with one theme called Default. The page has three parts:
- Theme (top): the theme you are editing, with New, Duplicate, Make default and Delete, and Applies to, the tick boxes for Quotes, Invoices, Credit notes and Statements. Documents with no theme of their own use the default theme.
- Settings (left): everything you can change, from the layout down to content blocks.
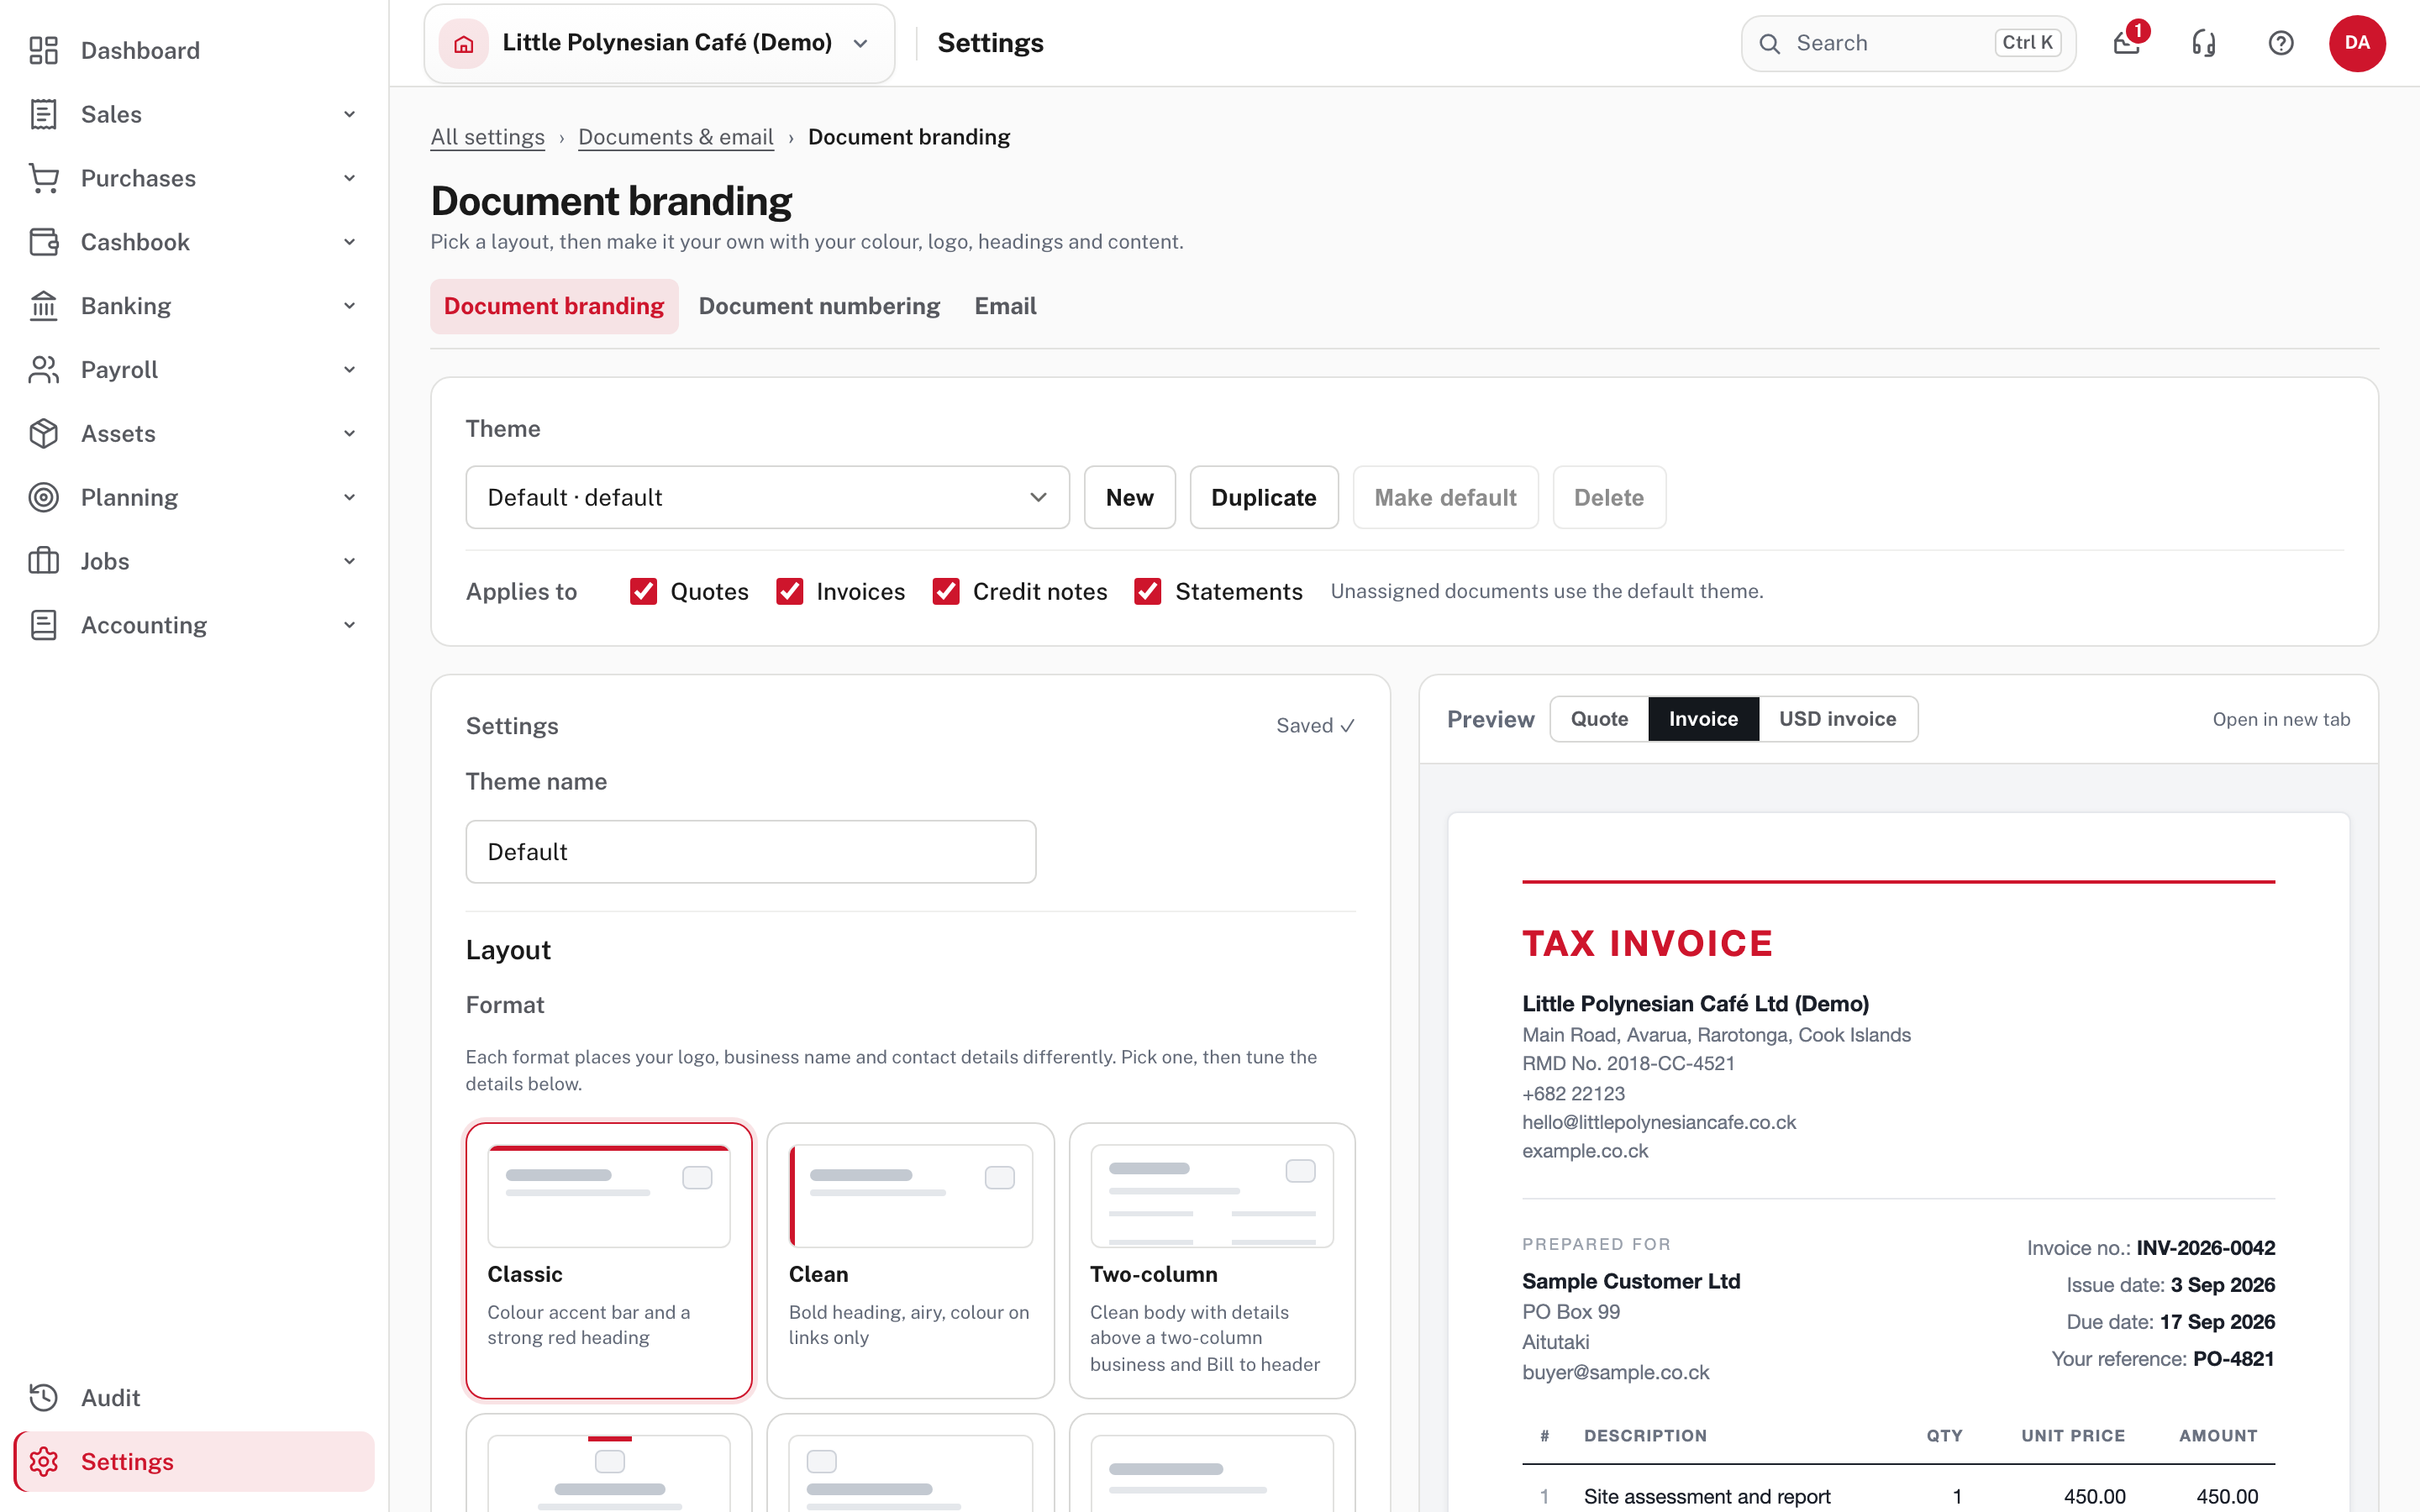
- Preview (right): the document as it will print. Switch between Quote, Invoice and USD invoice (an invoice in another currency), or Open in new tab. The preview shows the last save, so save before you look.
Under Layout → Format, choose one of six layouts. Each places your logo, business name and contact details differently:
| Layout | What it looks like |
|---|---|
| Classic | A colour accent bar and a strong red heading |
| Clean | Bold heading, airy, colour on links only |
| Two-column | A clean body with details above a two-column business and Bill to header |
| Serif | An elegant serif letterhead with a centred accent rule |
| Minimal | Left-aligned, compact and understated |
| Plain | Serif and mono, no colour |
Brand colour sets the accent used by most layouts. Type a colour code, or use the colour box.
Step 3. Header
Scroll to Header.
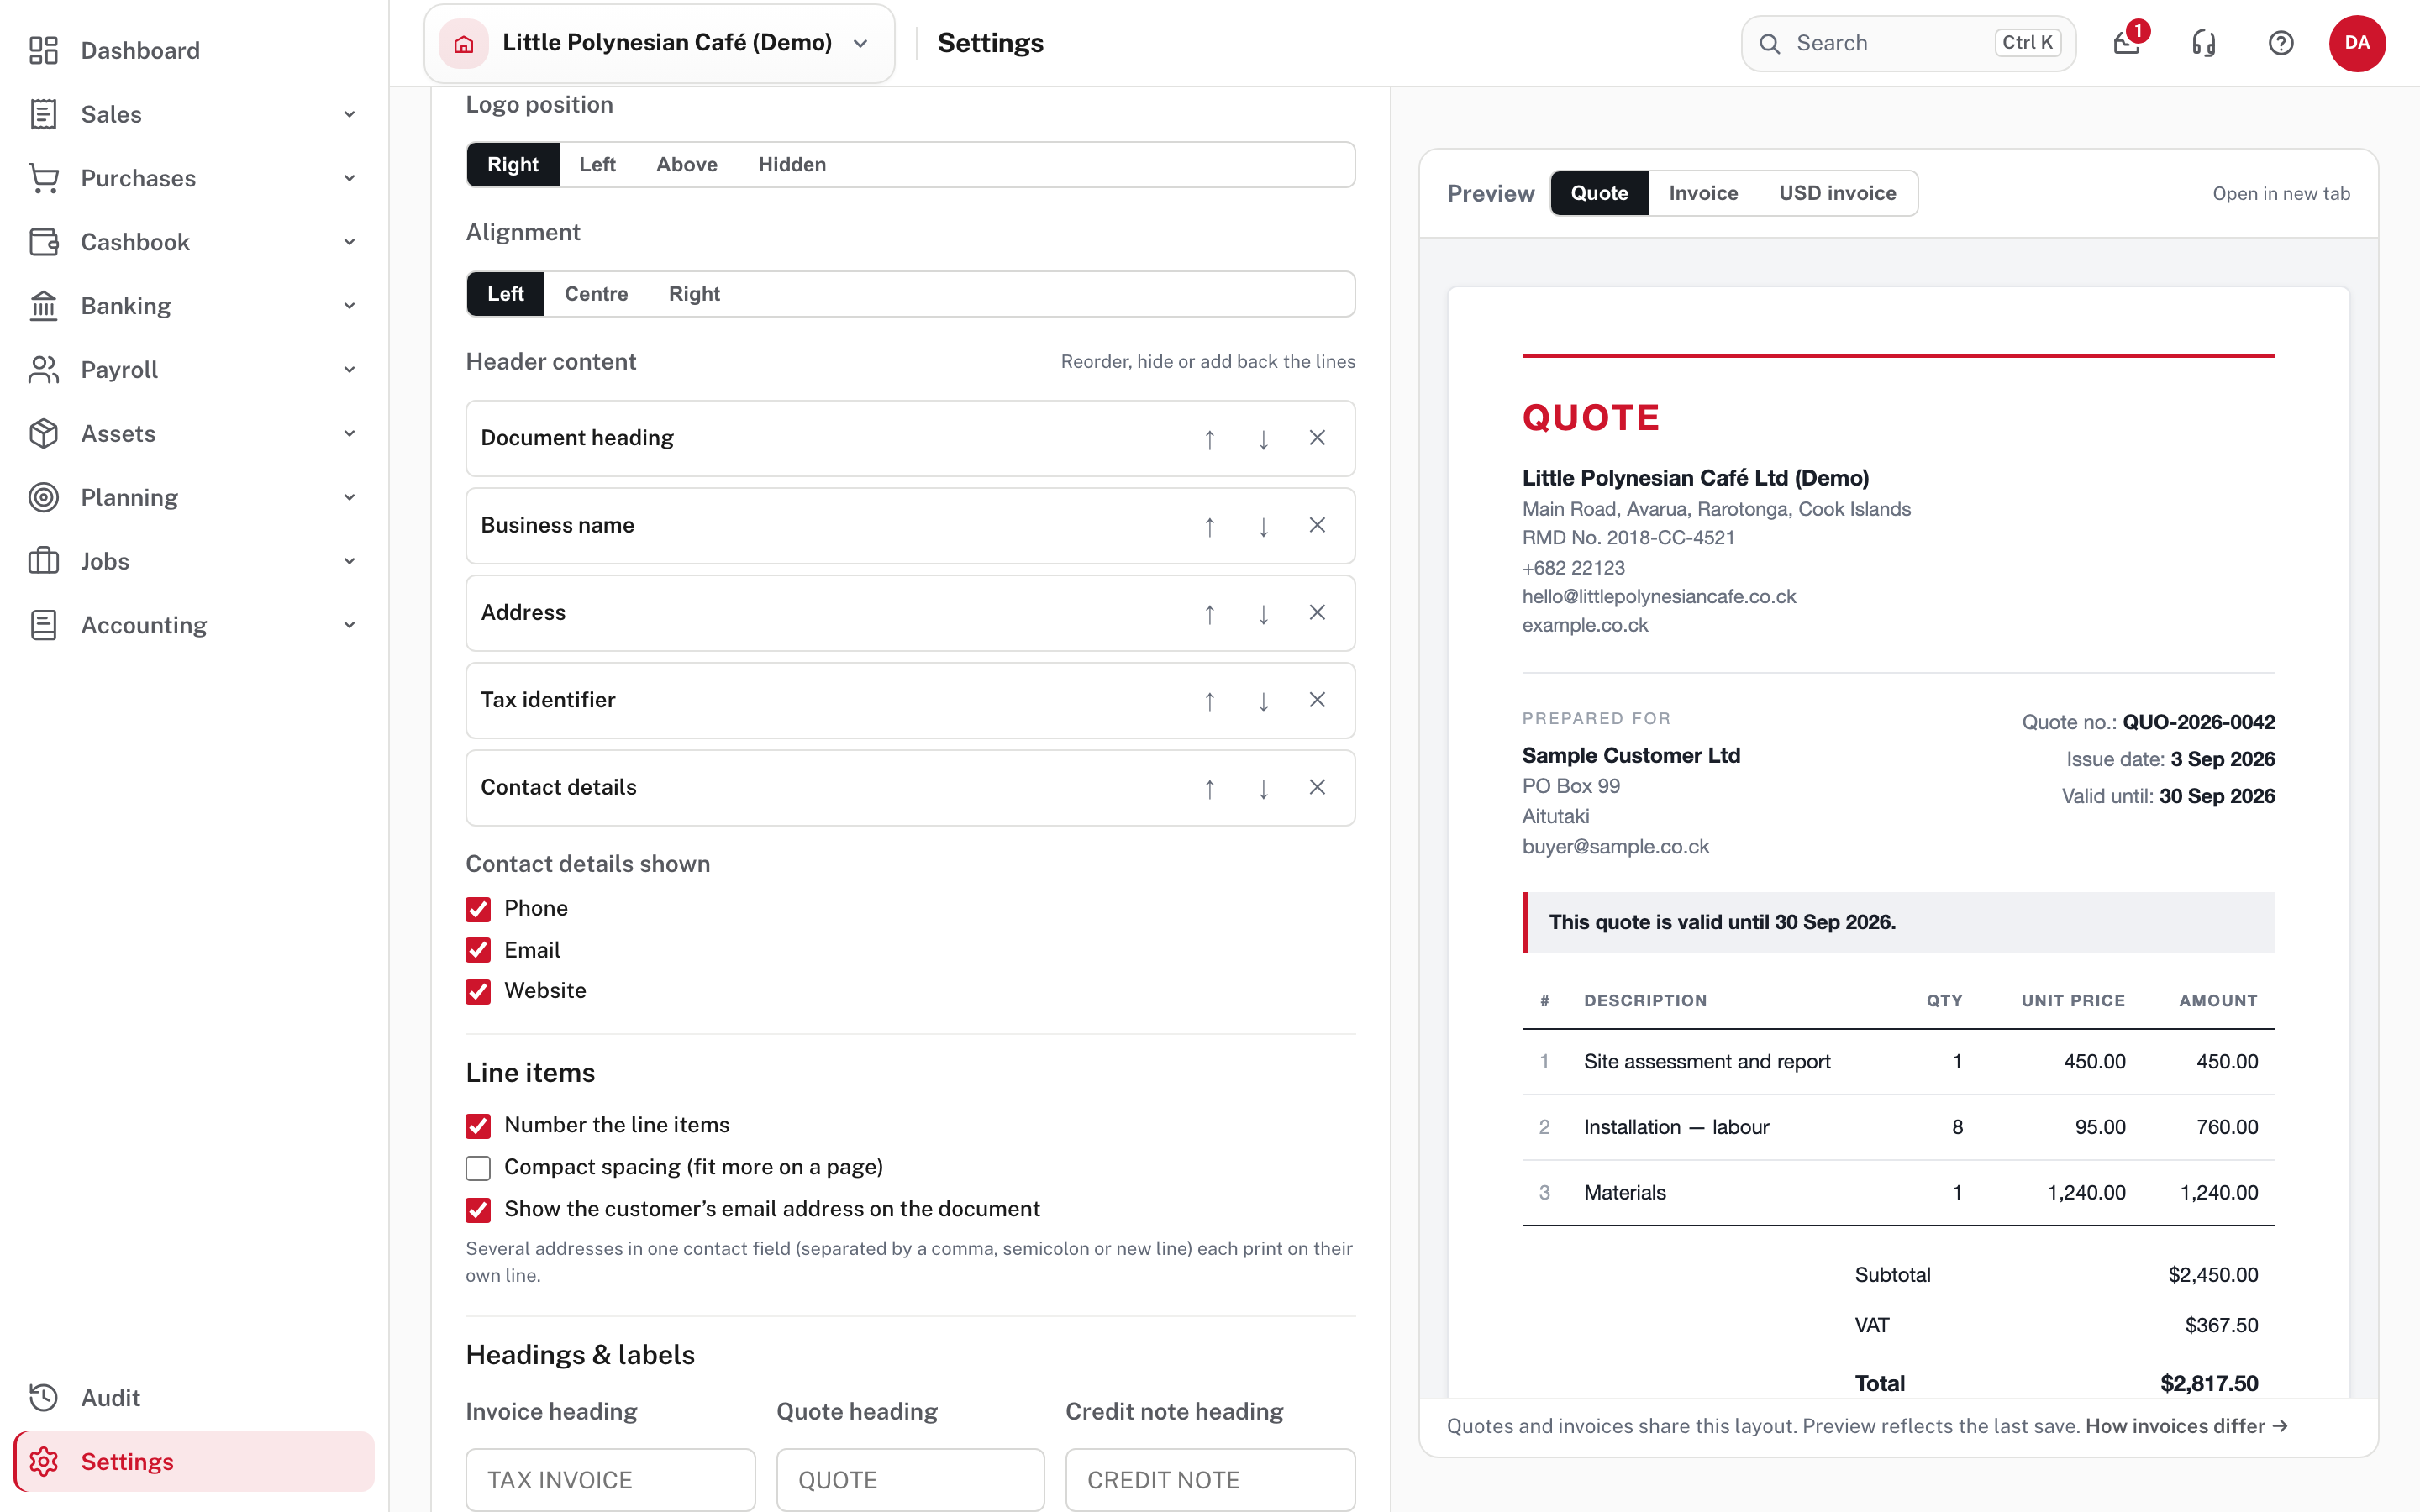
- Logo position: Right, Left, Above or Hidden.
- Alignment: Left, Centre or Right.
- Header content: the lines of the header (document heading, business name, address, tax identifier, contact details). Use the arrows to reorder them and the × to hide one; hidden lines can be added back.
- Contact details shown: tick Phone, Email and Website to show them.
Under Line items you can number the lines, use compact spacing to fit more on a page, and choose whether the customer's email address is shown on the document.
Step 4. Headings and labels
Scroll to Headings & labels.
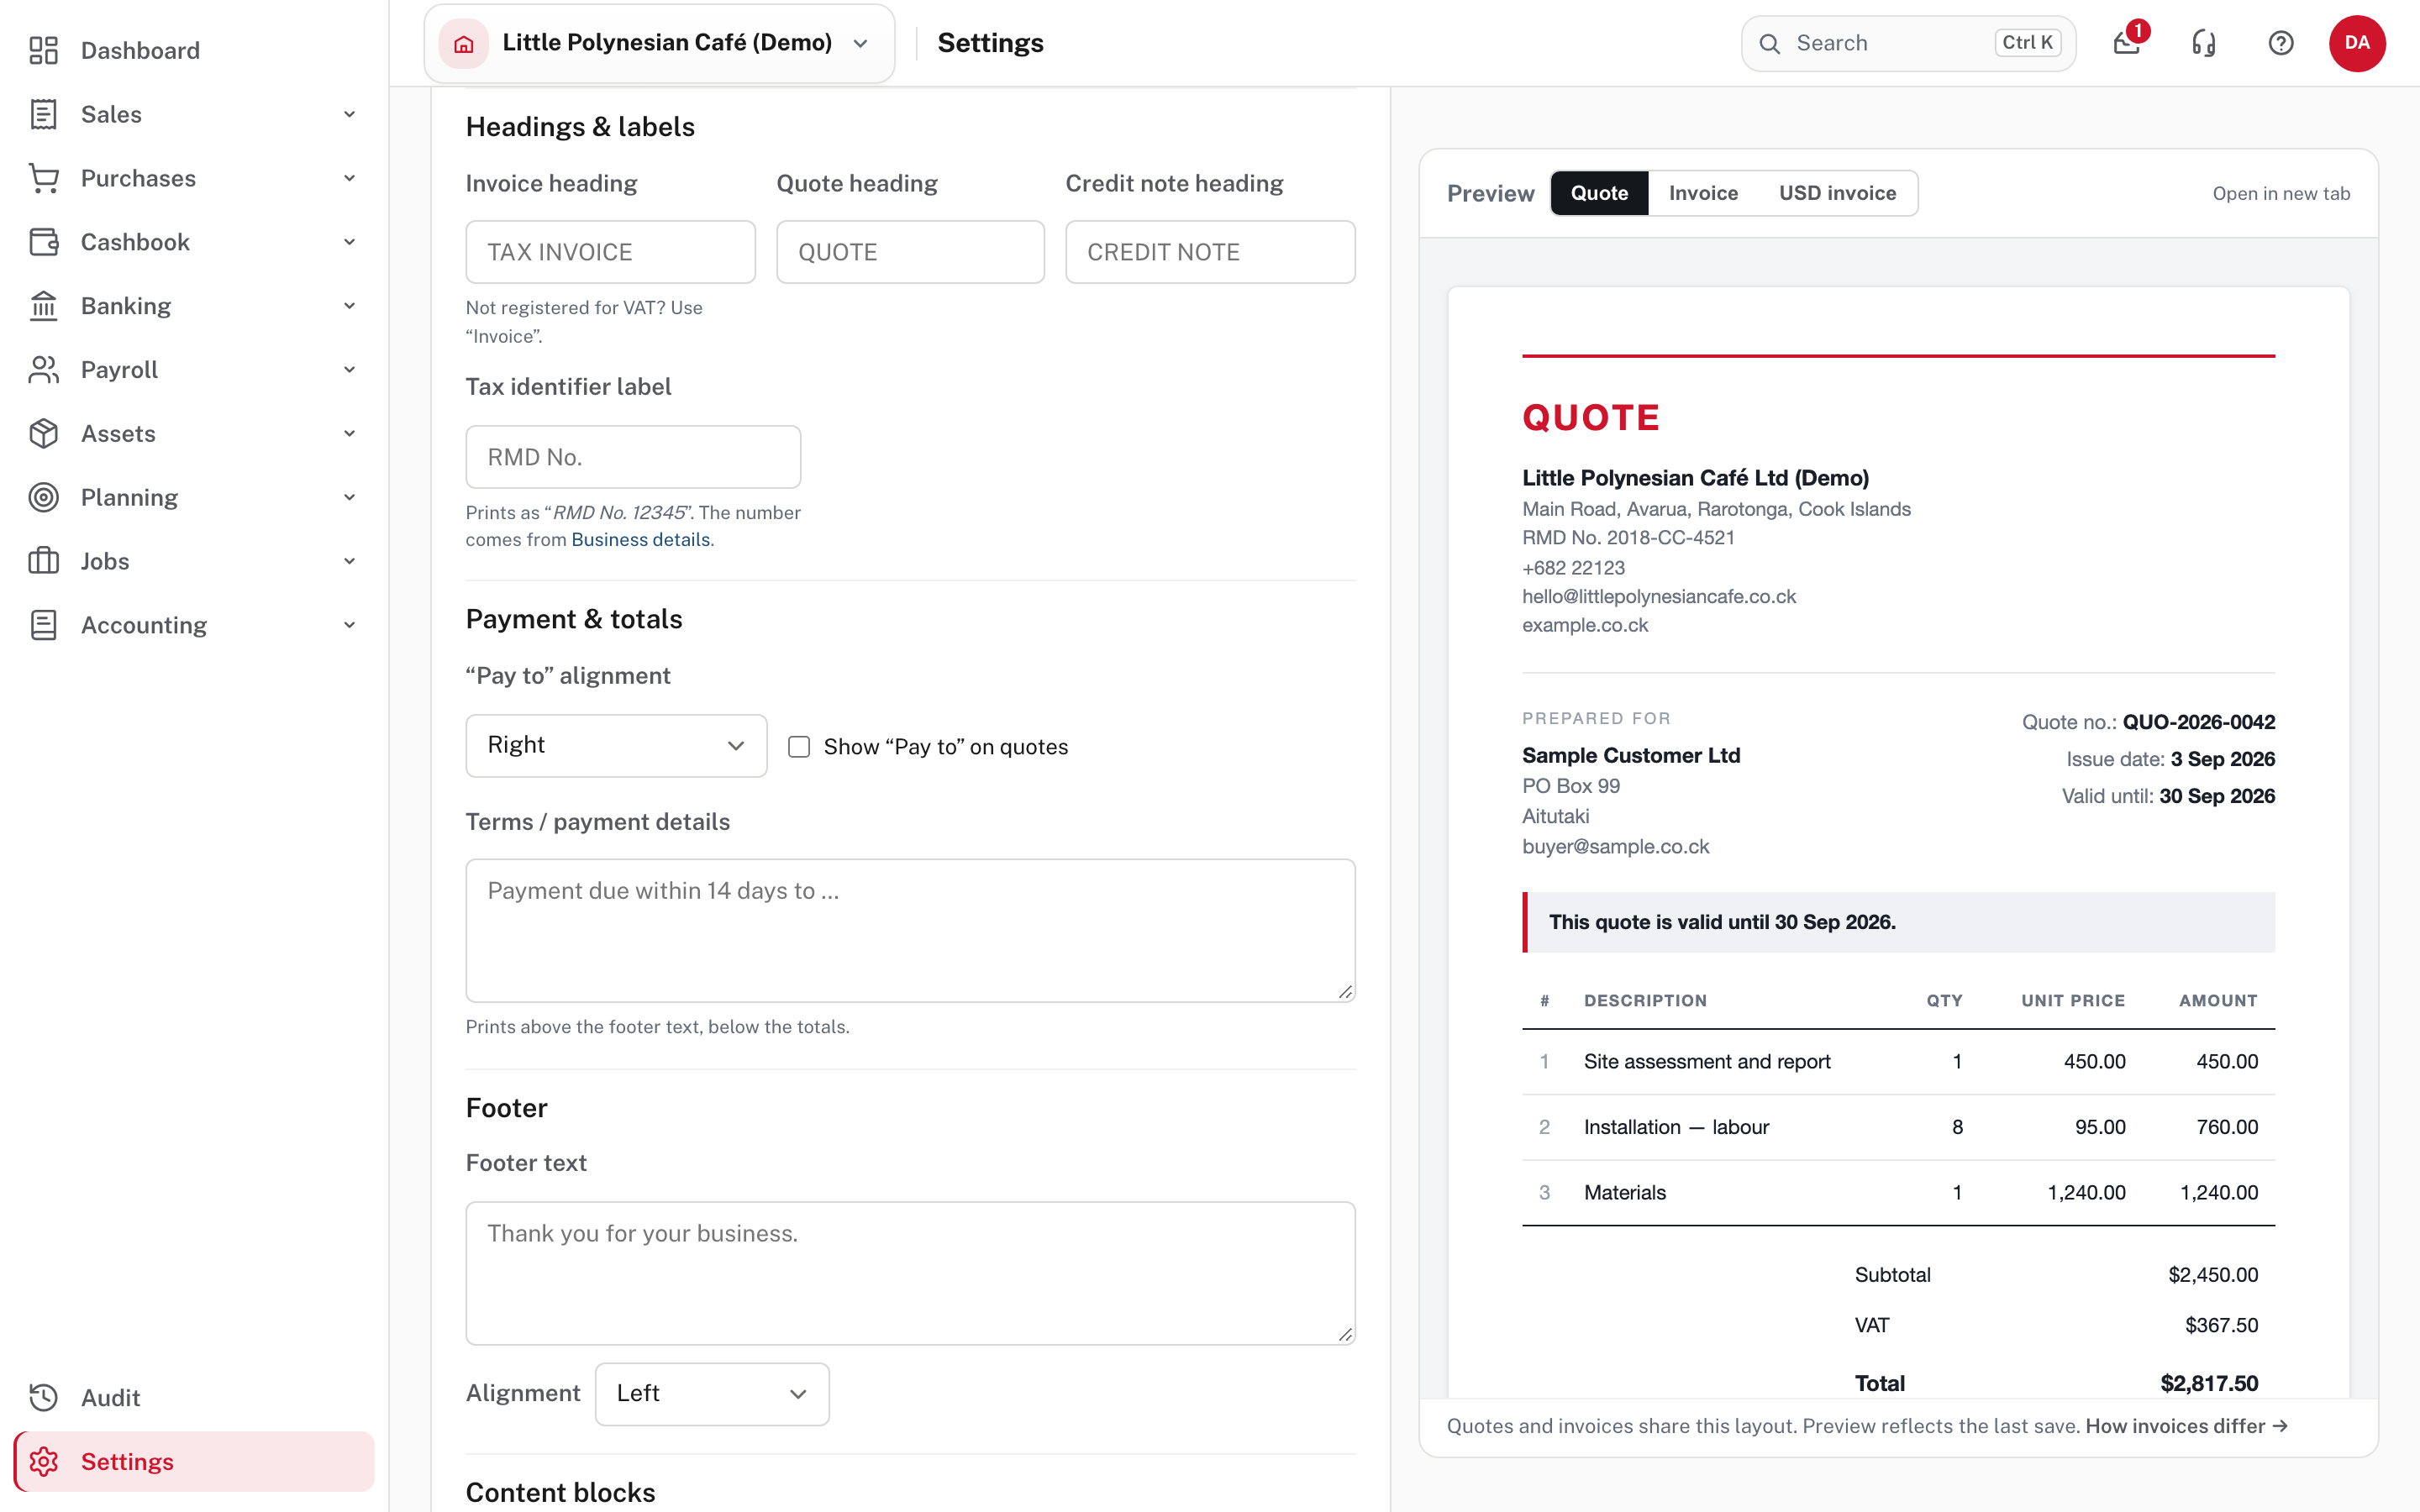
- Invoice heading, Quote heading and Credit note heading override the standard wording. An invoice is headed TAX INVOICE unless you set your own. If the company is not registered for VAT, use "Invoice", as the page reminds you.
- Tax identifier label is the text before your number, which prints as, for example, "RMD No. 2018-CC-4521". The number itself comes from Business details.
Step 5. Payment details, footer and extra blocks
Under Payment & totals:
- "Pay to" alignment places the bank details block. Show "Pay to" on quotes adds it to quotes too (invoices always have it).
- Terms / payment details prints above the footer text, below the totals. For example, "Payment due within 14 days".
Under Footer, Footer text and its alignment print at the foot of the document, for example "Thank you for your business."
Content blocks add extra content around the document, such as deposit terms on quotes or payment instructions on invoices. Choose + Add block.
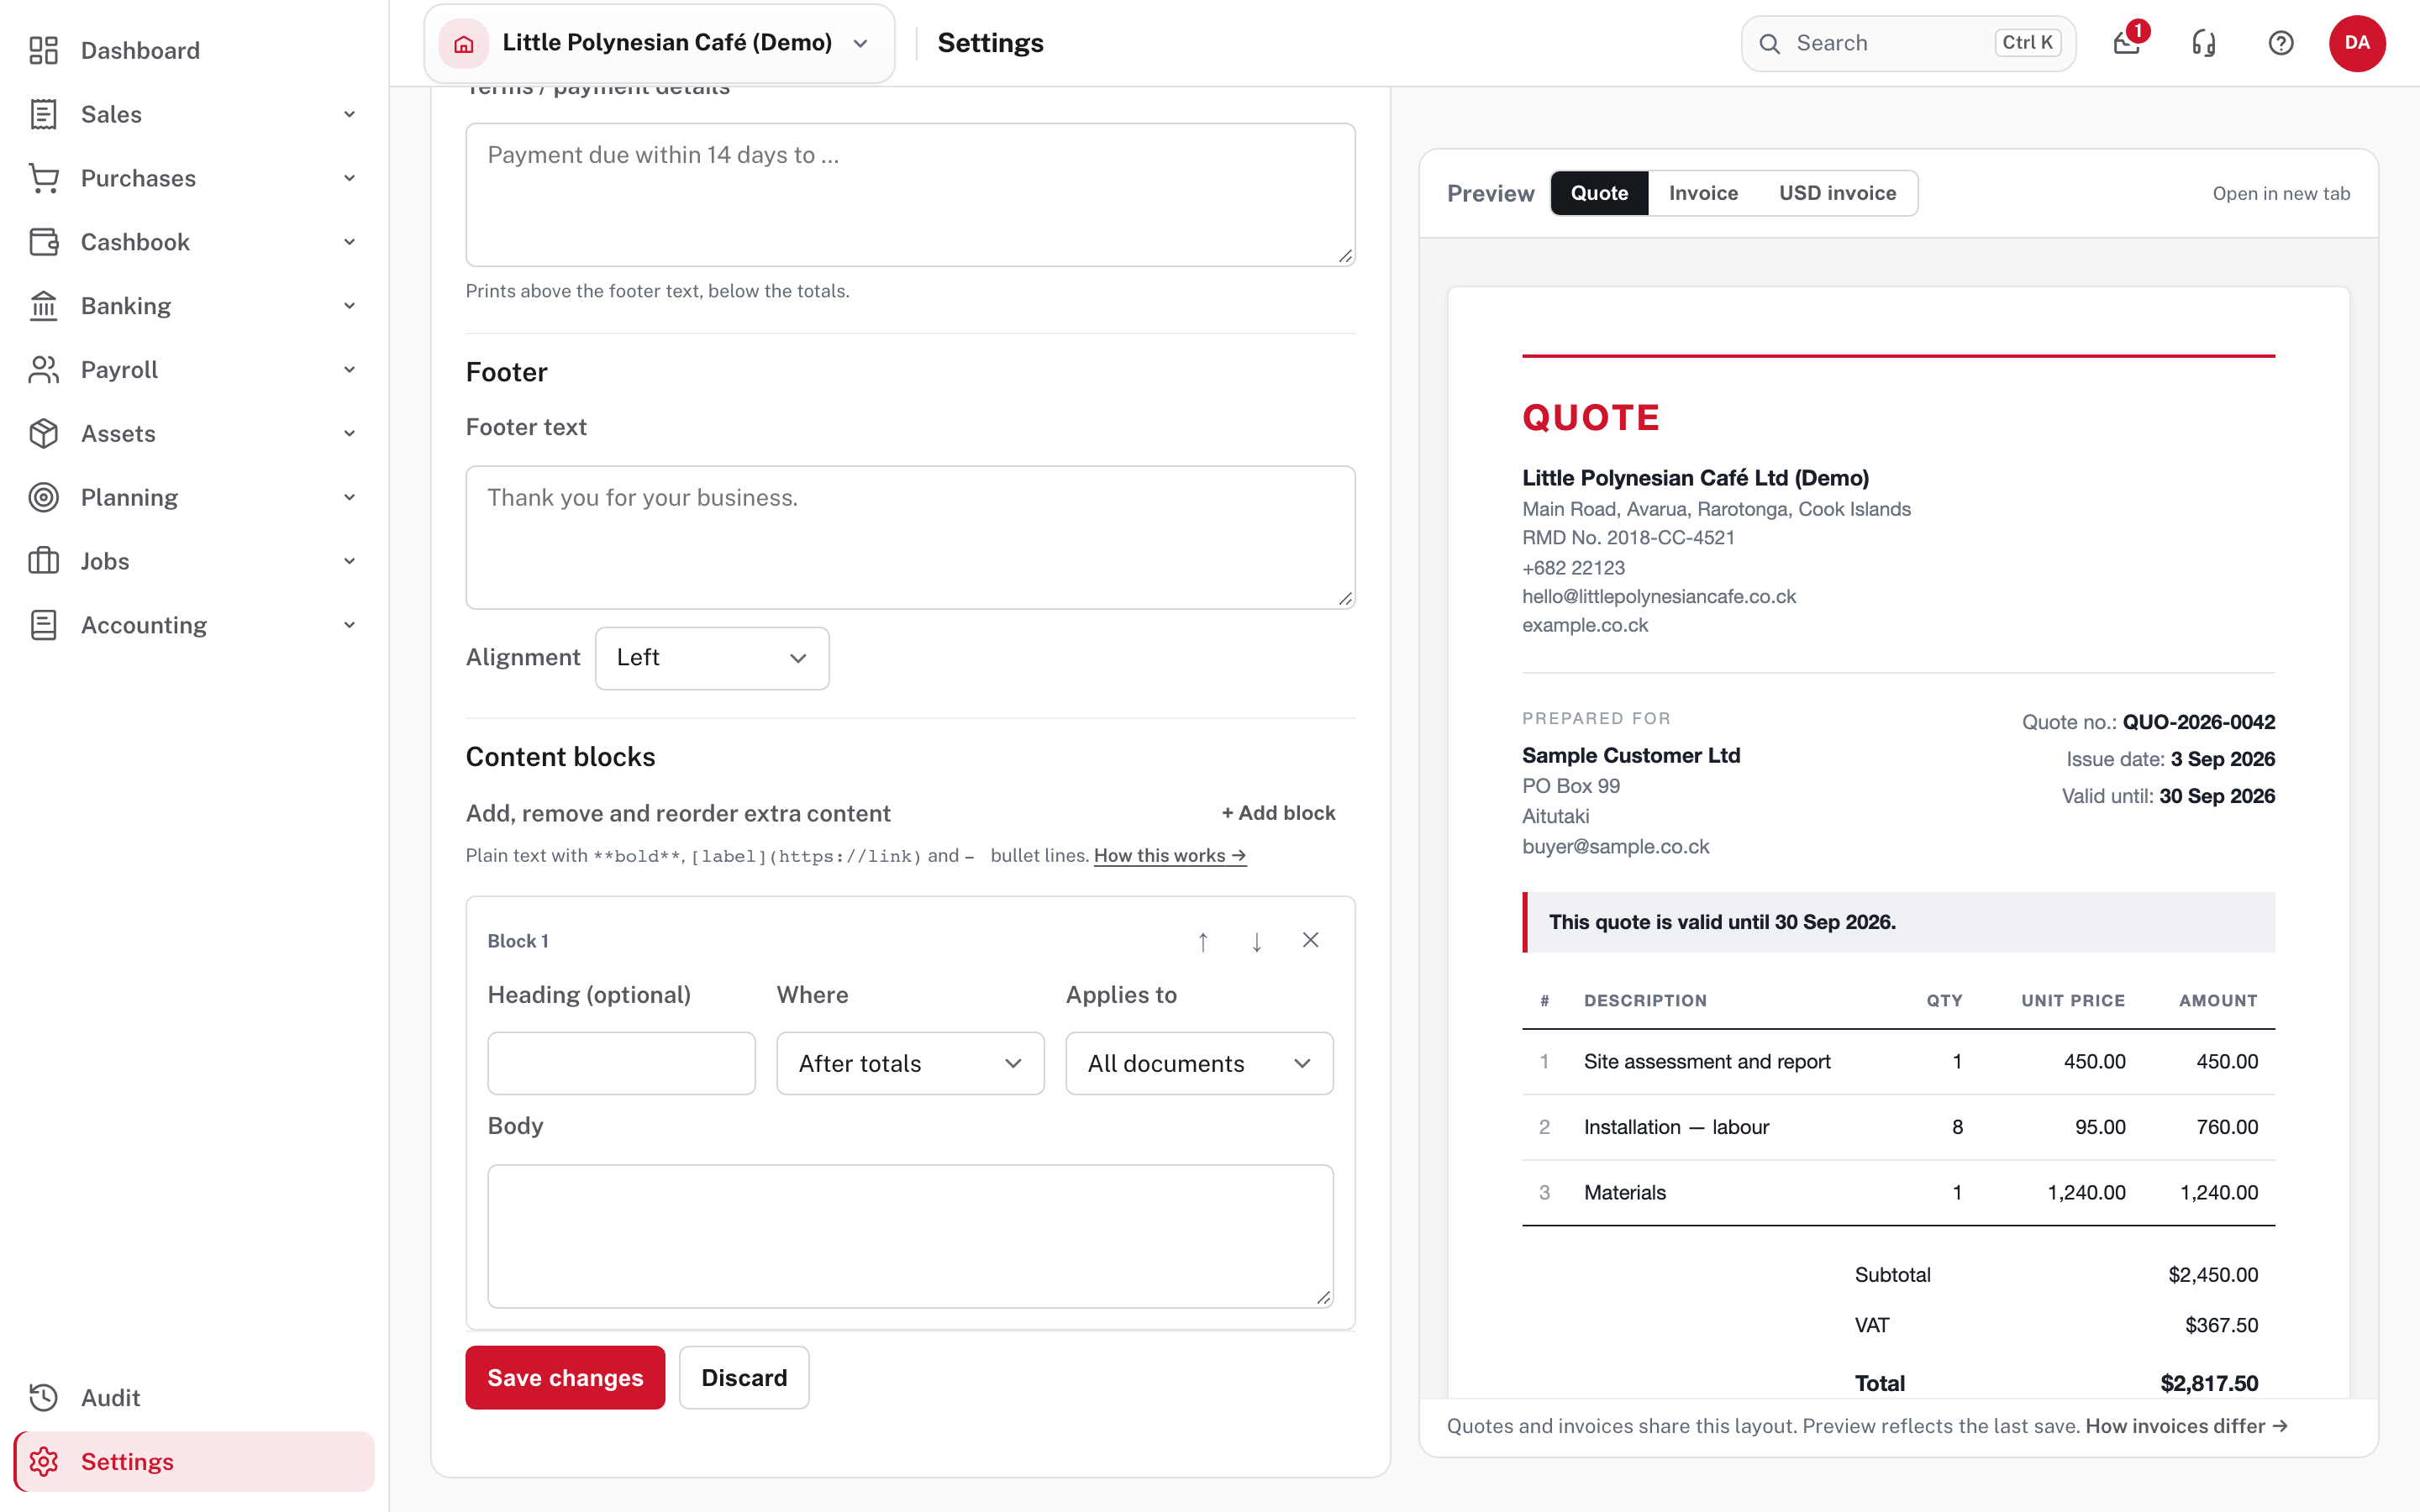
Each block has an optional heading, Where it sits on the page, Applies to (all documents or one kind), and a body. Use the arrows to reorder blocks that sit in the same place. The body is plain text with three conveniences:
| Write | You get |
|---|---|
**bold** |
bold text |
[label](https://link) |
a link |
- at the start of a line |
a bullet |
Choose Save changes (or Discard). Saved ✓ appears at the top of Settings, and the preview updates.
More detail: Document branding.
Step 6. Check where the "Pay to" bank details come from
The bank account printed on invoices is not on the branding page. It is under Settings → Banking & payments → Getting paid.
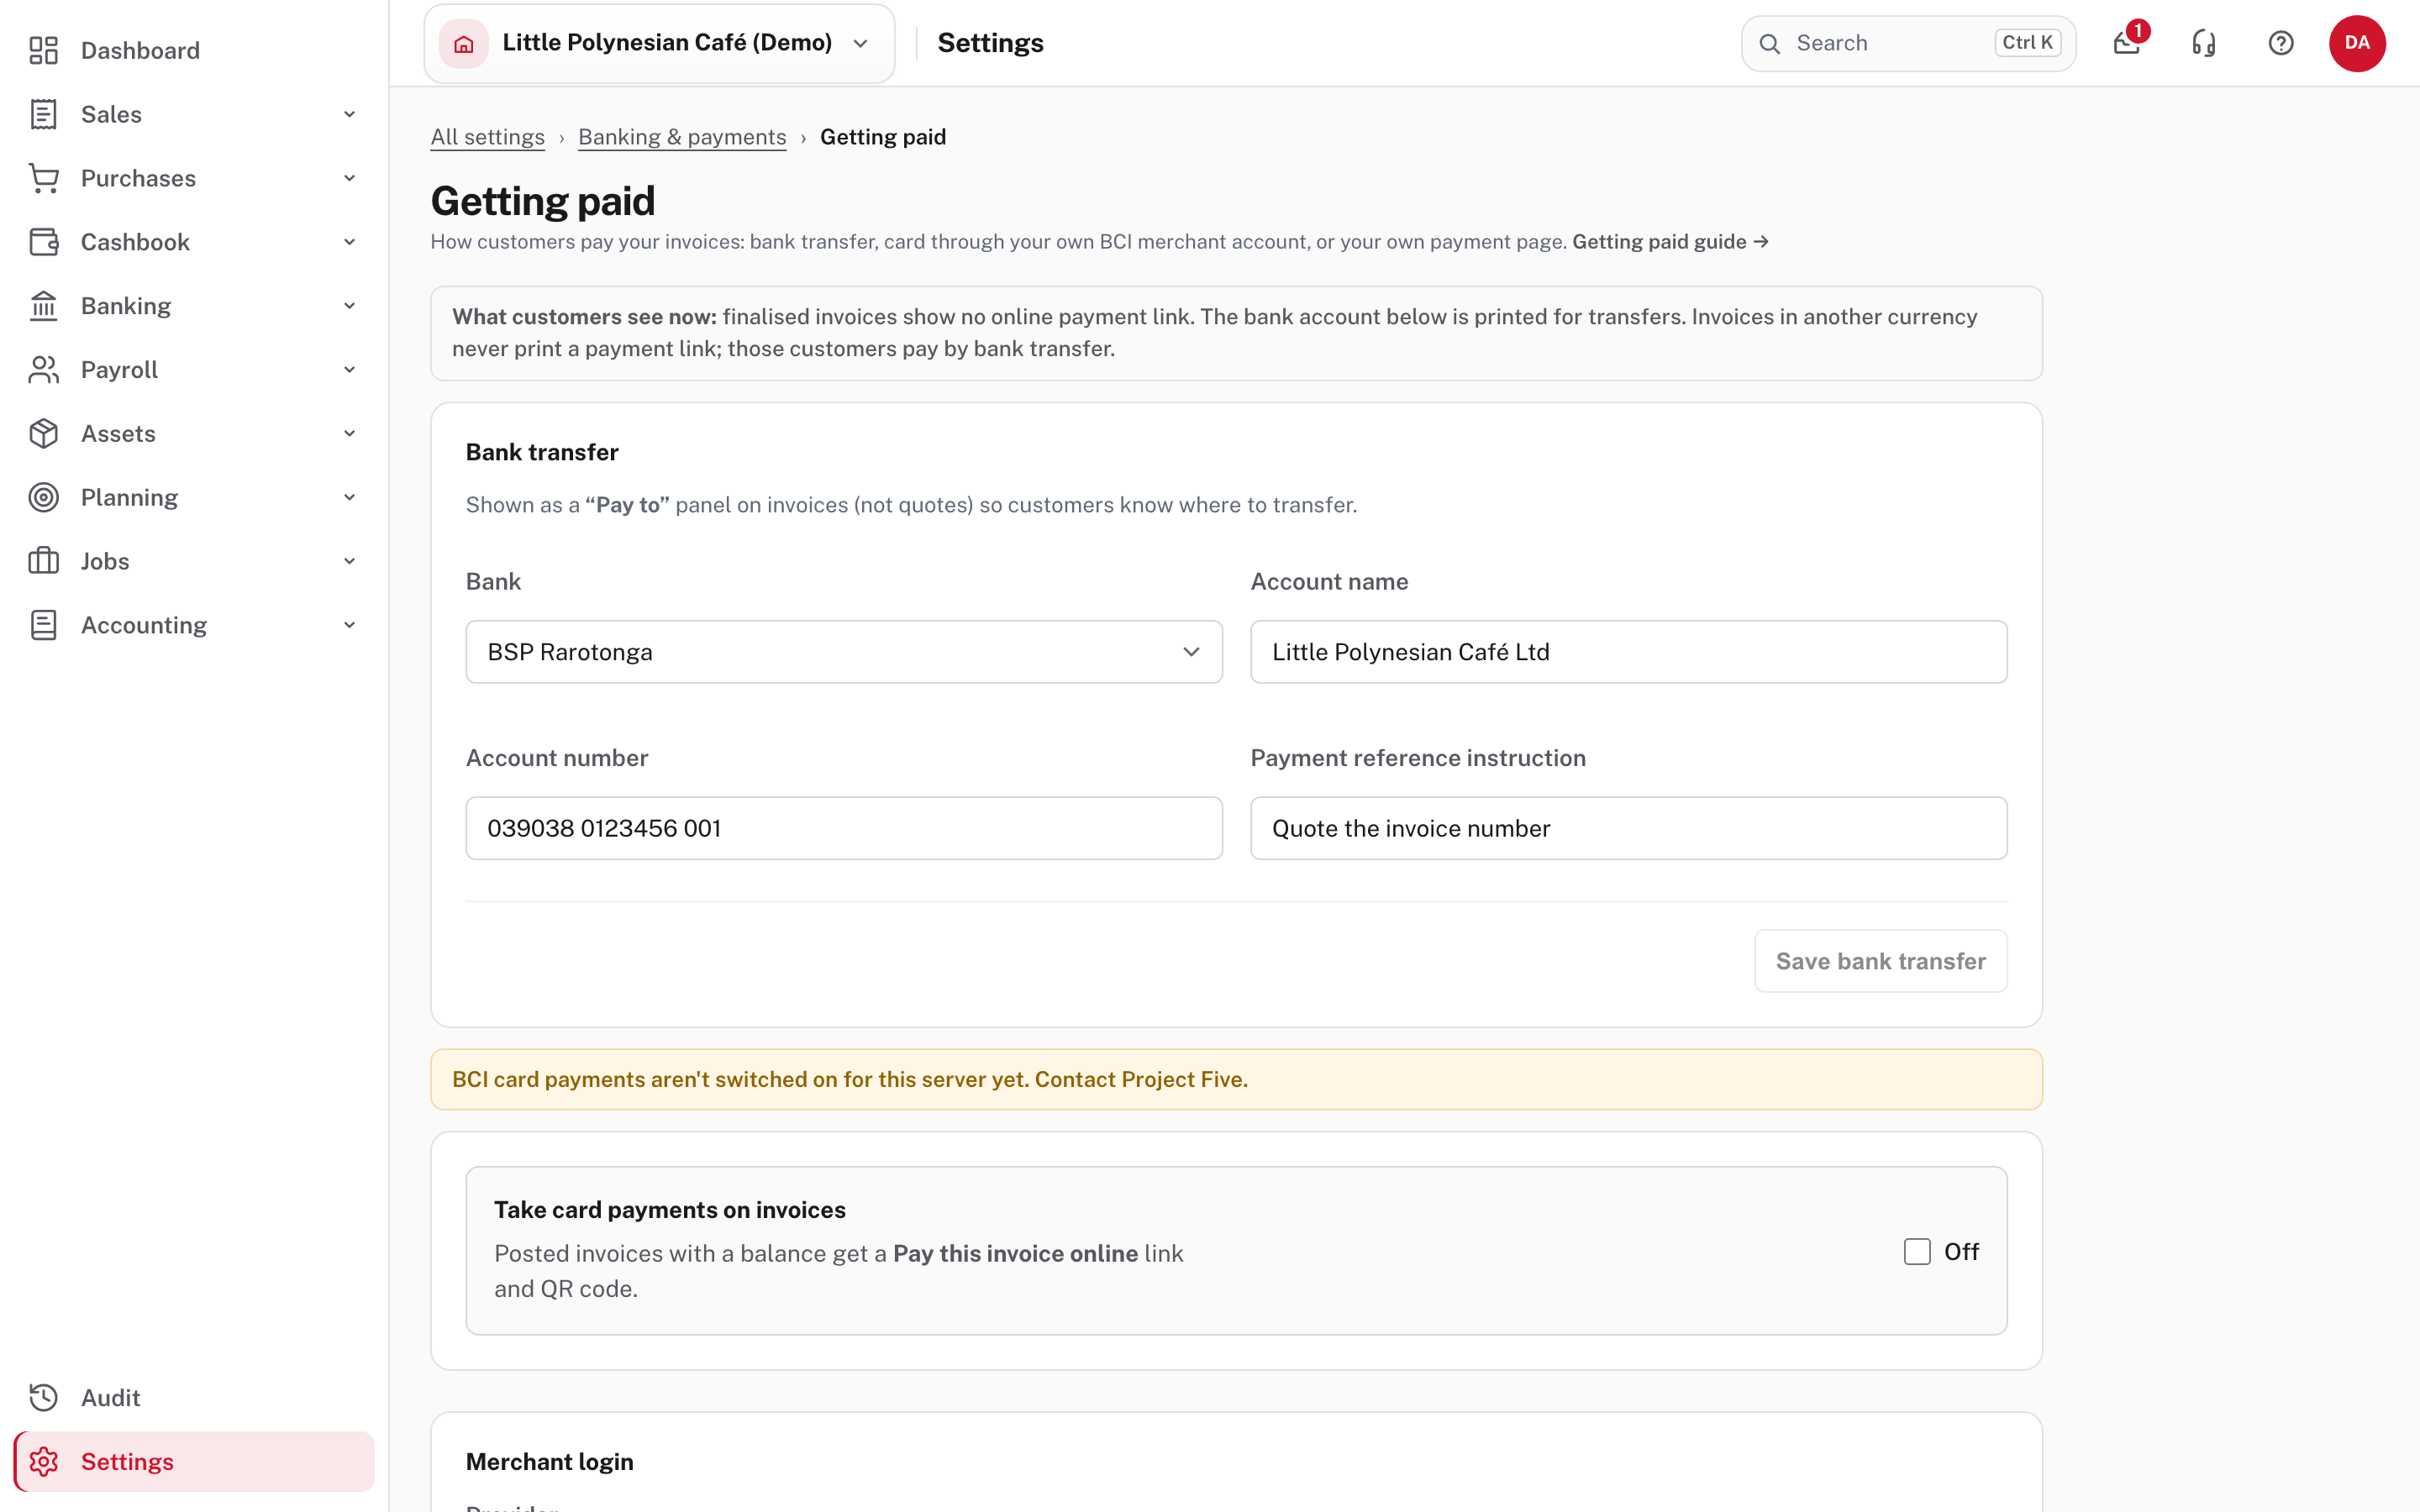
Under Bank transfer, choose the bank, and enter the account name, account number and a payment reference instruction; then Save bank transfer. It shows as a "Pay to" panel on invoices, not quotes. The same page sets up card payments and your own payment page; invoices in another currency never print a payment link, so those customers pay by bank transfer.
More detail: Invoice reminders and online payment.
Step 7. Use more than one theme (optional)
Use Duplicate to copy the current theme, change what you want, then use the Applies to boxes to say which documents print with which theme (for example, a plainer theme for statements). Make default chooses the theme every unassigned document uses. Delete removes a theme.
Step 8. Document numbering
Settings → Documents & email → Document numbering.
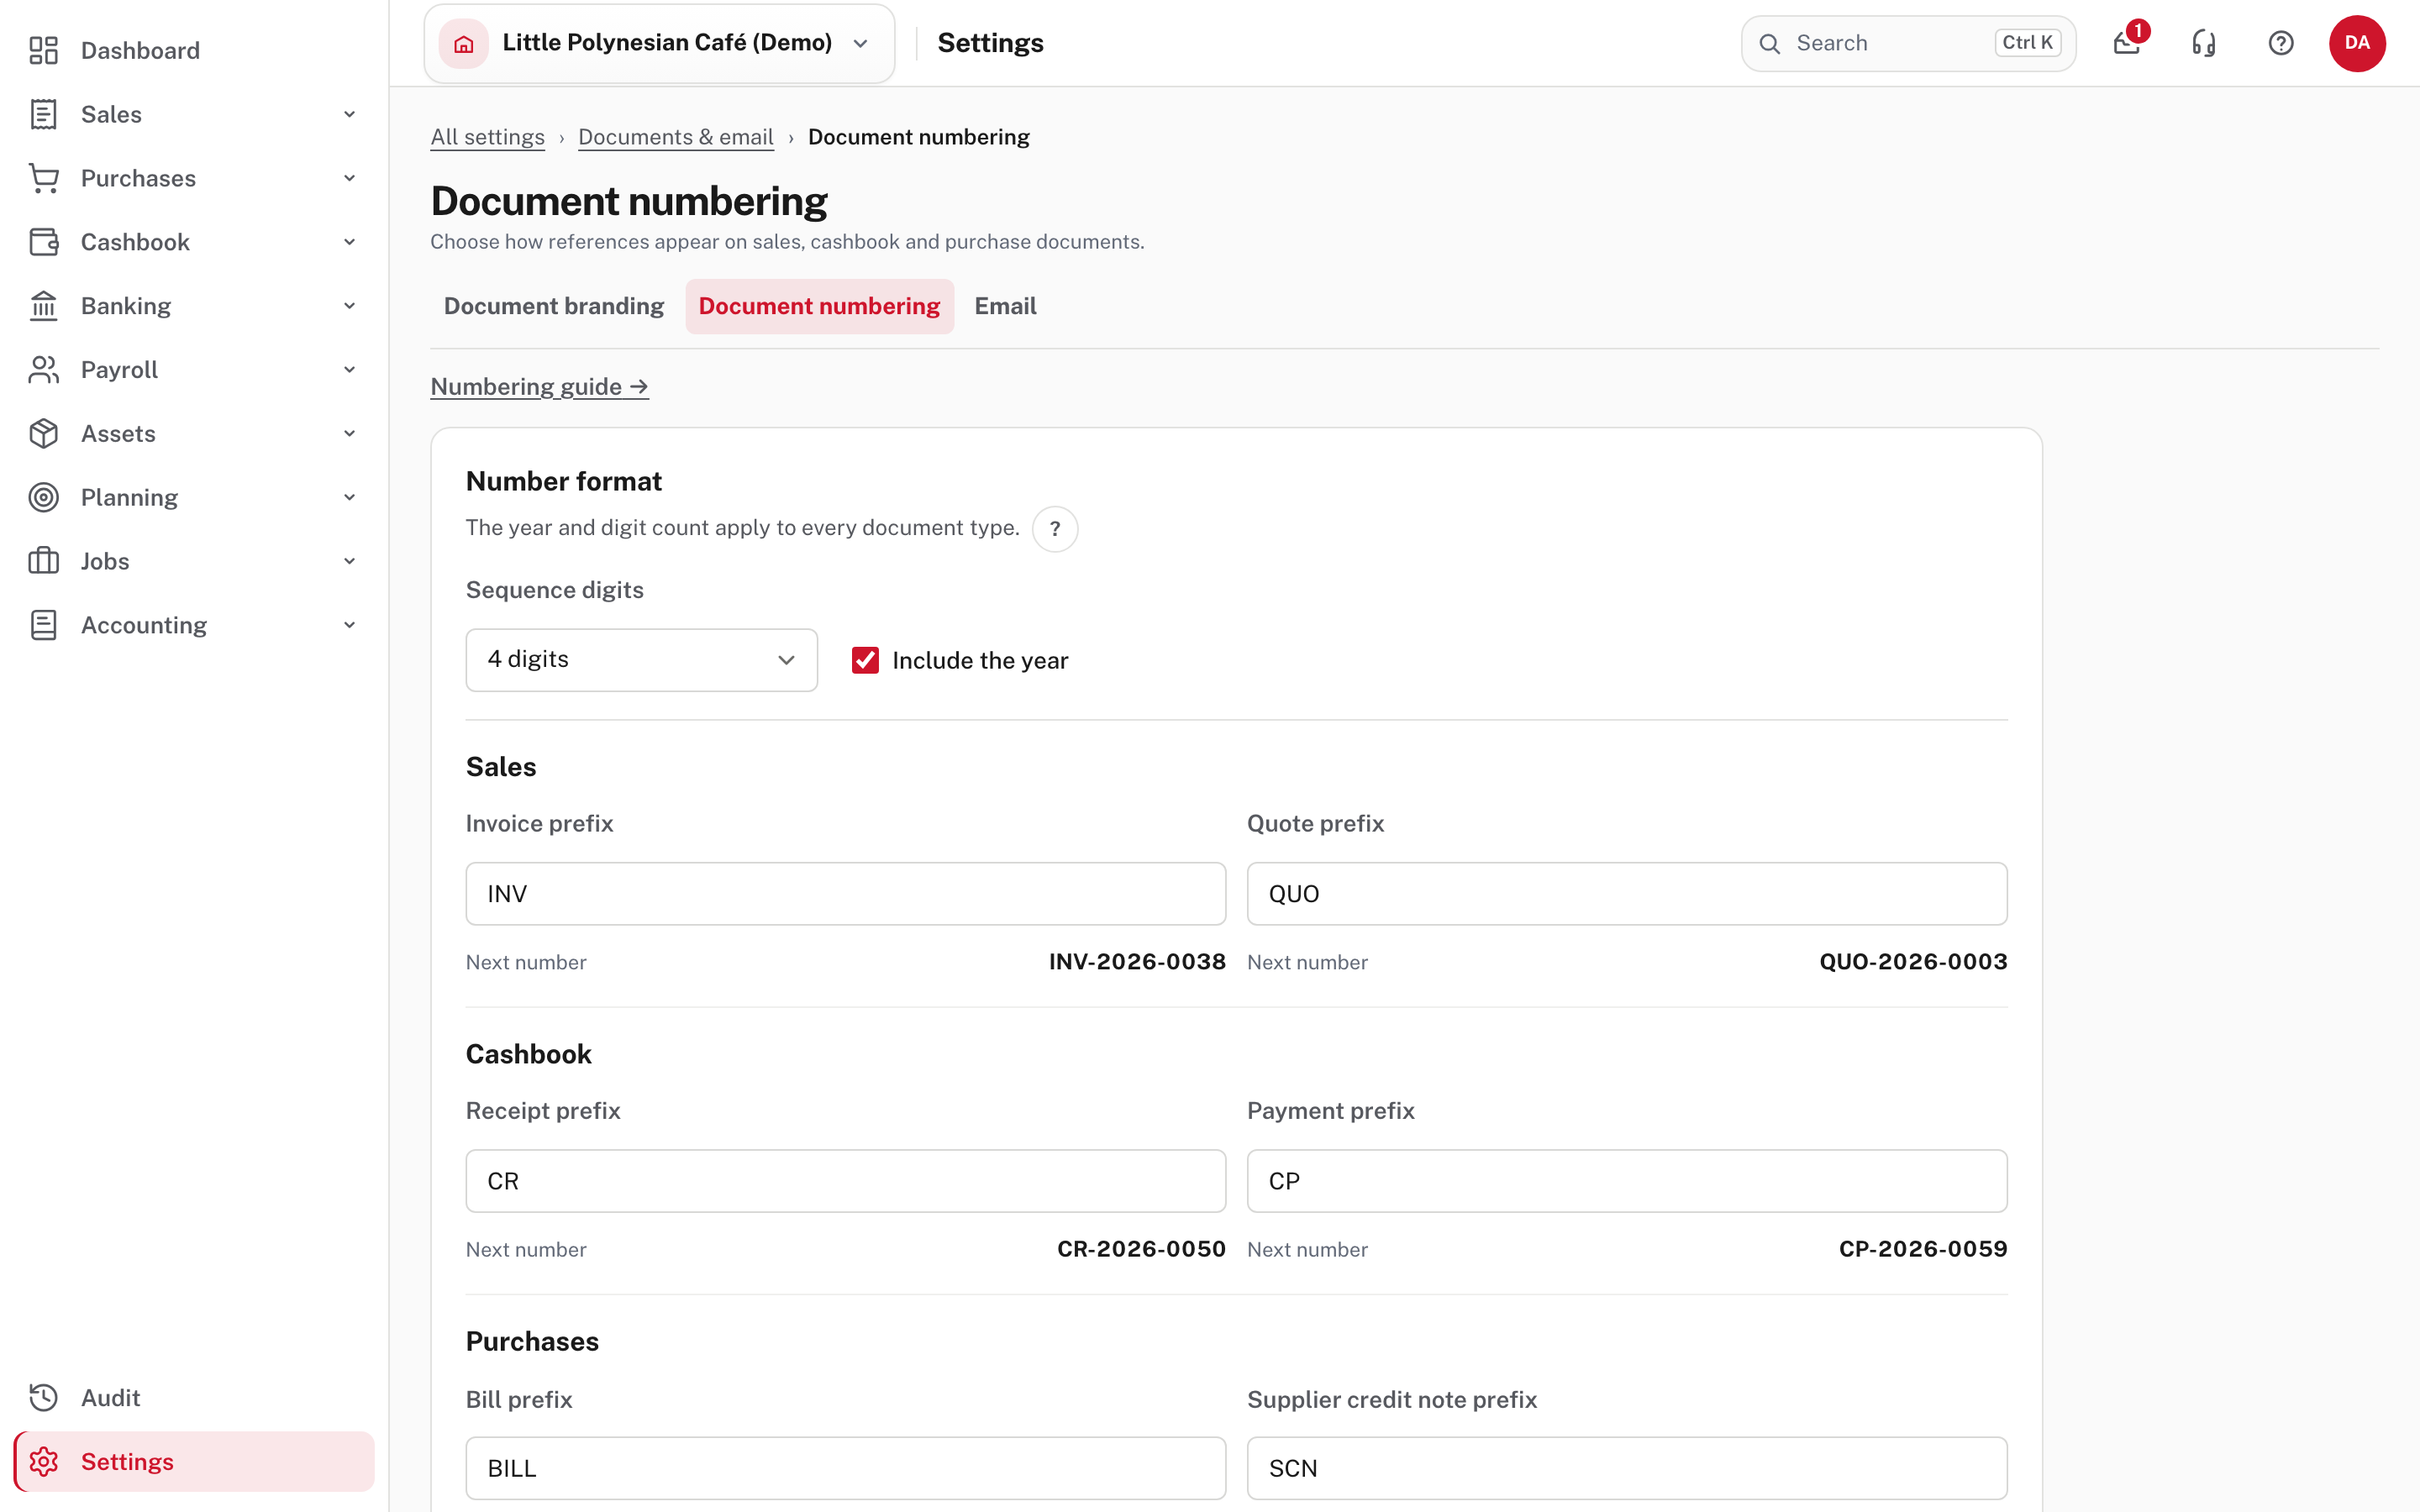
- Sequence digits (three to eight) and Include the year apply to every document type on the page.
- Set a prefix for invoices and quotes, cashbook receipts and payments, bills and supplier credit notes. Use prefixes that make sense on a bank statement or in an email. The next number beside each prefix shows the format before you save.
- Credit notes, purchase orders, journals, pay runs and other series keep fixed prefixes you can't change.
- Changing numbering affects new documents only. It does not rename documents already created, so search for an older one by its original reference.
Choose Save numbering after checking each preview.
More detail: Document numbering.
Check before you continue
Check before you continue
- Business details are complete, including the RMD number, and the logo is uploaded.
- The preview looks right for Quote, Invoice and USD invoice after you saved.
- If the company is not registered for VAT, the invoice heading says Invoice.
- The "Pay to" bank account is entered under Getting paid, and is the right one.
- Document prefixes and the number of digits are final: change them before the first invoice, not after.
Next
Raise, send and get paid for an invoice. The first real invoice is your last check: open its PDF and compare it with the preview.