Chasing overdue invoices: statements and reminders
Do this weekly or monthly. Chasing has three parts: see who owes you and how late they are, send them a statement, and let automatic reminders nudge them for you. It is the other half of Raise, send and get paid for an invoice.
About the screenshots
Screenshots are from Easy's demo company, Little Polynesian Café. Customer names and amounts are examples. Email sending isn't set up on the local demo, so the screens that email show that notice. On a live company they show the email buttons.
Before you start
- Invoices are finalised and receipts are recorded and applied. A report is only as good as the allocation of receipts: a payment recorded but not applied to its invoice leaves the invoice looking overdue.
- Customers have an email address (up to five, separated by commas). A customer with no email on file can't be emailed.
- Email sending is set up for the company, if you want to email from Easy. If not, download the PDF and send it yourself.
Step 1. See who owes you
Sales → Reports → Who owes you, by age (also reached from the Invoices list).
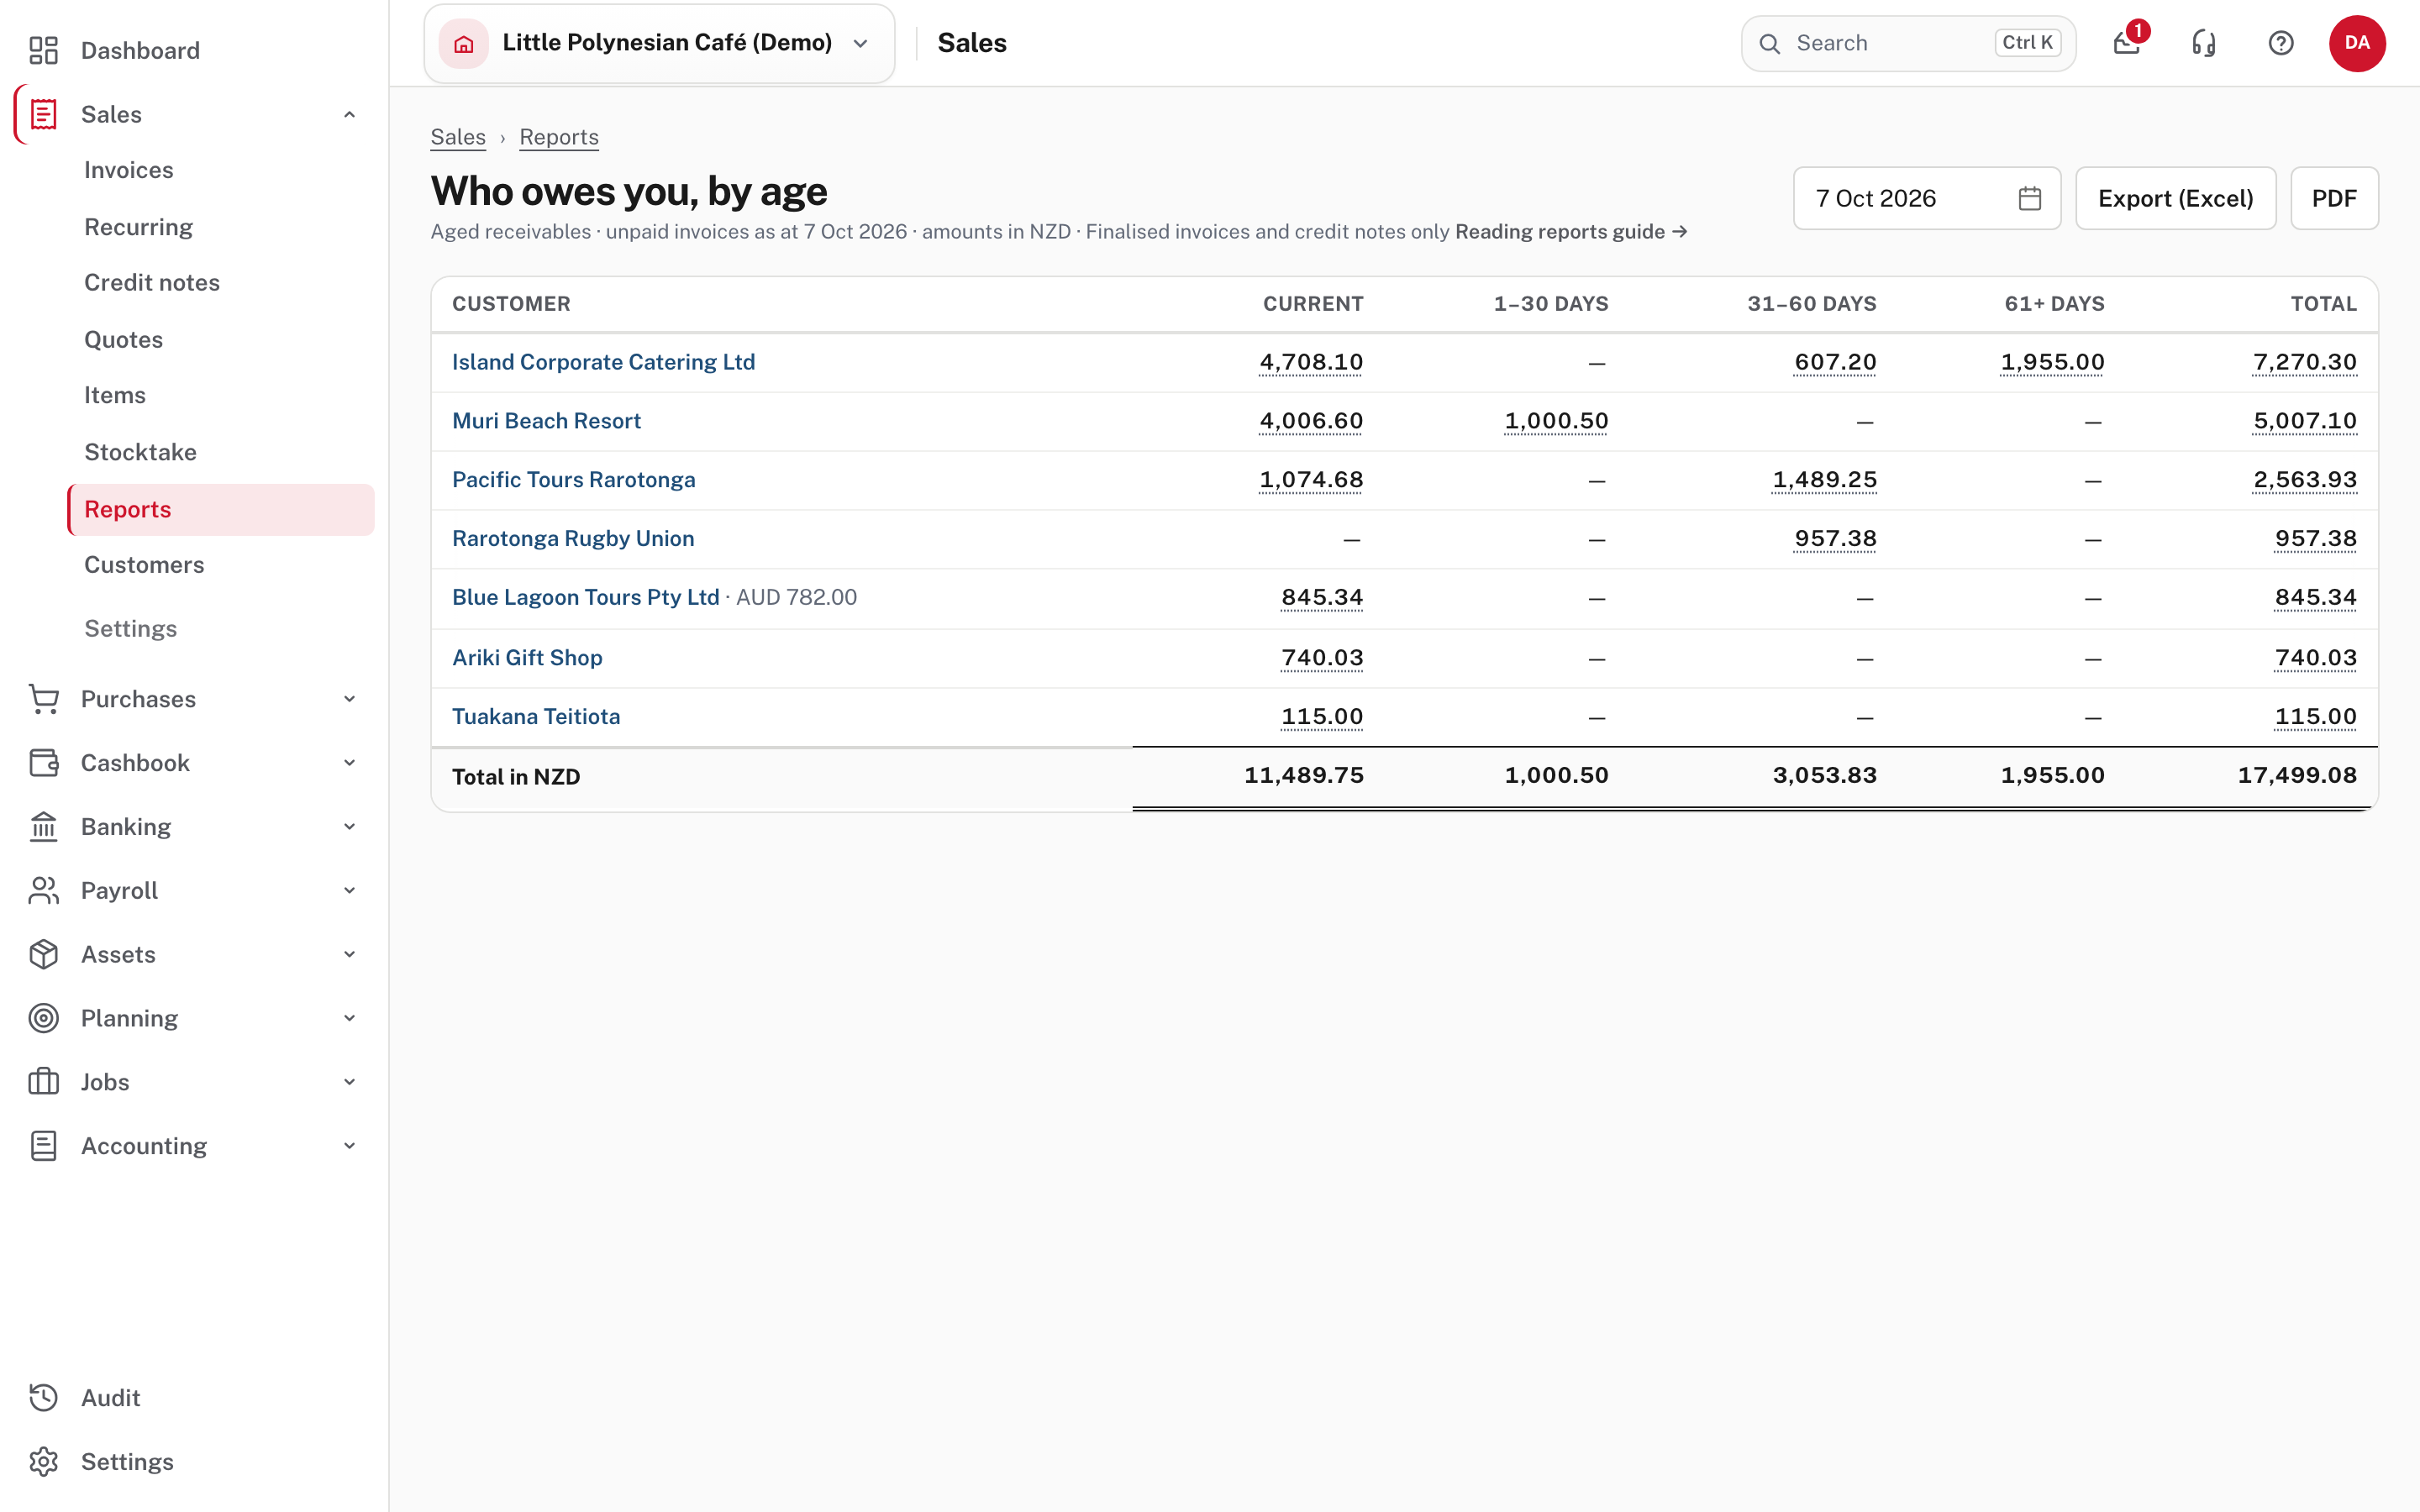
The aged receivables report lists each customer's unpaid invoices as at the date you choose, in age bands: current, 1–30 days, 31–60 days and 61+ days, with a total. A customer who is invoiced in another currency is shown in both currencies. The Total of the customer rows is what the Trade Debtors control account holds; the period-close check compares the two (see Month-end checklist). Choose PDF or Export (Excel) to keep a copy.
Step 2. See the overdue invoices one by one
Sales → Reports → Overdue invoices.
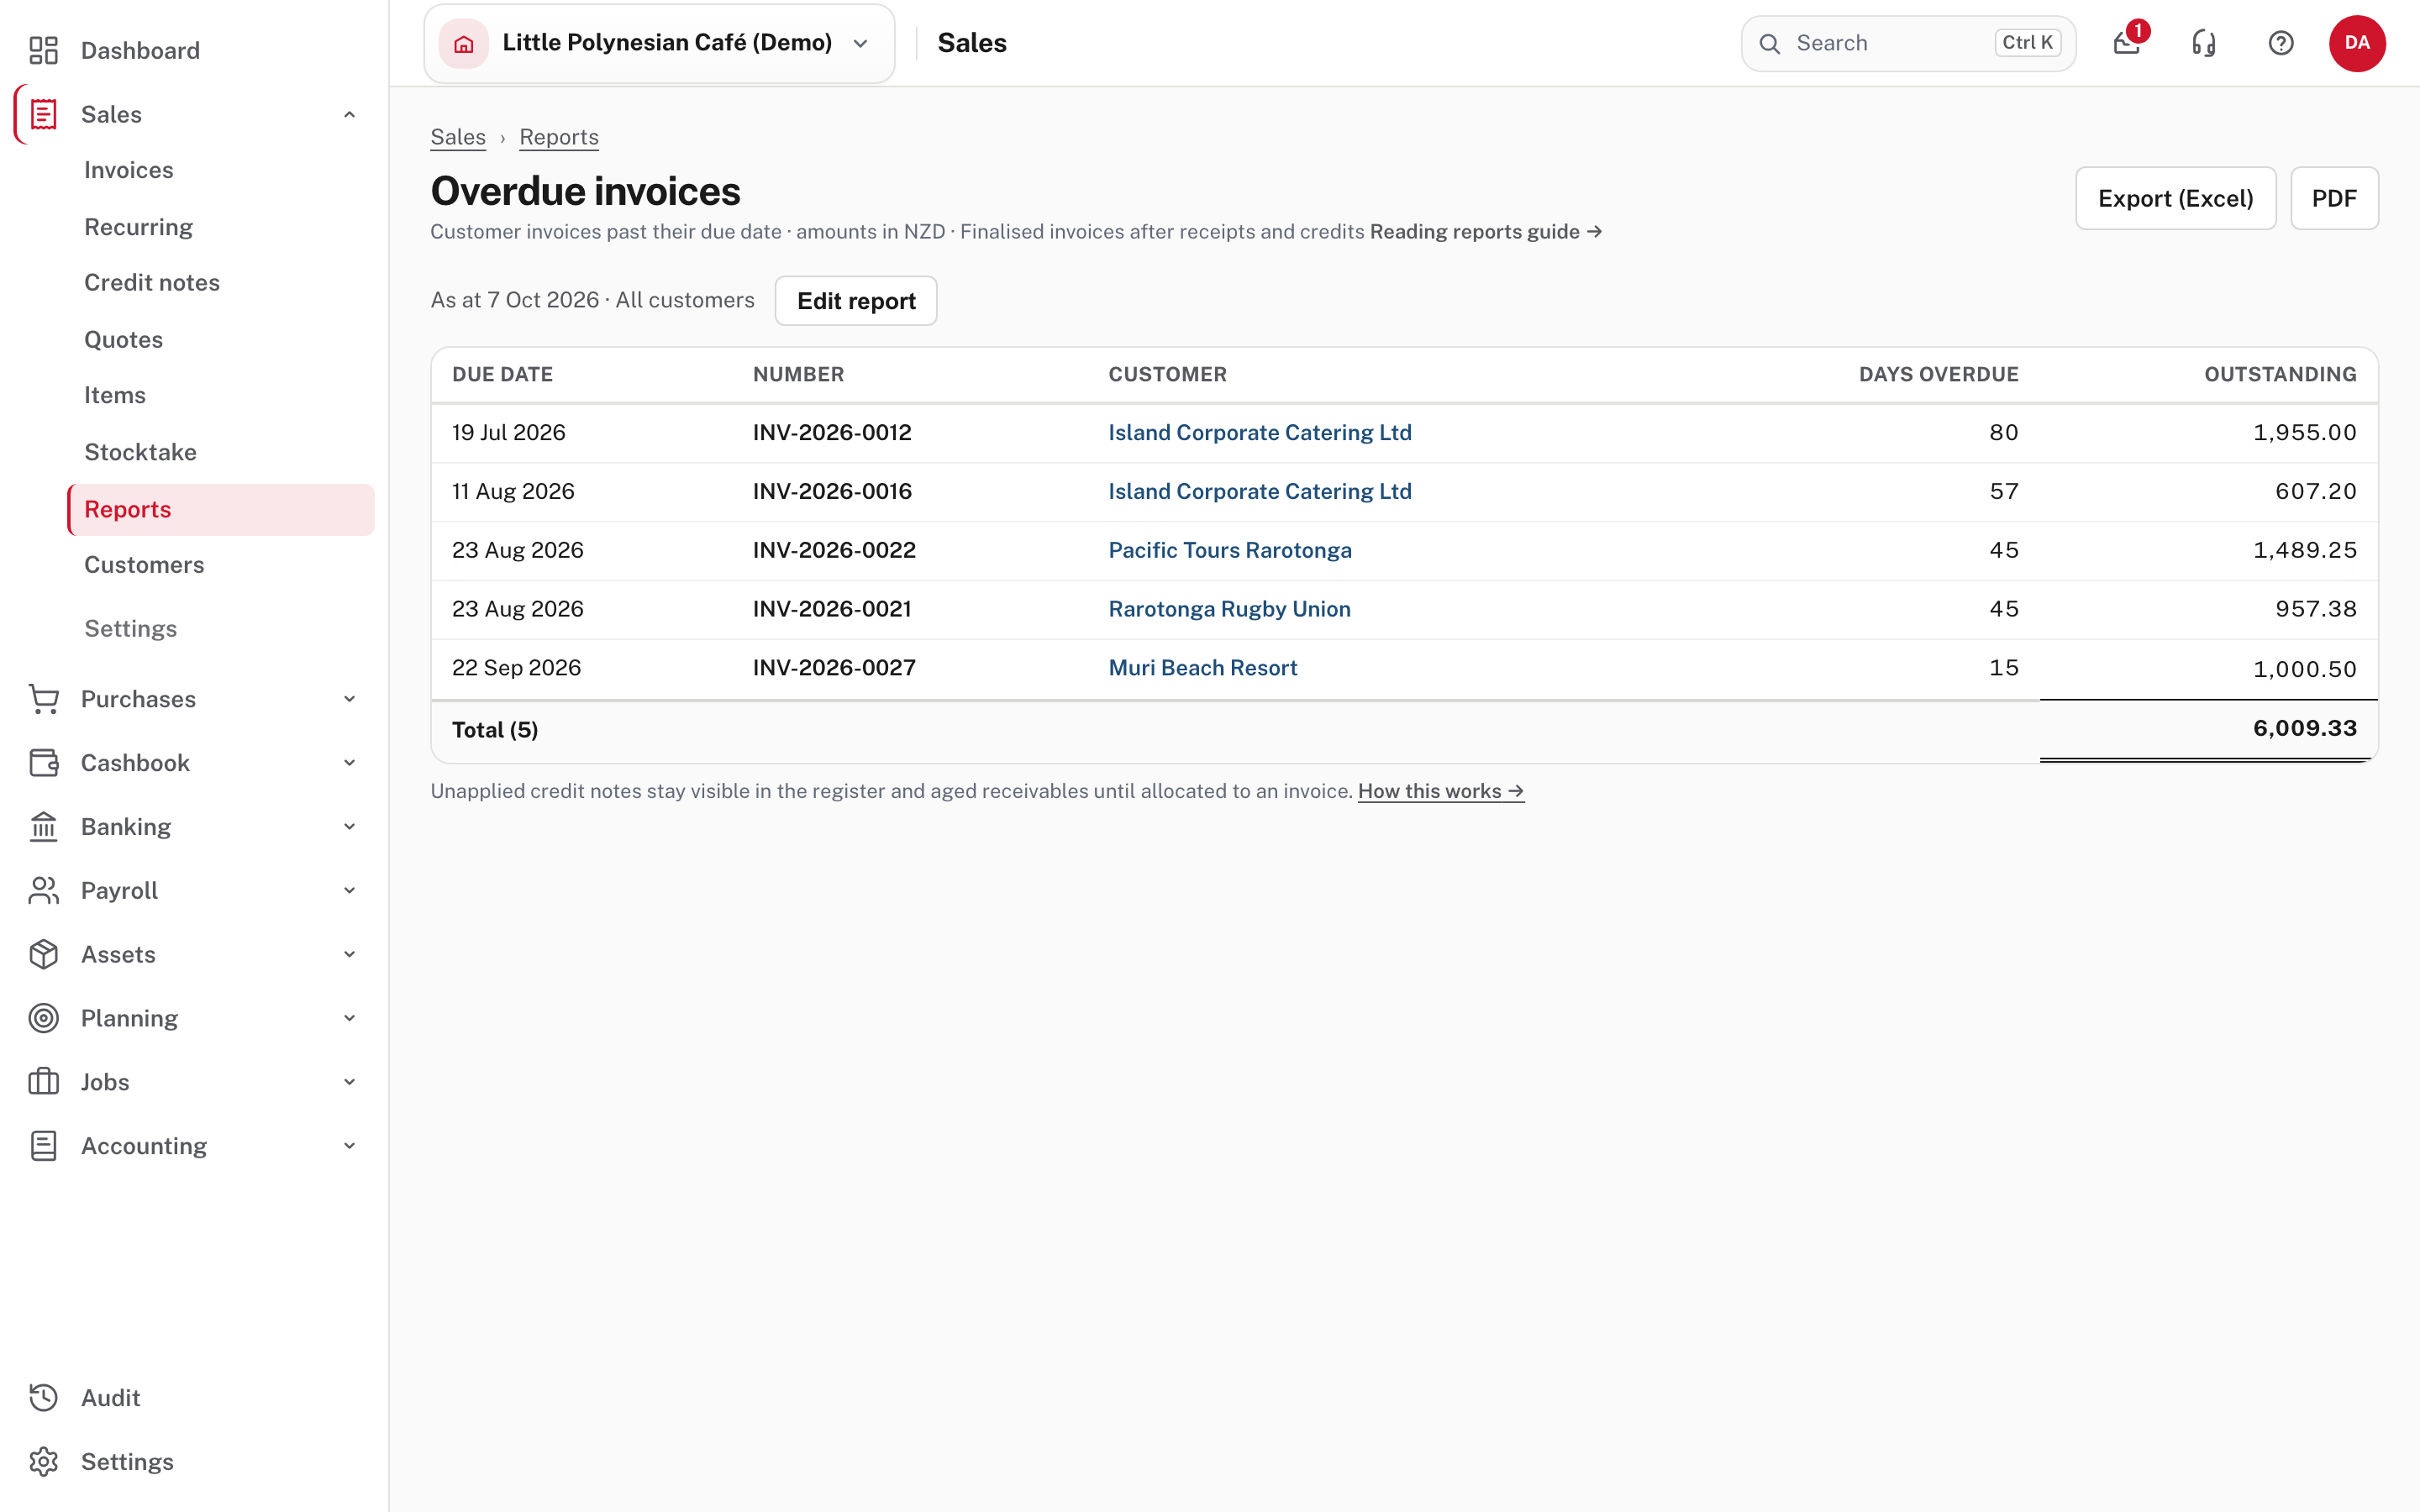
Every invoice past its due date, the days overdue and the outstanding amount after receipts and credits. This is your phone list. Choose a customer's name to open their statement.
Unapplied credit notes stay visible in the invoice register and in aged receivables until they are allocated to an invoice, so check for one before you chase: the customer may already be owed a credit.
Step 3. Send one customer a statement
Sales → Reports → Customer statements. Choose the customer and the dates, then Run statement.
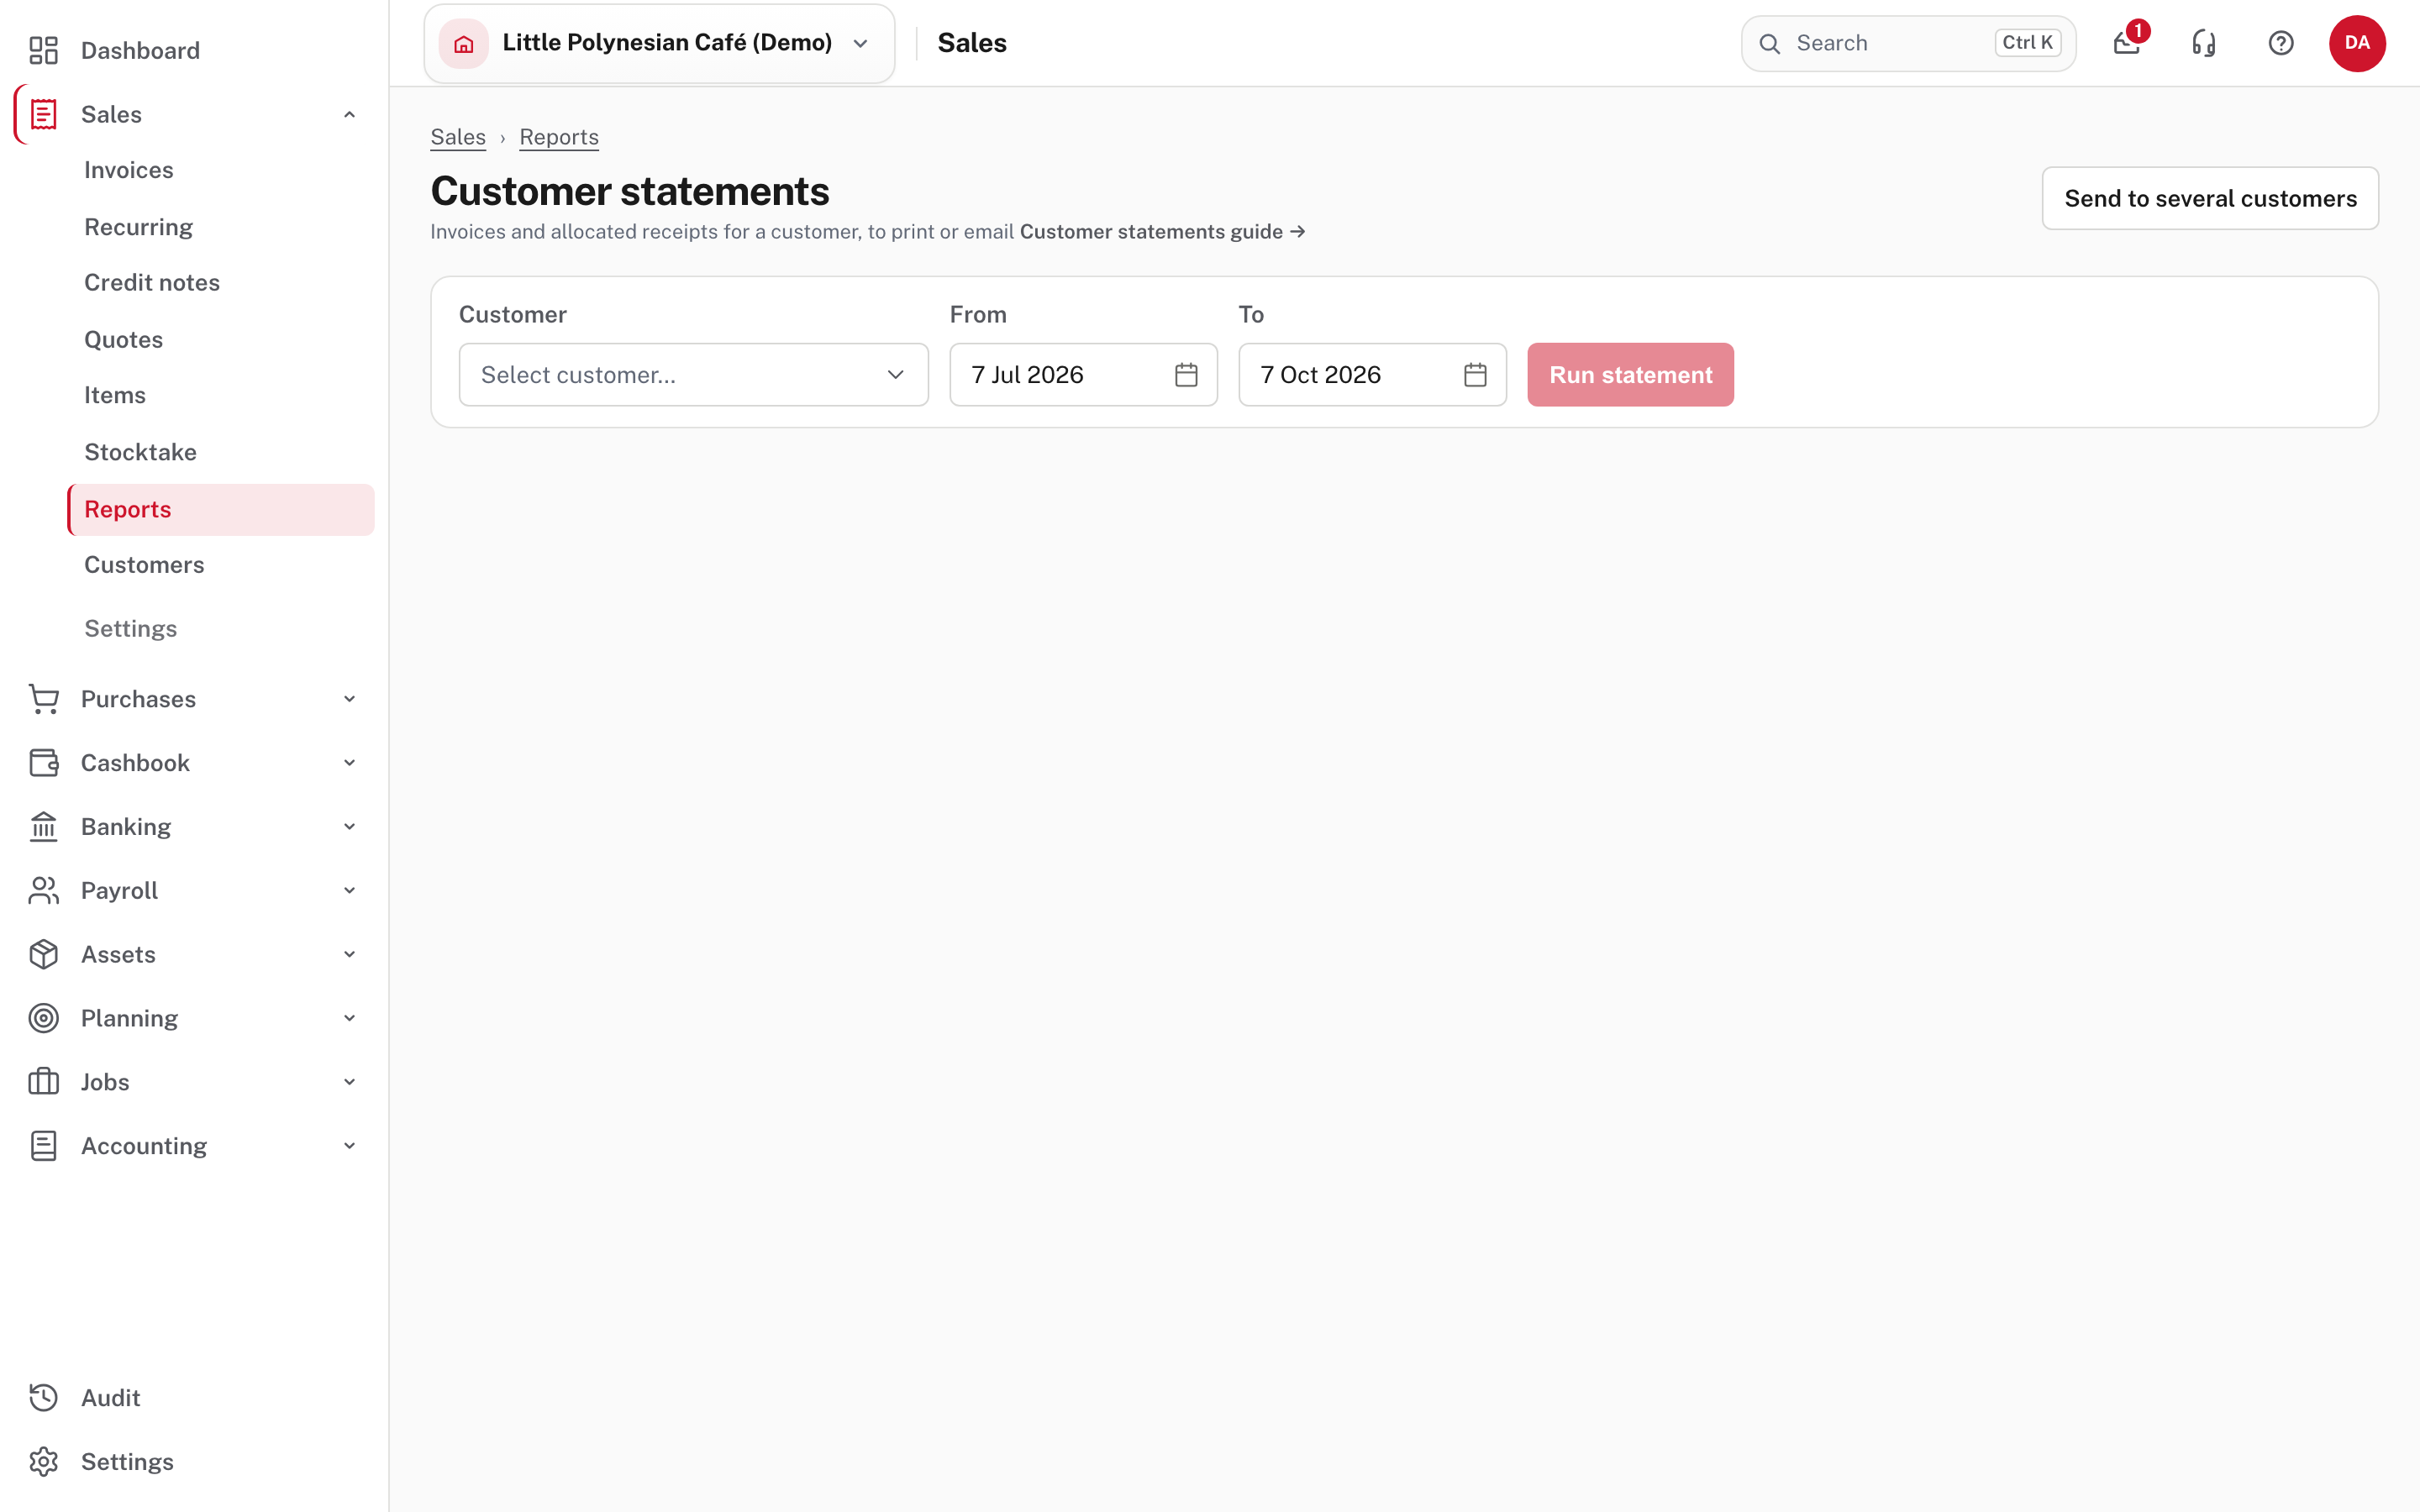
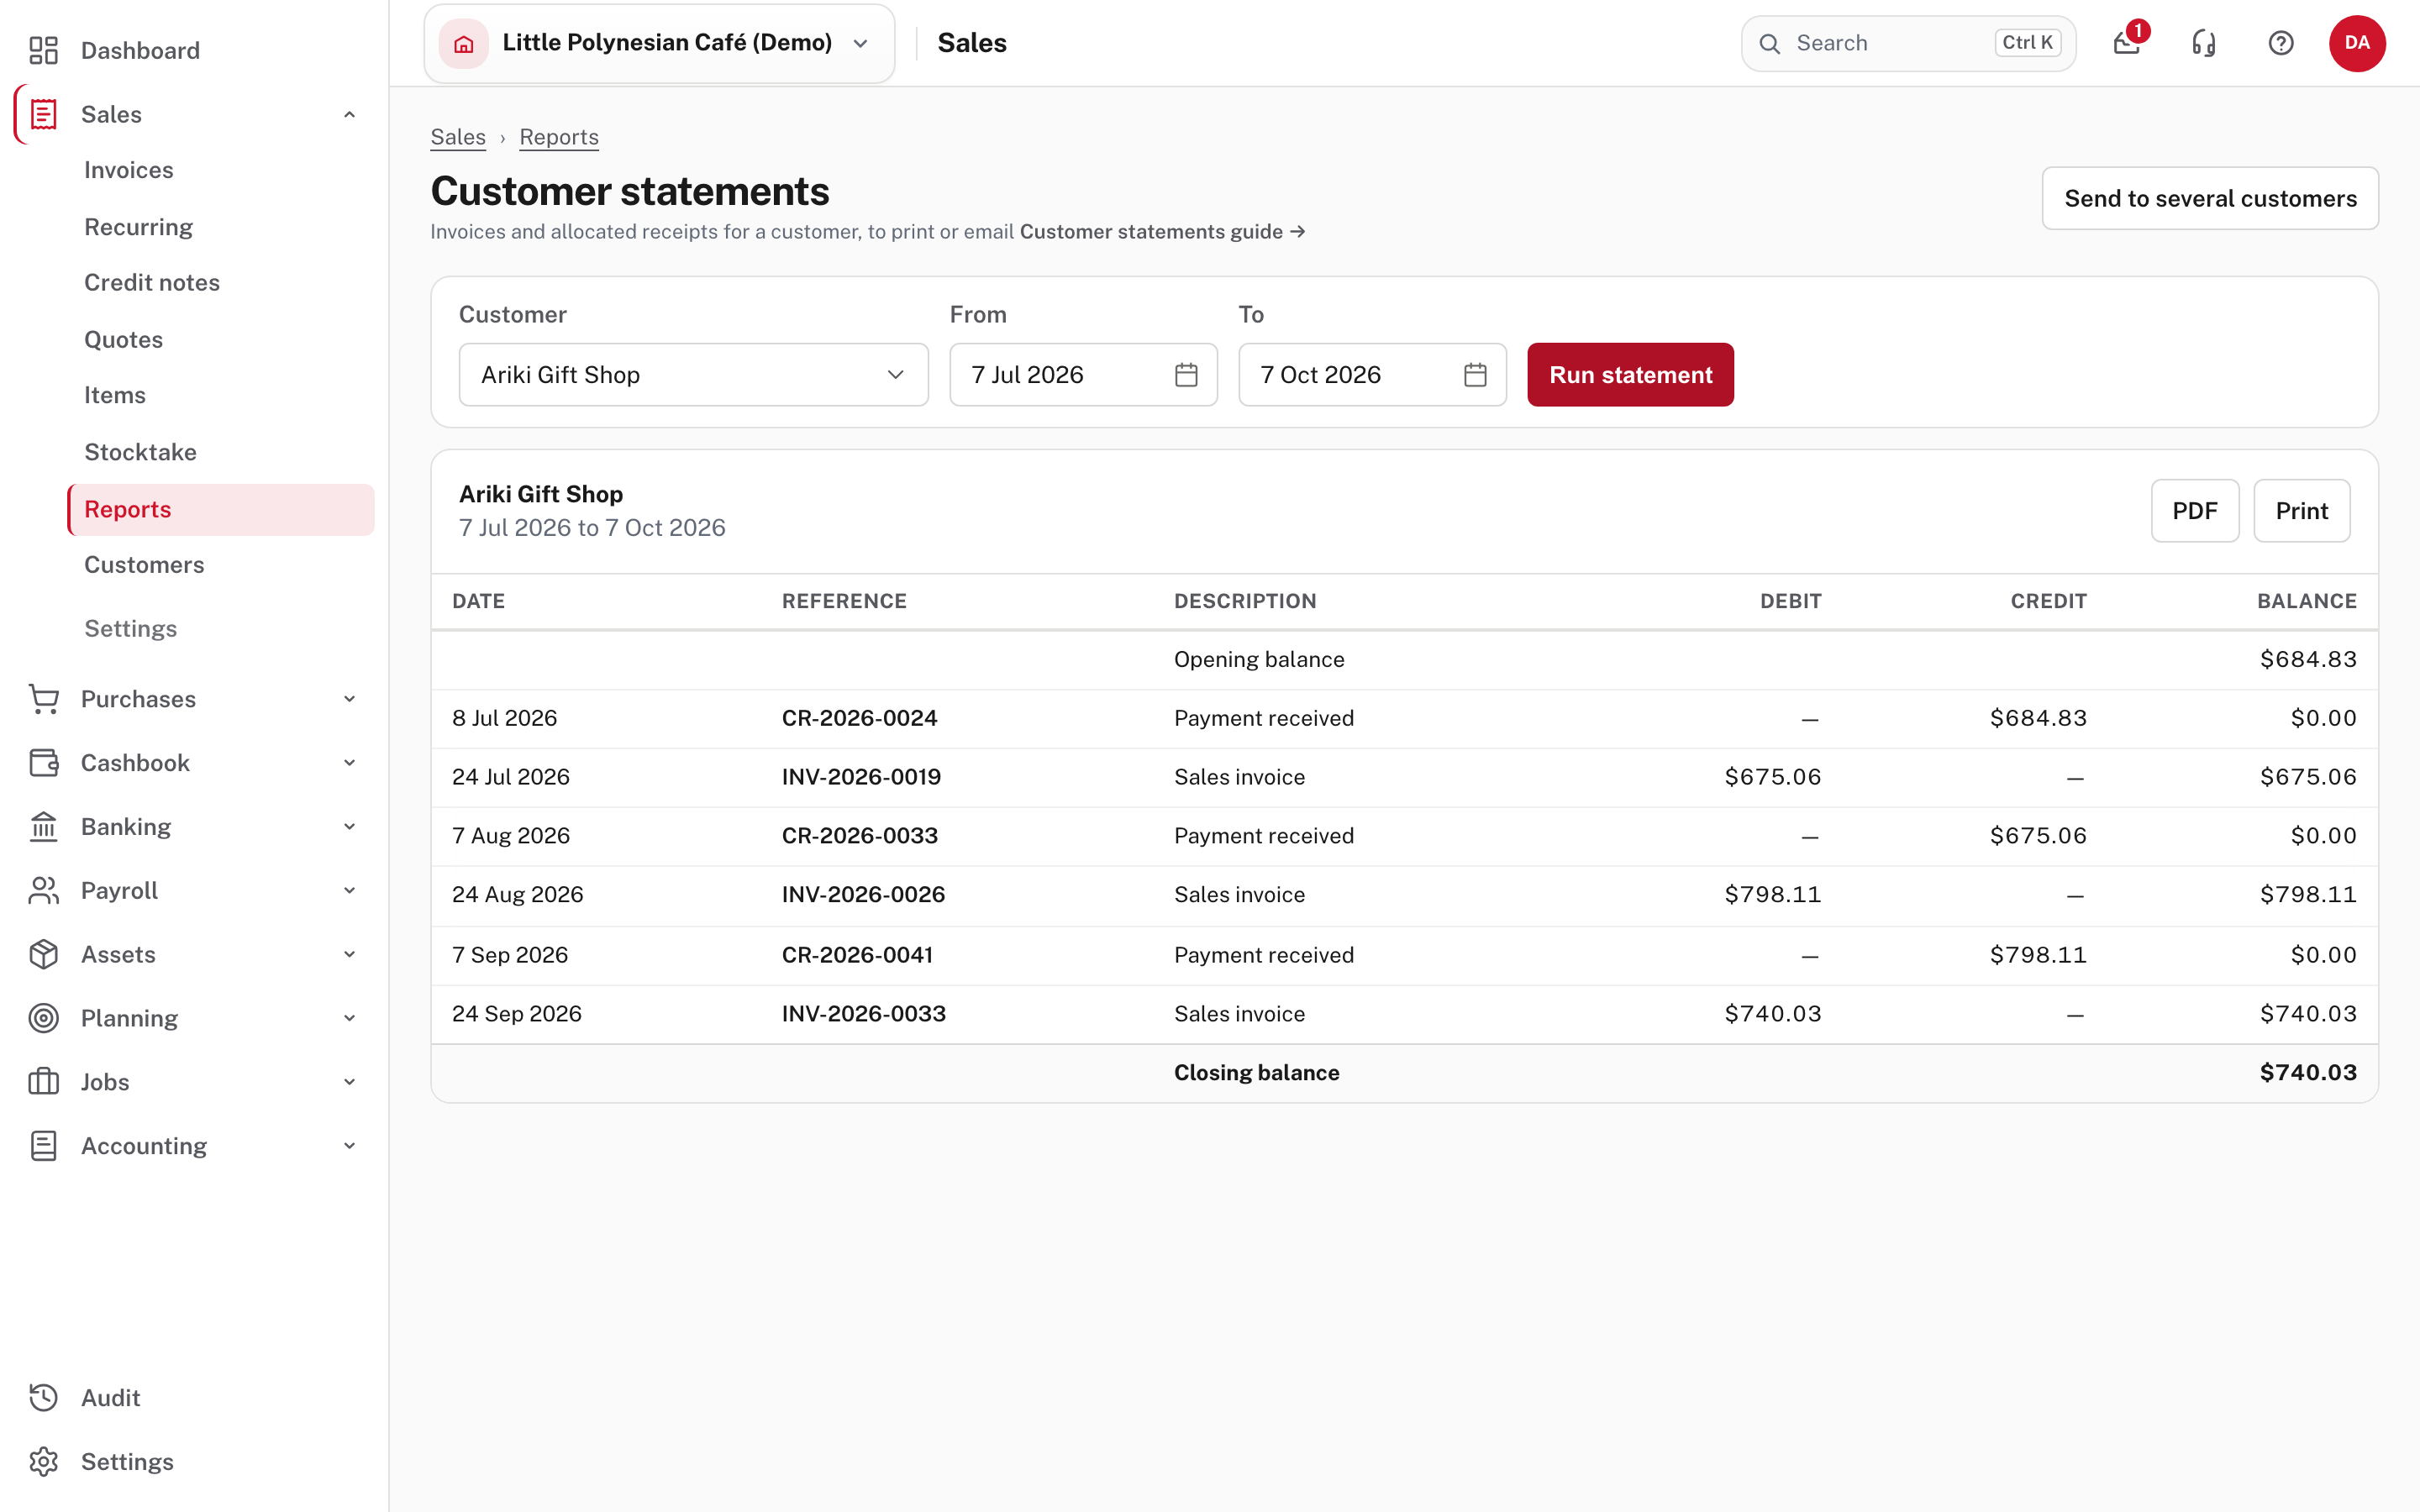
A statement shows, for one customer and a period, an opening balance, every movement with a running balance (invoices, credit notes, payments received, refunds and cancellations), and a closing balance. The closing balance agrees with what the customer owes in Trade Debtors on that date. Every amount shows $ (or the currency code), because a statement is a document you send, not a report. Each reference opens the invoice, credit note or receipt behind it.
From the result you can open the PDF, Print it, or Email statement (which appears when email is set up). The email is filled in from the customer's record, and you can edit the recipient, subject and message before it goes. The PDF uses the theme you assigned to statements in Document branding (Invoice branding).
Step 4. Send statements to everyone who owes you
Choose Send to several customers (top right of Customer statements).
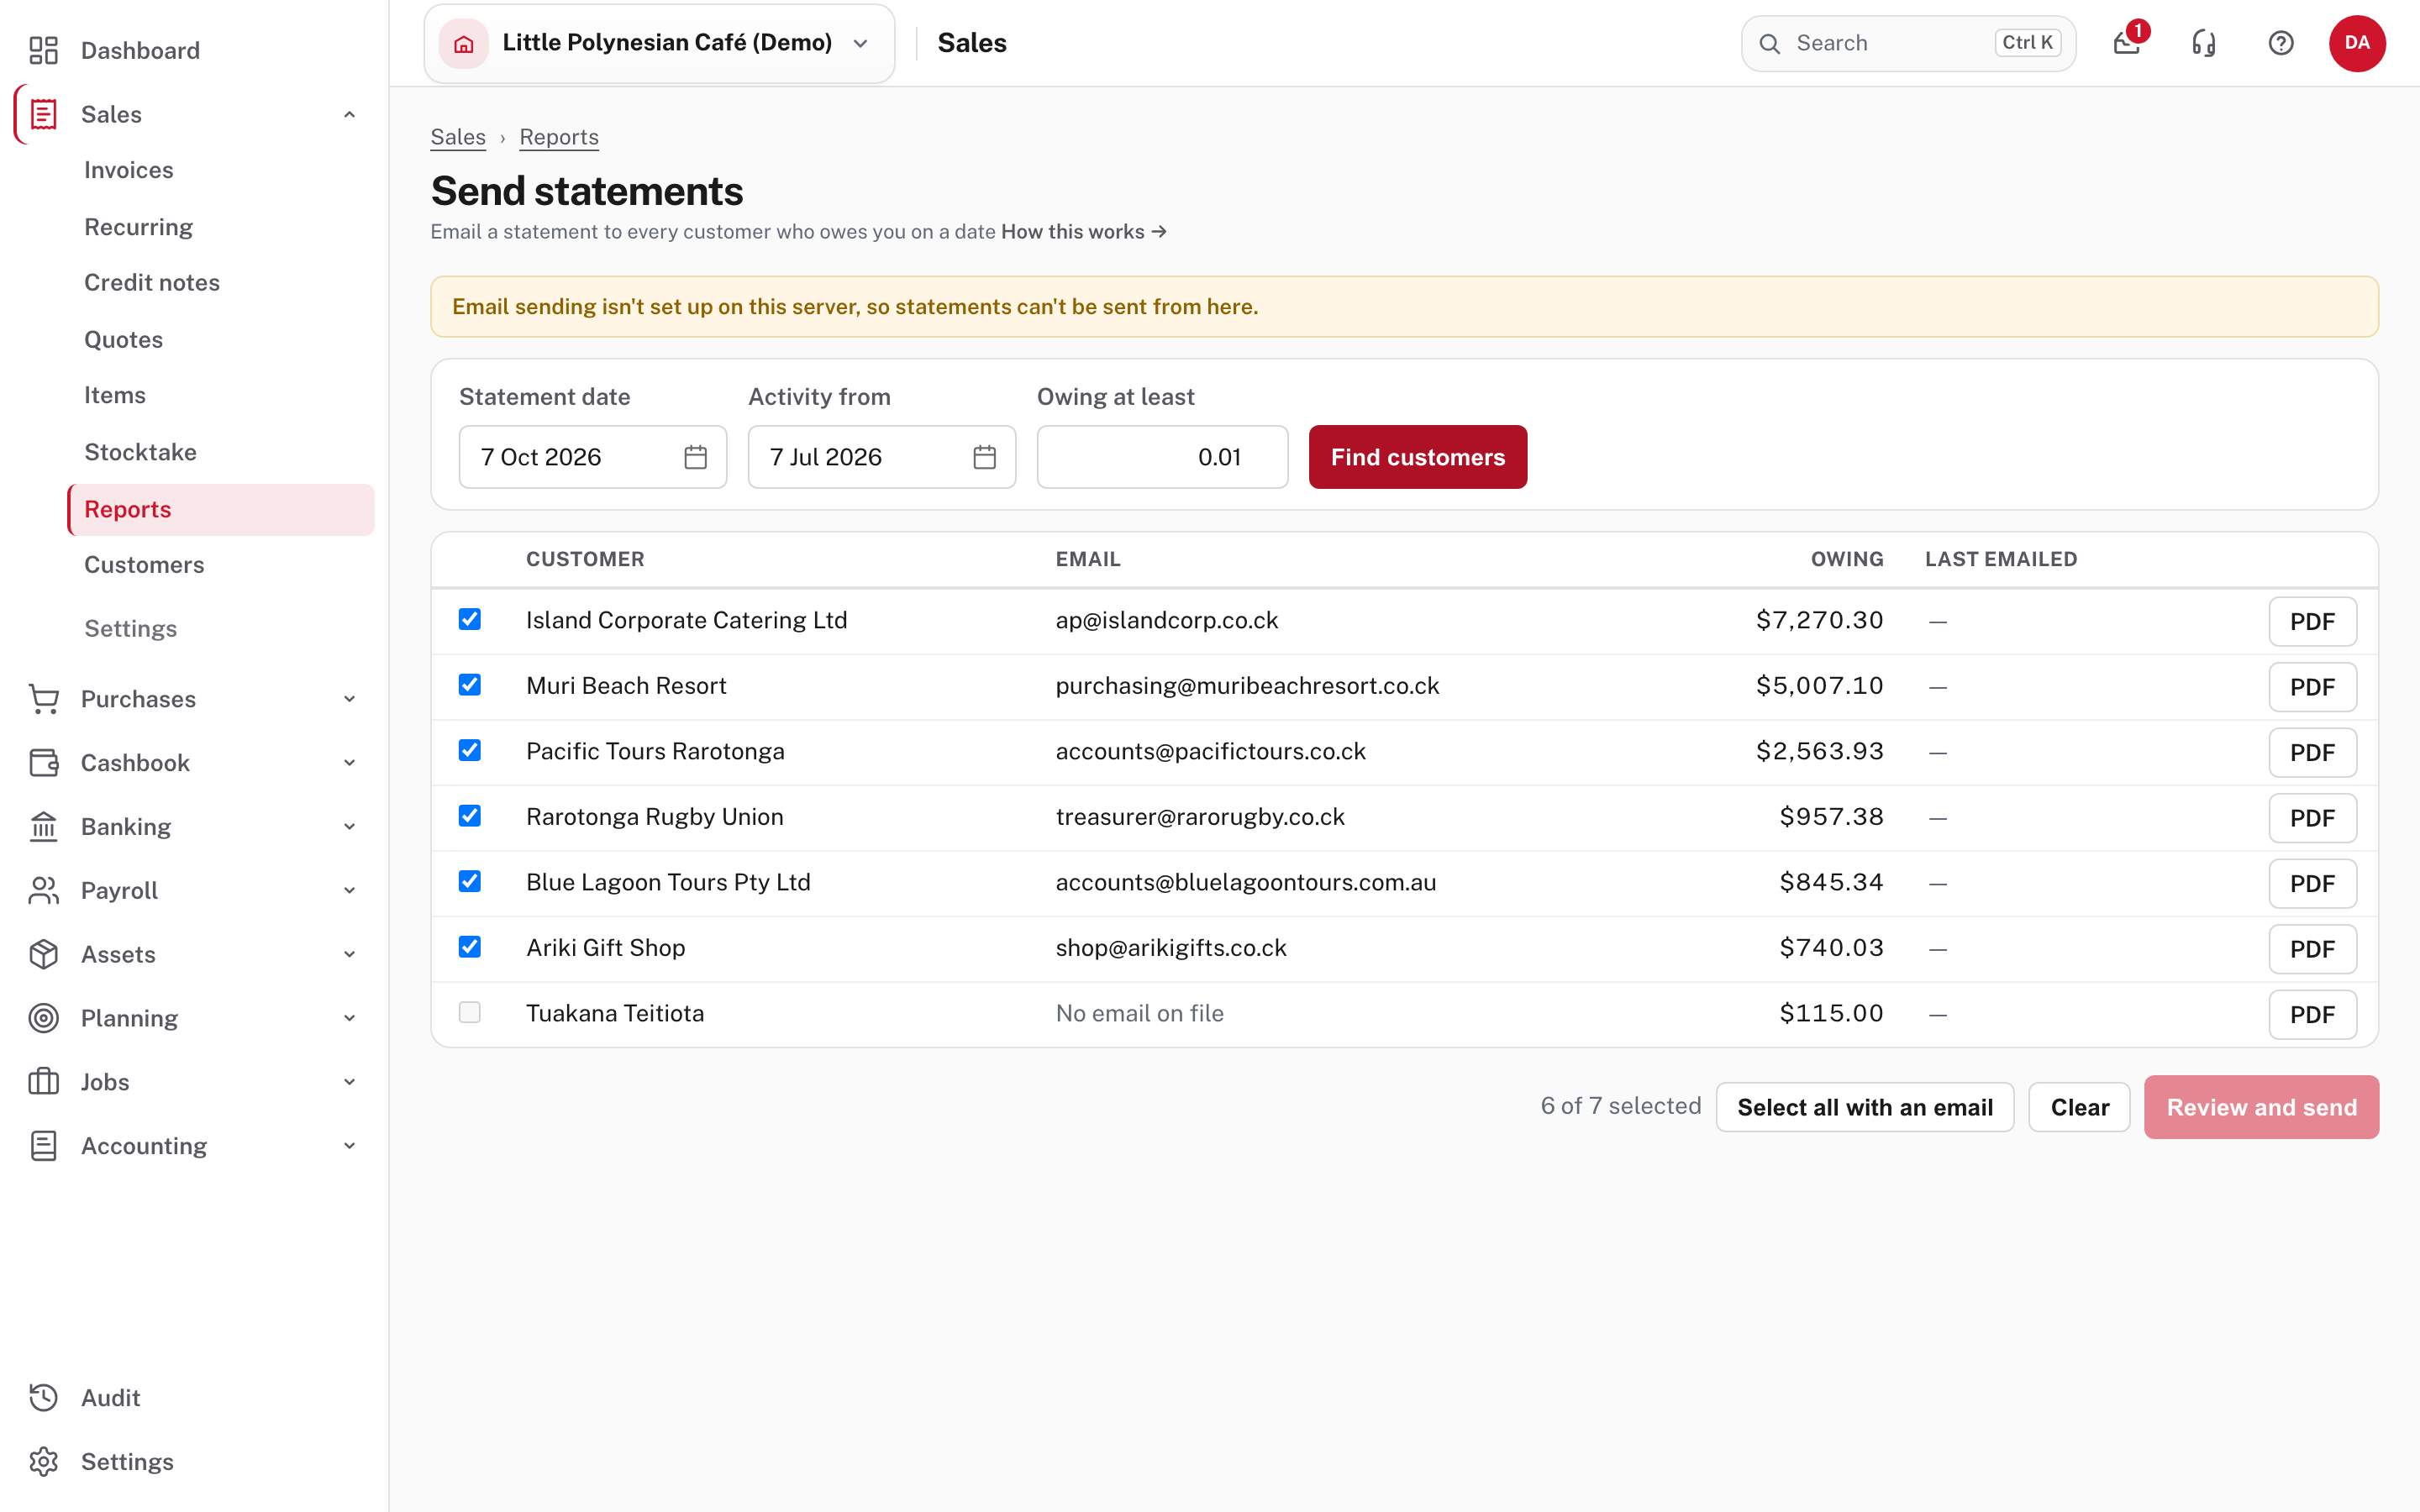
| Field | What it does |
|---|---|
| Statement date | The date the balances are worked out as at |
| Activity from | The start of the period each statement lists |
| Owing at least | Customers owing less than this are left out (the lowest value is 0.01) |
Choose Find customers. Everyone owing at least that amount is listed with their email, how much they owe and when they were last emailed. Everyone with an email address is ticked, except customers already emailed a statement for the same date. A customer with no email on file (here Tuakana Teitiota) can't be ticked, and each row has a PDF button. A customer marked Leave out of bulk statement emails on their record is listed but can't be ticked.
Choose Review and send: Easy shows who will receive one before anything is sent, then sends each customer their own statement as a PDF. Up to 50 customers are sent per run, so run it again for the rest. Replies go to your business reply-to address. Each statement sent is recorded in the audit trail and under Email activity in Mail, which is what fills the Last emailed column, so a second run doesn't mail the same statement twice unless you tick the customer again.
More detail: Customer statements.
Step 5. Let reminders go automatically
Settings → Sales → Sales settings.
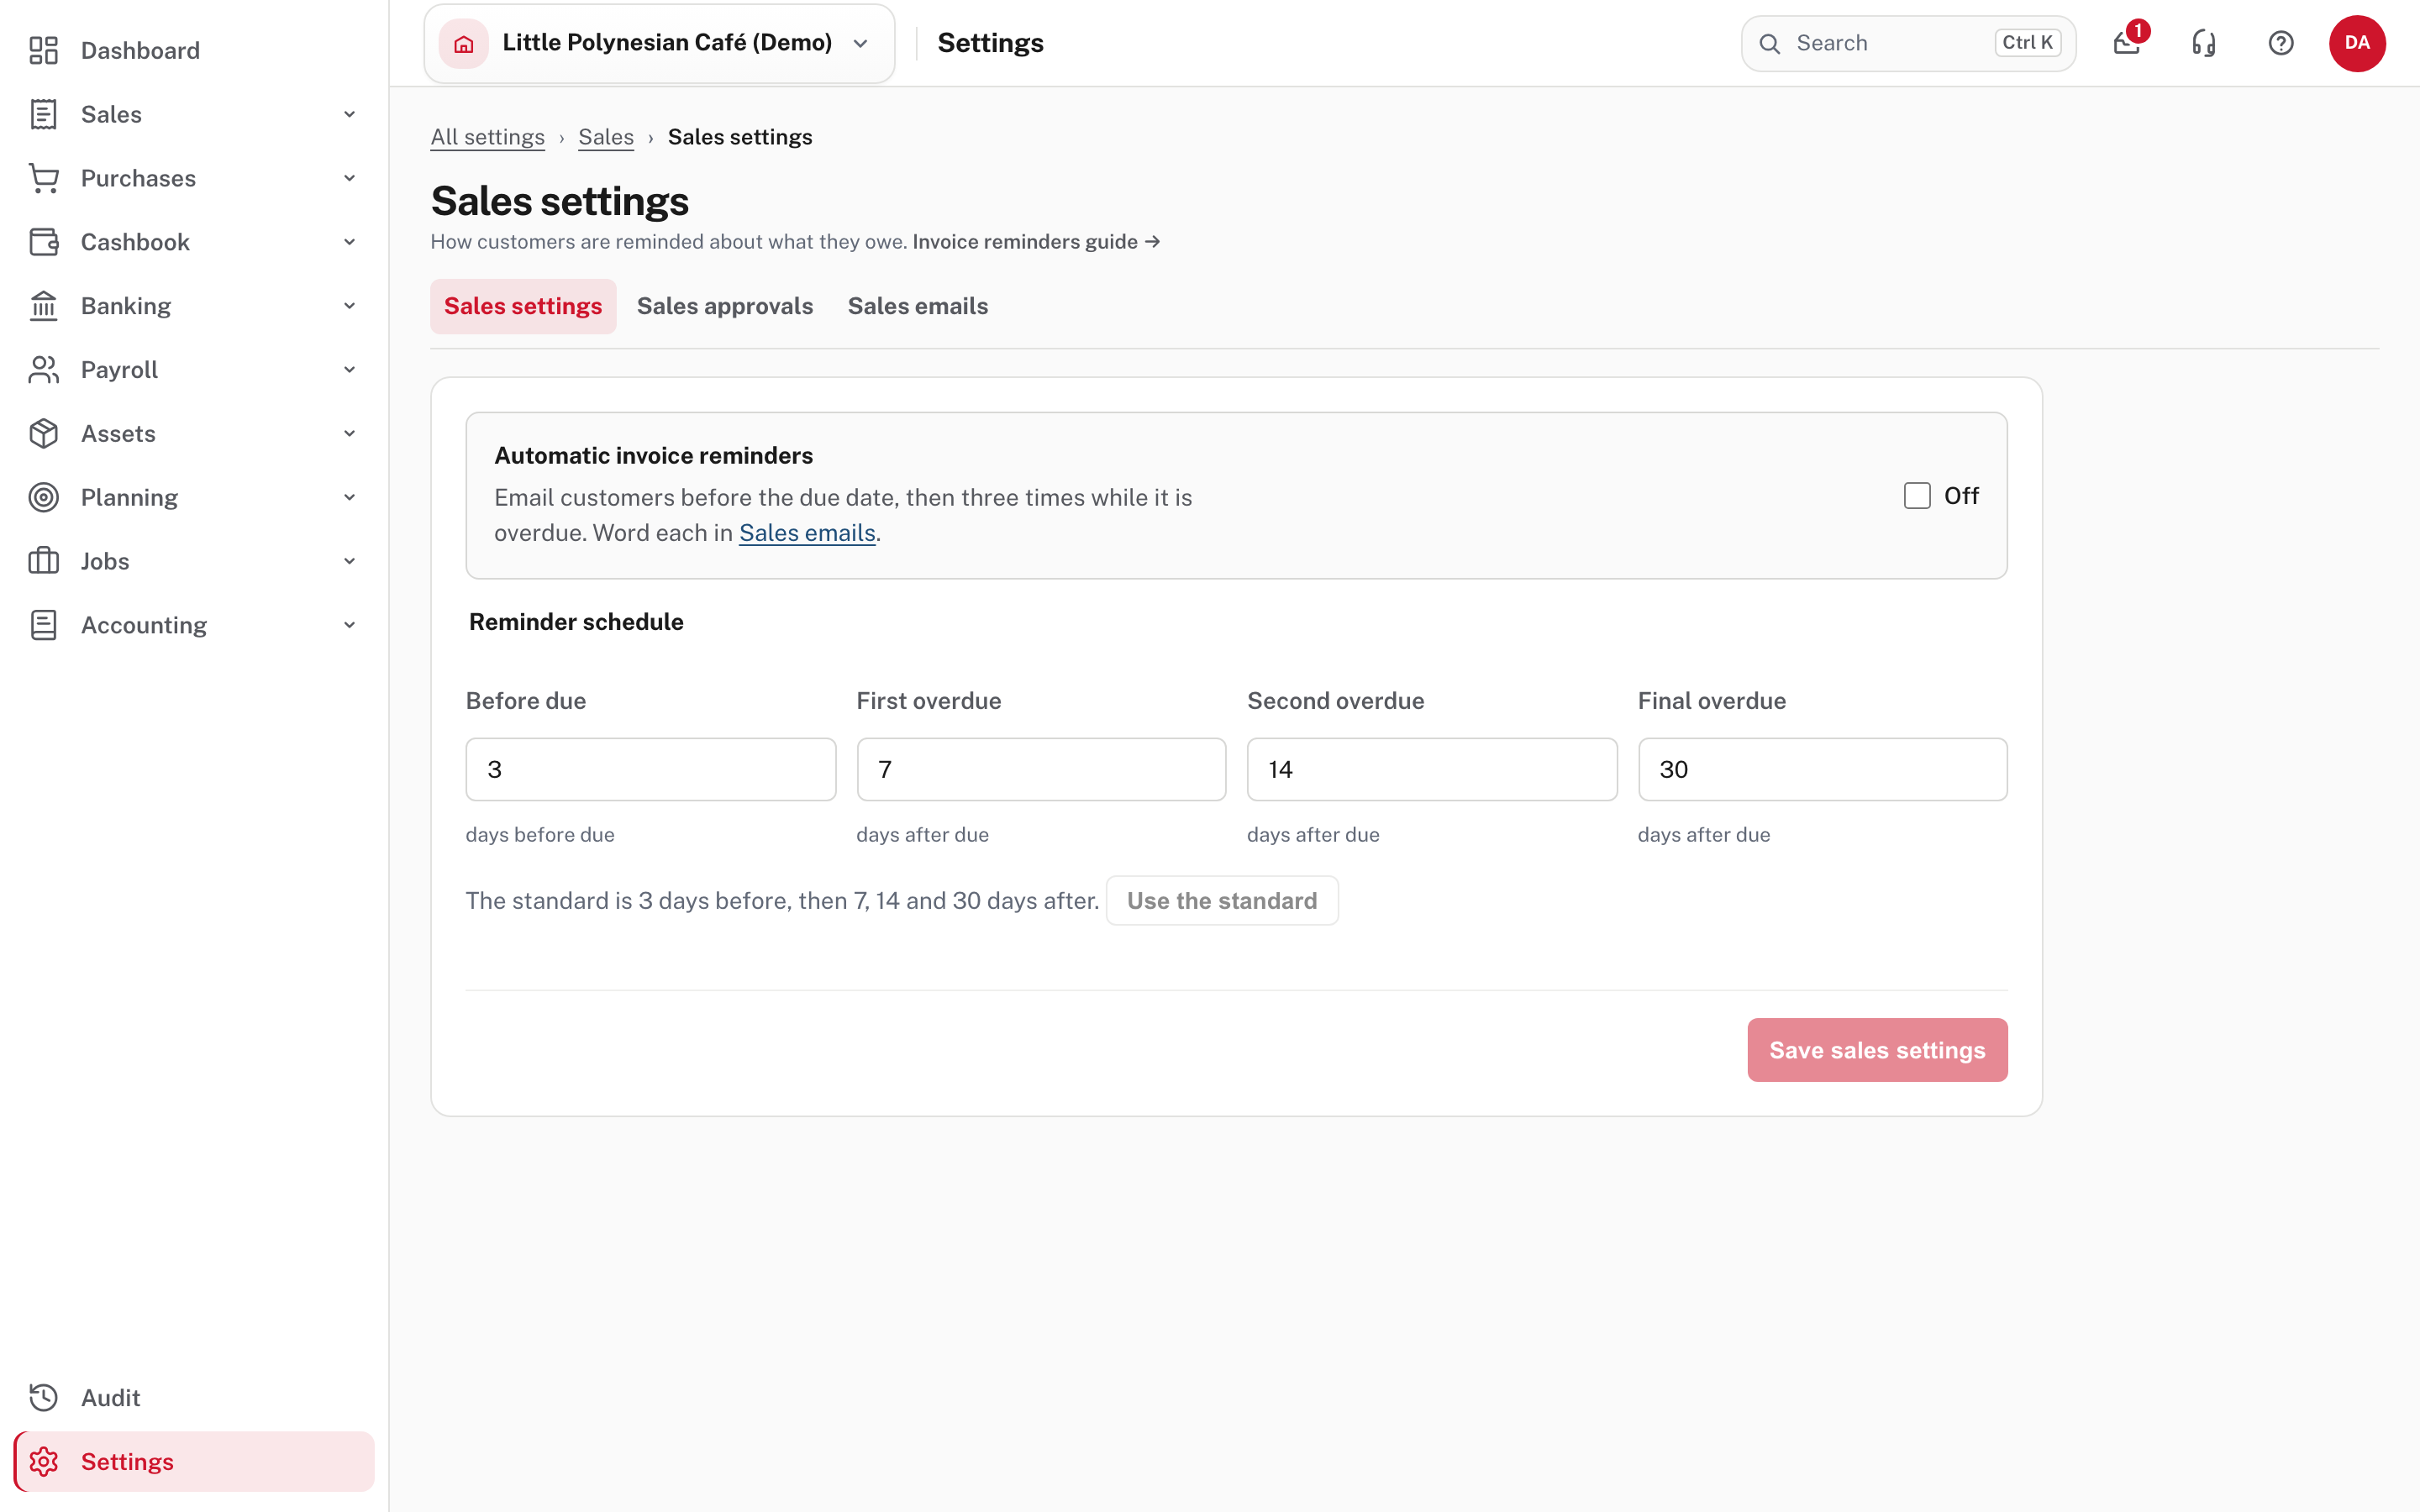
Switch Automatic invoice reminders on and Easy emails customers before the due date, then three times while the invoice is overdue. The standard schedule is 3 days before, then 7, 14 and 30 days after the due date. You can move each of the four numbers on the same page (each overdue reminder must be later than the one before), and Use the standard puts the standard back. Moving a reminder never sends one twice: an invoice that already had a stage's reminder won't get it again. A single customer can opt out on their own record.
Reminders are off until you switch them on
In the demo the switch reads Off. Decide when to turn them on, and word them first (next).
Word the reminders
Settings → Sales → Sales emails lists every email a customer can be sent: the invoice, quote, credit note, statement, receipt and each reminder stage.
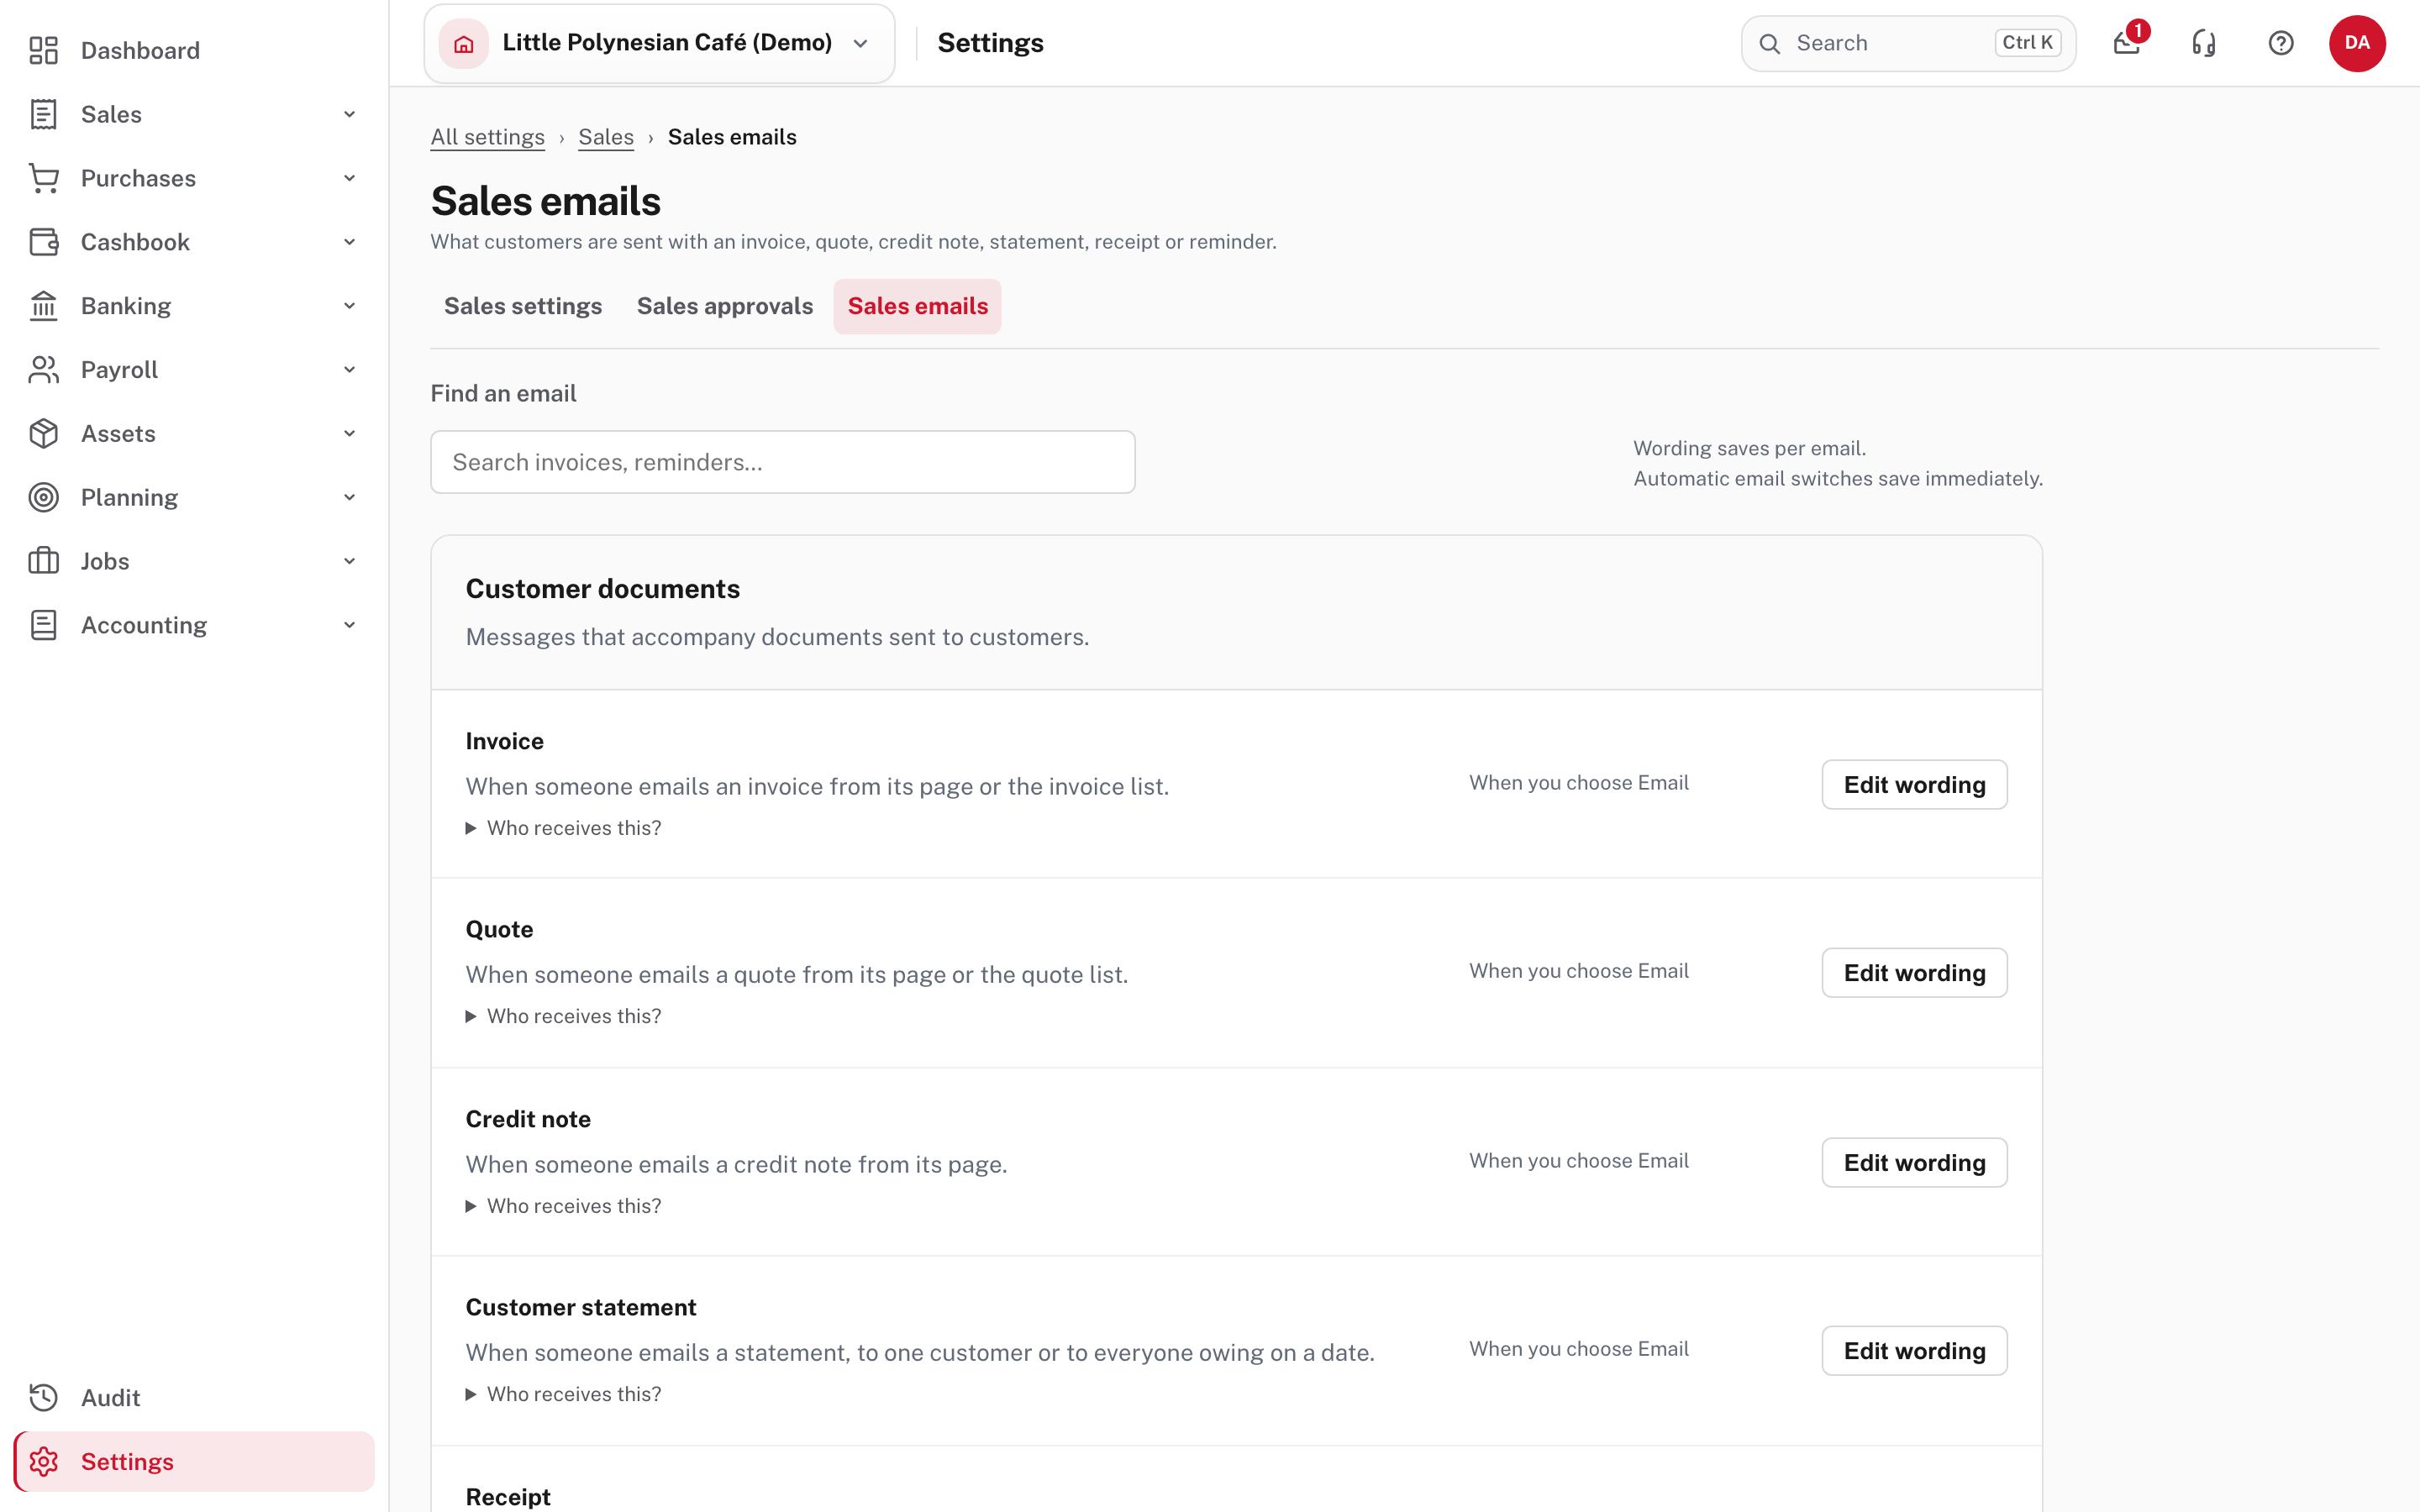
Choose Edit wording on a stage to change what it says. Each reminder stage has its own wording and its own on/off switch; a stage
that is switched off is skipped, and the next stage still goes when it falls due. A reworded email shows Reworded, and Restore standard wording puts back Easy's wording. Put a merge field in curly brackets (for example {document} for the invoice number); the email
may state amounts, such as {amount} and {outstanding}.
More detail: Customer and supplier emails and Invoice reminders and online payment.
Step 6. Make it easy to pay
The easiest invoice to collect is the one that is easy to pay.
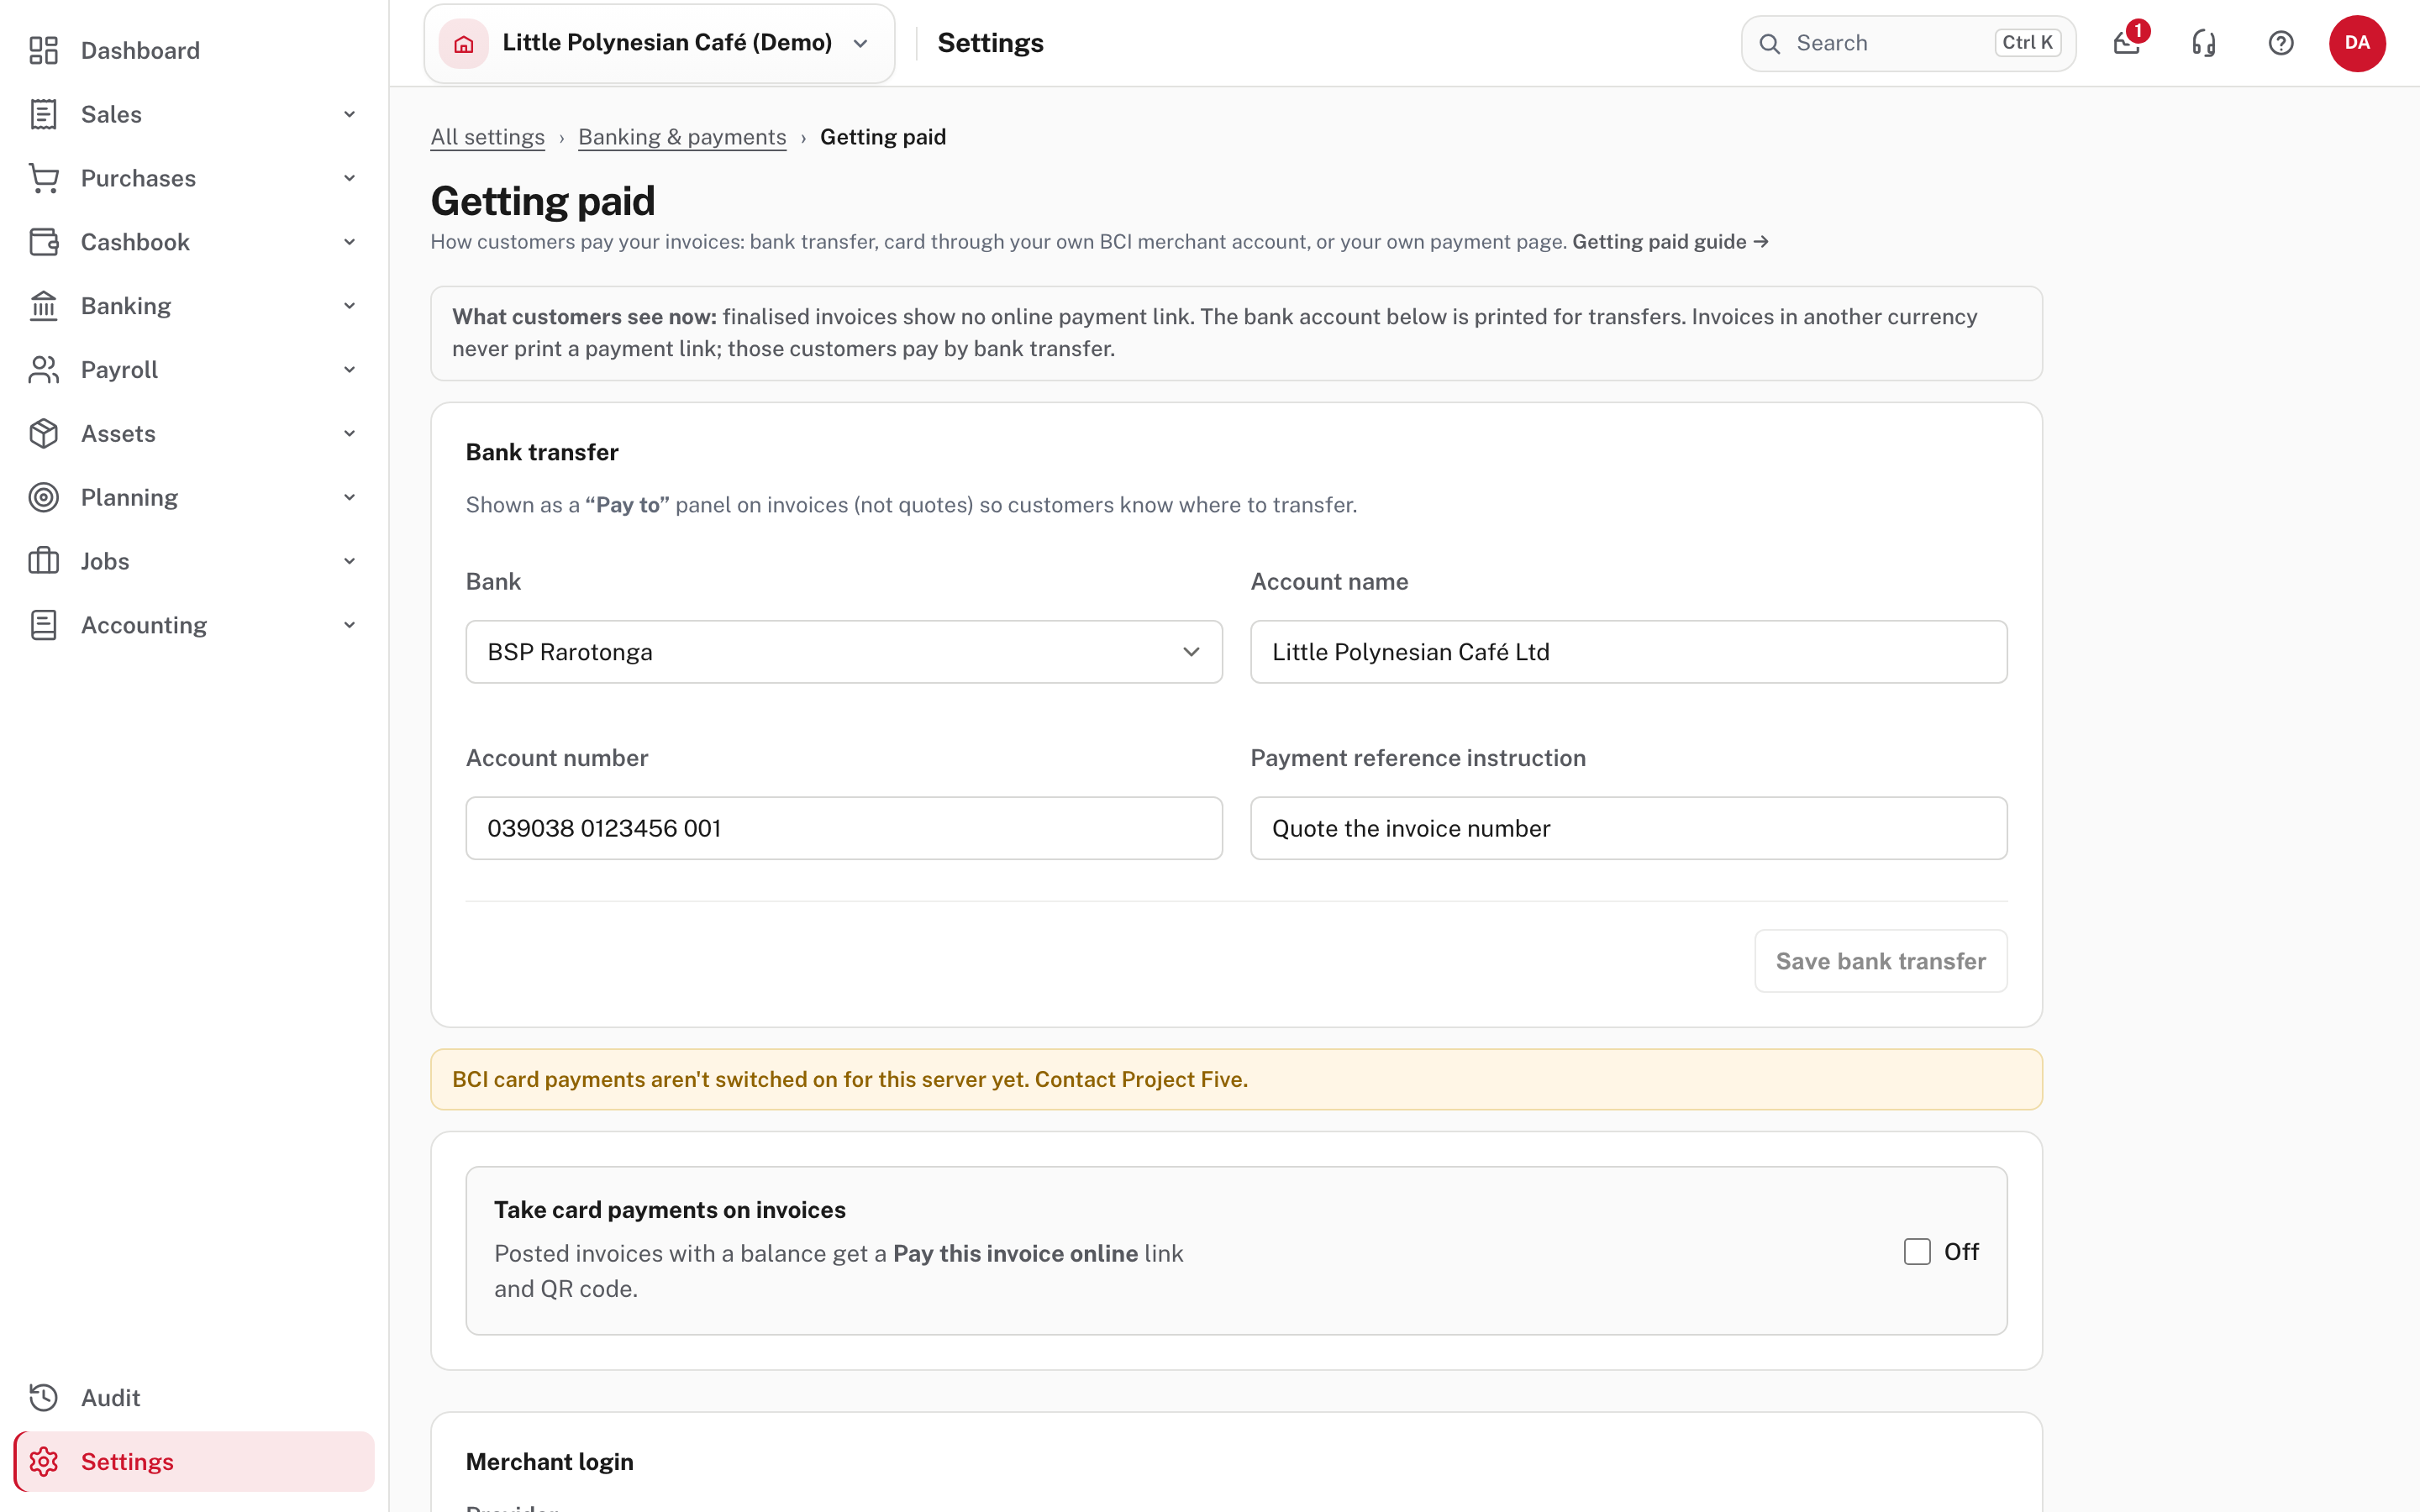
Settings → Banking & payments → Getting paid is where you set what customers see on the invoice:
- Bank transfer: the "Pay to" panel printed on invoices (bank, account name, account number and a payment reference instruction).
- Card payments through your own BCI TakuEcom merchant account: invoices with a balance get a QR code and a Pay this invoice online link, and Easy checks with BCI every two minutes and records the receipt when the payment goes through. Each payment lands in a clearing account, because BCI holds card payments for a few days; when the payout reaches your bank, record a transfer from the clearing account to the bank. BCI's card fees are not recorded by Easy: any fee shows as the difference left in the clearing account.
- Your own payment page: a link to any hosted payment page, which Easy prints on the invoice. Payments through it aren't recorded automatically.
Invoices in another currency get no card link: the customer pays by bank transfer.
When a customer disputes an invoice
Don't change the invoice. Raise a credit note against it, or undo the invoice if it should never have been raised. See Credit notes, undoing and correcting.
Check before you continue
Check before you continue
- The aged receivables total equals the Trade Debtors balance (the period-close check says Agrees).
- Every receipt is applied to the right invoice, so nothing looks overdue that was paid.
- Customers with no email on file are chased another way (phone, post).
- Reminders are switched on, worded the way you want, and the schedule is one you can live with.
- The "Pay to" details and any card link on the invoice are correct.